Cheesy Taco Rice Skillet
This post may contain affiliate links. Please read my disclosure policy.

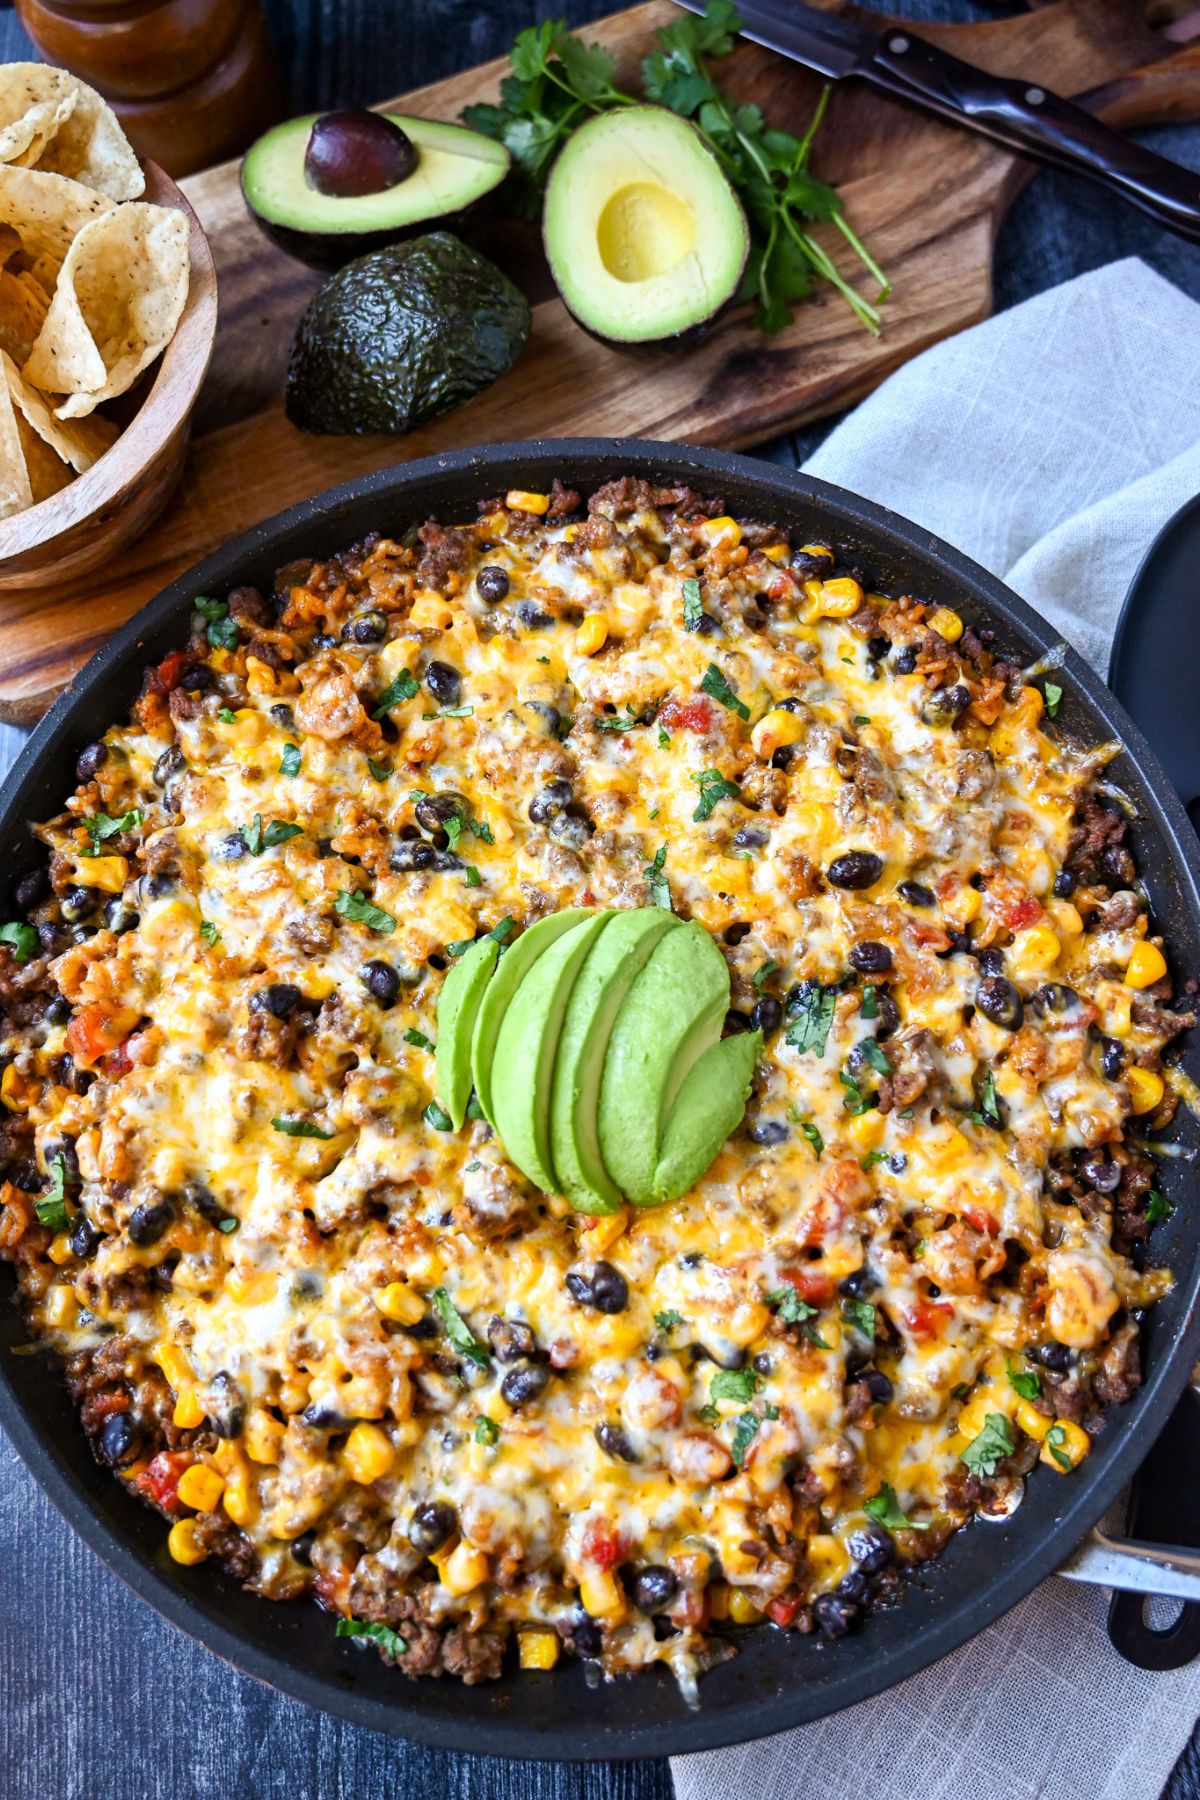
Make this 30-minute, one-pan Cheesy Taco Rice Skillet and enjoy a protein-packed casserole filled with lean ground beef, canned beans, corn, ready rice, melty cheese, and mouthwatering Mexican flavor. It’s the perfect quick and easy, protein-packed alternative for taco night!
If you’re looking for ways to simplify taco night, I’m pleased to introduce your new best friend, the cheesy beef taco and rice skillet! Don’t get me wrong –I love making dishes like fajitas and smothered burritos, but this cheesy beef taco rice skillet comes to the rescue when I want a super fast one-pan meal.
Imagine a sizzling casserole with taco-seasoned ground beef, canned black beans, sweet corn, and spicy Mexican ready-rice smothered in gooey, melted cheese. Top it off with fresh cilantro, avocado, and crunchy tortilla chips, and you’ve got a satisfying, protein-packed dinner.
The best part? It all comes together in under 30 minutes in a single skillet, making cleanup a breeze. This delicious recipe will surely become a staple in your taco night rotation!
Recipe highlights
- All-in-one 30-minute meal. Prepare the protein, grains, and veggies in one dish for a hearty, comforting, complete meal in just half an hour.
- Minimal prep. With canned beans, corn, tomatoes, and ready rice, most ingredients are convenient pantry staples to save time and effort.
- Kid and adult approved. What’s not to love? You can easily adjust the ingredients and toppings to suit your family’s preferences or dietary needs.
Ingredients you’ll need
- Ground beef. Preferably lean ground beef. If using a higher fat content, drain the excess fat after browning. Feel free to substitute ground turkey or chicken for a lighter option.
- Onion. Yellow, white, or red onions –whatever you have on hand for aroma and flavor.
- Taco seasoning. Grab your favorite ready-made taco seasoning for that classic Mexican flavor, or try my easy chicken taco seasoning blend. It’s fantastic with beef!
- Salsa. Choose a smoother, restaurant-style salsa like my blender salsa rather than a thick and chunky variety to coat the ingredients evenly. Choose mild, medium, or hot salsa based on your preferred heat level.
- Black beans. I prefer black beans, but you can use kidney or pinto beans as an alternative. Just be sure to drain and rinse them before adding them to the skillet.
- Sweet corn. Unlike the beans, there’s no need to drain the canned corn. I dump the whole can in for extra moisture and flavor. Frozen corn works great here, too.
- Diced tomatoes and green chilies. Like Ro-tel. Or canned tomatoes and a small can of diced green chilies in a pinch.
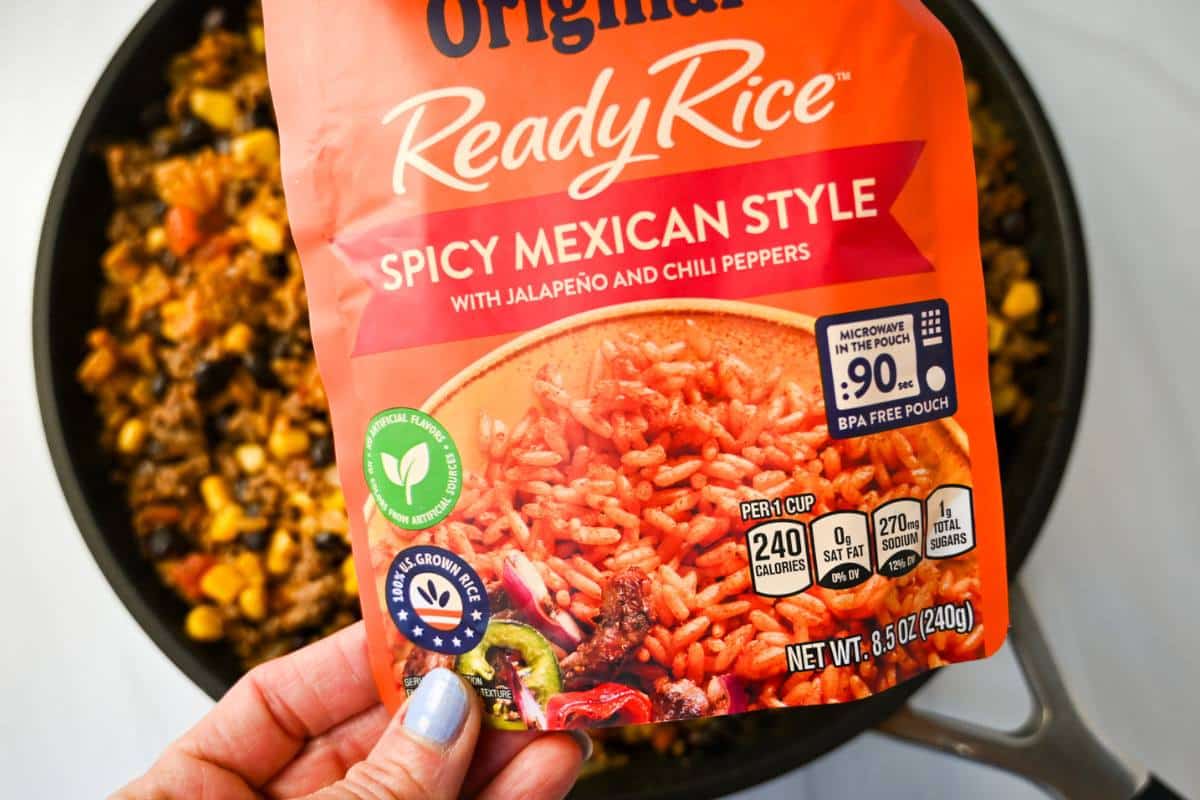
- Cooked rice. I used Uncle Ben’s Spicy Mexican-style ready rice for added flavor, but you can use any pre-cooked rice variety.
- Colby jack cheese. Or cheddar cheese or Mexican blend cheese, shredded from the block for the best melting quality and creaminess.
- Garnishes. Choose from fresh cilantro, sliced avocado, sour cream, crushed tortilla chips, and more for added texture and flavor.
How to make a cheesy beef and rice skillet
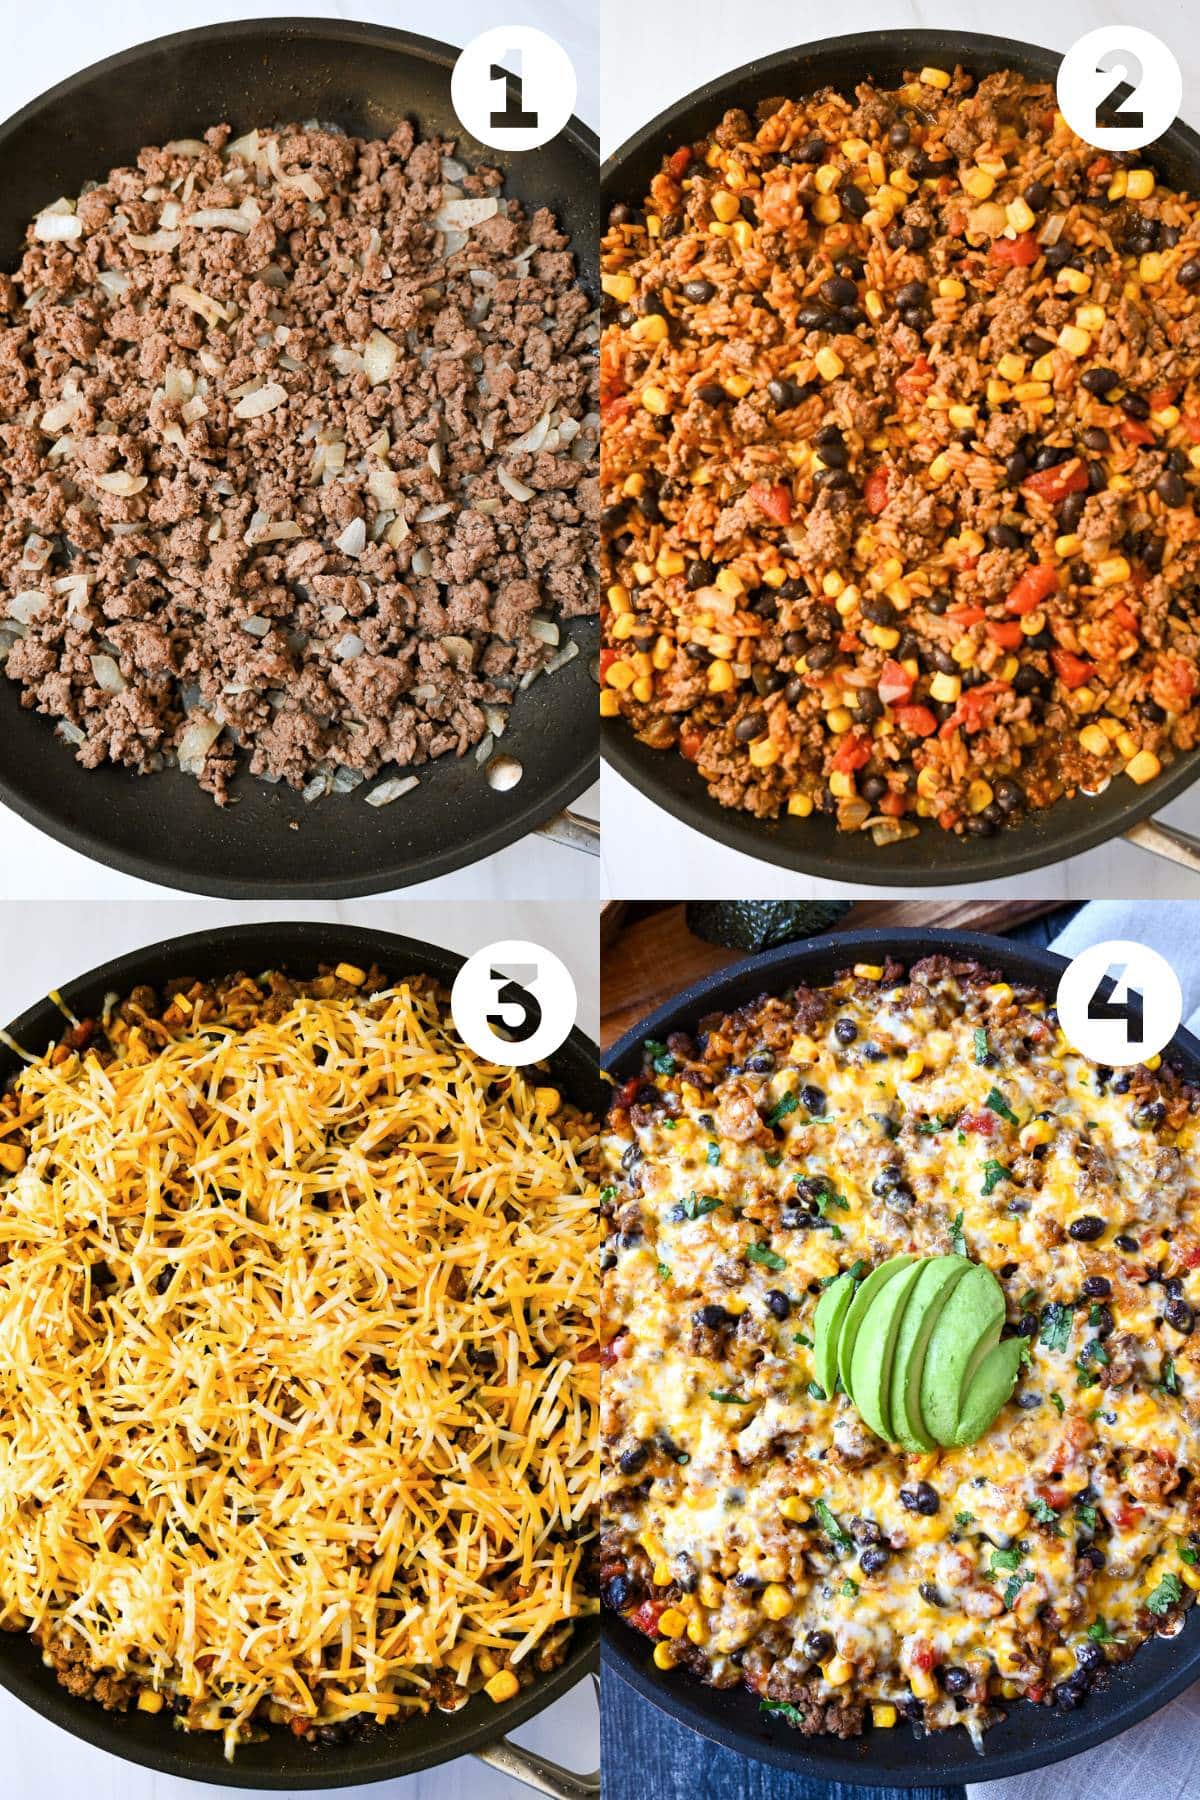
Step 1: Cook the ground beef and onions. Heat a large skillet over medium heat, and spray with nonstick cooking spray. Add the ground beef and onions and cook until the meat is browned and the onions are softened.
Step 2: Simmer with ingredients. Stir in the taco seasoning and salsa, then add the drained black beans, undrained corn, and undrained diced tomatoes. Bring the mixture to a simmer and cook until most liquid is absorbed.
Step 3: Add the rice and cheese. Add the cooked rice to the skillet and stir well, then top with shredded cheese.
Step 4: Broil. Place the skillet under the preheated broiler on the middle rack until the cheese is bubbly (this will only take a minute or so).
Step 5: Serve. Garnish with chopped cilantro and serve hot with your favorite toppings, such as sliced avocado, sour cream, and broken tortilla chips.

Recipe tips and variations
- Shred your own cheese! Pre-shredded cheese often contains anti-caking agents that affect how well it melts. So, again, shred your cheese fresh from the block for the best melting and texture.
- No oven-safe skillet? If your skillet isn’t oven-safe, prepare the beef and rice mixture on the stove as instructed, then transfer the mixture to a baking dish, top with cheese, and broil until the cheese is melted and bubbly.
- Add other aromatics – Such as diced bell peppers and minced garlic. Simply sauté them with the onions for enhanced flavor.
- Make it spicier – For those who like it hot, increase the spiciness by adding diced jalapeños, a pinch of cayenne pepper, or a splash of hot sauce. You can also use a spicier salsa.
- Cook rice from scratch – Instead of ready rice, opt for long-grain rice, brown rice, or even cauliflower rice. Cook it separately and then fold it into the skillet mixture before adding the cheese.
Serving suggestions
I went with a sprinkle of chopped cilantro, creamy avocado, sour cream, and crushed tortilla chips for toppings. Feel free to top the skillet with sliced jalapeños or a dash of hot sauce for an extra kick. Consider guacamole, pico de gallo, and lime wedges for freshness.
Most importantly, don’t forget warm, soft tortillas or crispy tortilla chips to scoop up all the cheesy, beefy rice goodness!
Storing instructions
This beef and rice skillet reheats beautifully, perfect for meal prepping or enjoying delicious leftovers the next day.
Refrigerator: Allow leftover cheesy taco rice skillet to cool completely, then transfer it to an airtight container and refrigerate for 3-4 days.
Freezer: Let the skillet cool completely, transfer it to a freezer-safe container, and keep frozen for 2-3 months. Thaw in the refrigerator overnight before reheating.
FAQ
Yes! You can cook the taco beef and rice mixture as directed, then cool and store it in the refrigerator. When ready to serve, top with a fresh layer of cheese and broil until hot and melted.
To make a vegetarian version, omit the ground beef and add more beans or a meat substitute like crumbled tofu or soy crumbles. You can also add more vegetables like bell peppers, zucchini, or mushrooms for added texture and flavor.
Yes, but you must use gluten-free taco seasoning and ensure your ready rice, salsa, and other canned ingredients are gluten-free. Always check labels for sneaky sources of gluten in your ingredients!
More all-in-one Mexican recipes
- Cast Iron Skillet Nachos
- Skillet Salsa Chicken
- Mexican Chicken Casserole
- Mexican Beef Casserole
- Taco Bell Power Veggie Bowl Copycat
If you love this cheesy Mexican beef and rice skillet, I would be so grateful if you could leave a 5-star 🌟 rating in the recipe card below. I love reading your comments and feedback!
Stay posted on my latest cooking adventures through social media @ Instagram, Pinterest, and Facebook. Also, don’t forget to tag me when you try one of my recipes!


Cheesy Taco Rice Skillet
Equipment
- 1 Large oven-proof skillet
Ingredients
- 1 lb lean ground beef
- ½ medium onion diced
- 3 tbsp taco seasoning
- ½ cup prepared salsa storebought or homemade- any salsa that is not thick and chunky will work great here.
- 15 oz can black beans drained and rinsed
- 15 oz can sweet corn *frozen corn works well here, too
- 10 oz can diced tomatoes and green chiles
- 8.5 oz bag Ready Rice microwaved according to package directions- I used Uncle Ben's Spicy Mexican style rice
- 4 oz Colby Jack cheese shredded from the block
- optional garnishes: fresh cilantro, sliced avocado, sour cream, crushed tortilla chips
Instructions
- Heat a large oven-safe skillet over medium heat and spray with avocado oil spray (or olive oil).
- Add the ground beef and onions and cook for 8-10 minutes until the meat is no longer pink and the onions are soft.
- Preheat the oven to Broil and place the rack in the middle setting.
- Add the taco seasoning and salsa to the ground beef and onions and stir well to combine.
- Add the drained black beans, undrained corn, and undrained diced tomatoes to the skillet. Stir, and simmer for 5-6 minutes until most of the liquid has cooked down.
- Add the cooked rice to the skillet, stir well, and top with the shredded cheese.
- Broil, watching carefully, until cheese is bubbly (about a minute or so). Garnish and serve.
Notes
- Shred your own cheese! Pre-shredded cheese often contains anti-caking agents that affect how well it melts. So, again, shred your cheese fresh from the block for the best melting and texture.
- No oven-safe skillet? If your skillet isn’t oven-safe, prepare the beef and rice mixture on the stove as instructed, then transfer the mixture to a baking dish, top with cheese, and broil until the cheese is melted and bubbly.
- Add other aromatics – Such as diced bell peppers and minced garlic. Simply sauté them with the onions for enhanced flavor.
- Make it spicier – For those who like it hot, increase the spiciness by adding diced jalapeños, a pinch of cayenne pepper, or a splash of hot sauce. You can also use a spicier salsa.
- Cook rice from scratch – Instead of ready rice, opt for long-grain rice, brown rice, or even cauliflower rice. Cook it separately and then fold it into the skillet mixture before adding the cheese.
Nutrition

- Crispy Steak and Egg Breakfast Burritos - June 14, 2026
- Toasted Reuben Wrap Sandwich - May 20, 2026
- Low-Carb Spicy Tuna Bowl with Canned Tuna (High Protein) - May 17, 2026
yummy
Loved it. Easy and good for you. Will definitely make it again. Thank you!
You’re welcome, Joann! Thank you for sharing your feedback!
Great alternative to when taco night gets mundane and needs an upgrade. Will definitely be a regular in our house
This is a great recipe that uses many of the ingredients I generally have in my pantry. I did not have any ground meat, so I used diced up chicken breasts (pounded first to tenderize), and it turned out great! There was just the right enough cheese to make it yummy while still keeping it healthy. I served with extra cilantro and avocado slices. Familiar, favorite flavors made this a winner at my house tonight!
Recipe tastes great! 100% will make again
Hi Kendall! I’m so glad that you enjoyed it!
This dish was AMAZING! It came out just like the pics, it was simple and a family crowd pleaser. This recipe has been added to the rotation in this house. Yum!
I’m so glad that you enjoyed it!
This dish was AMAZNG! It came out just like the picture and was easy and a family crowd pleaser. It will be in the rotation in this house! So good!
Easy and delicious !
So glad that you enjoyed it Traci!
Delicious. Very easy and fast to put together. It was a hit with the whole family.
I’m so glad that you all loved it! Thank you so much for the feedback! 🙂
This was really good! I added in the sautéed peppers and onions that were mentioned as an option and it was really flavorful! Hearty, but light as it feels very low carb!
I’m so glad that you enjoyed it Lauren! It’s such a great quick and easy dinner!
This looks delicious. I think I will try it tonight. Can’t wait.
Robin
The entire family loved this!!
Yay! I’m so glad that y’all enjoyed it! Thank you so much for the review!😃