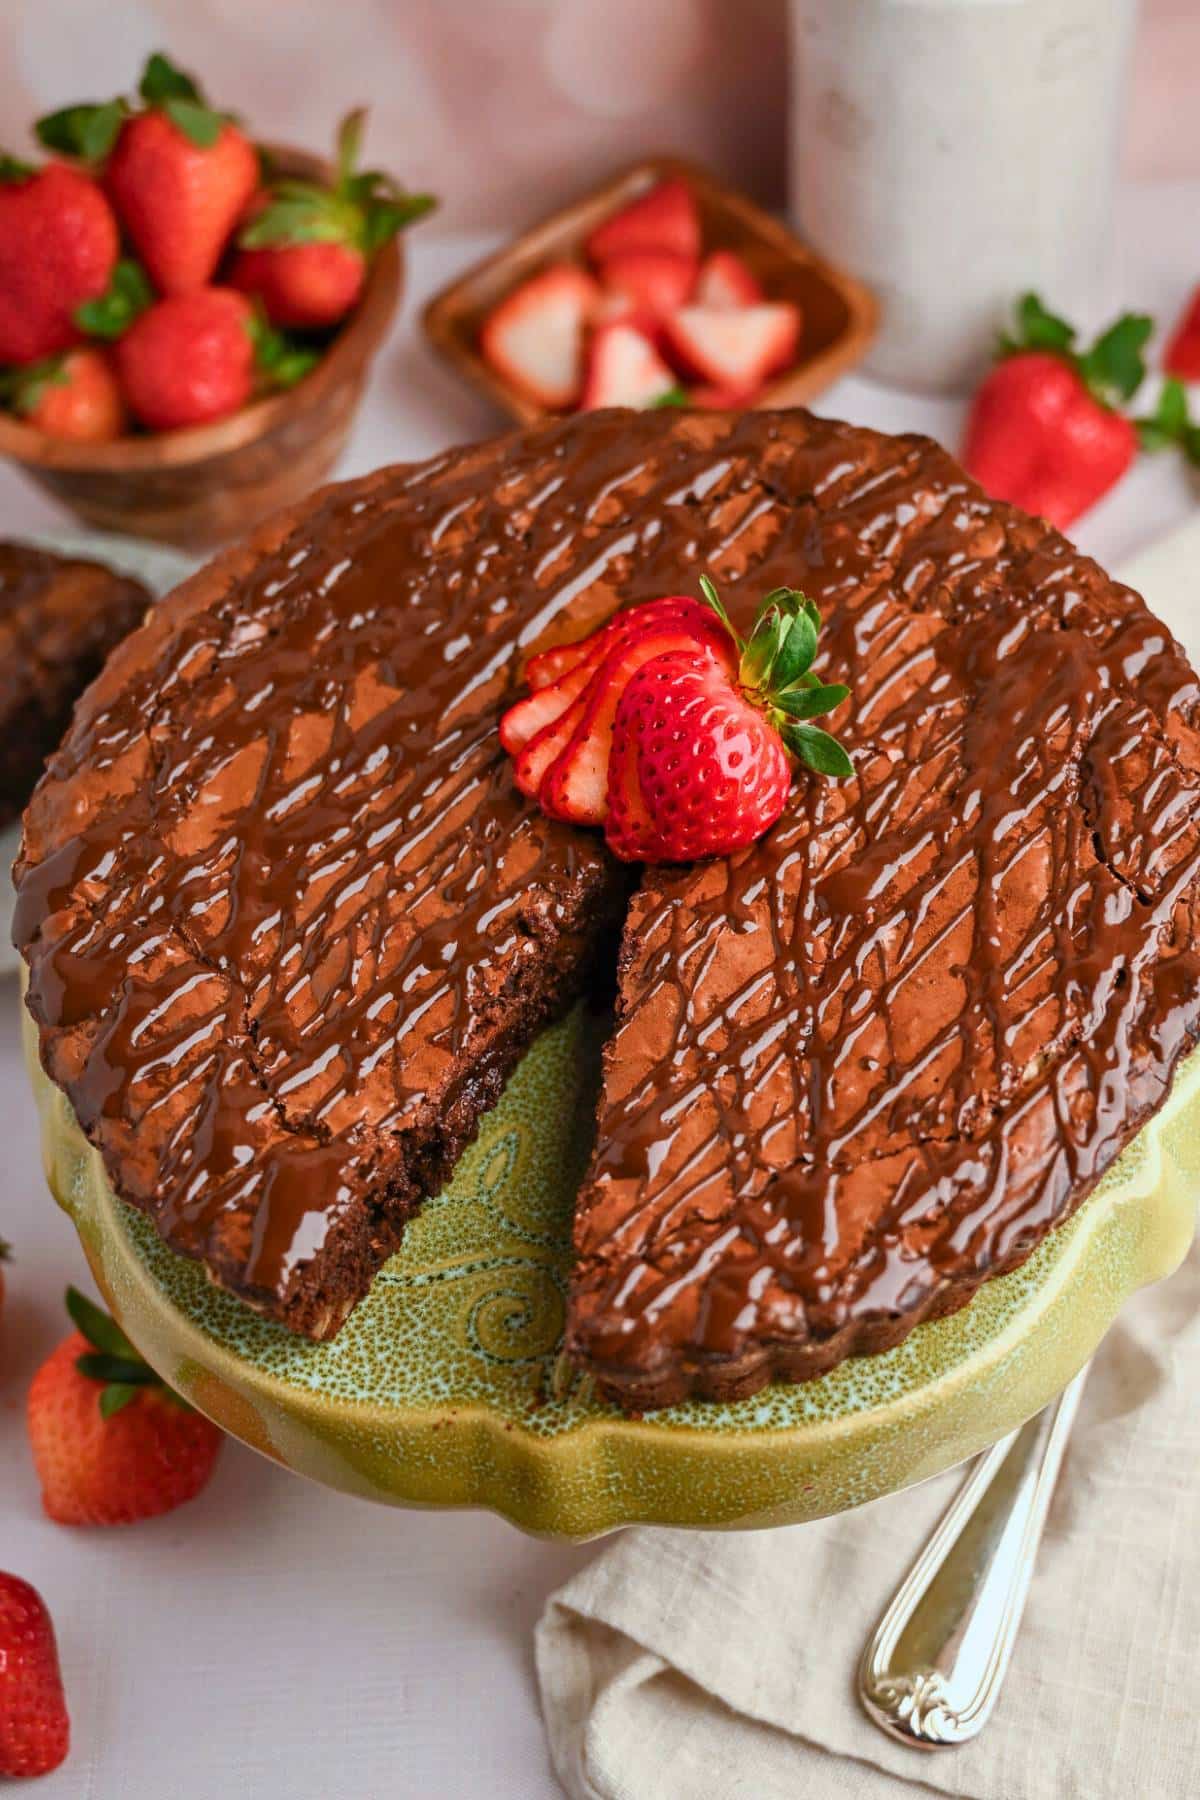
Toffee Brownie Tart
This post may contain affiliate links. Please read my disclosure policy.


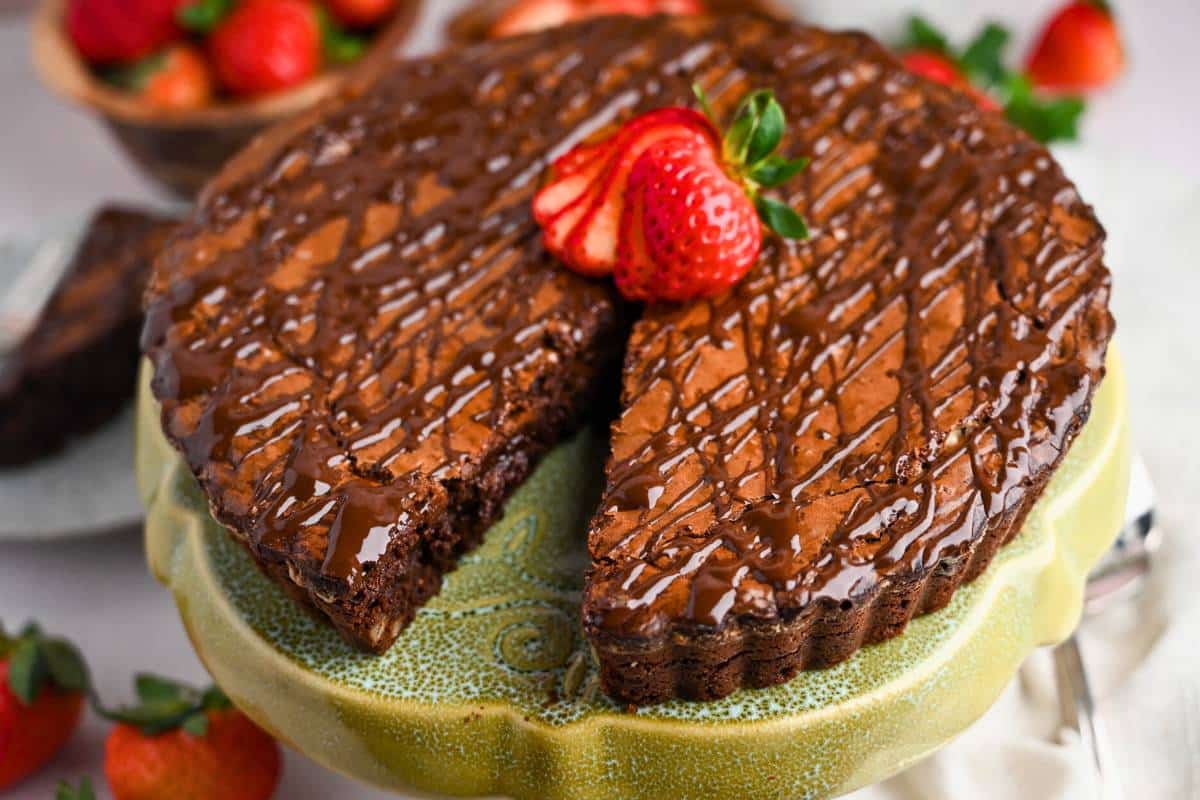
This crustless Brownie Tart recipe features a rich and fudgy chocolate brownie filling loaded with brittle Heath bits and crunchy pecans. Perfect for impressing party guests with a dessert that looks way more sophisticated than it actually is! Gluten-free option included.
In my book, Ina Garten can do no wrong, and her brownie tart recipe lives up to that standard. I made a few small changes to her original recipe over the years – like swapping in coconut sugar, using fewer chocolate chips (while still keeping it moist and rich), and adding toffee chips (because everything is better with crunch), and the result is consistently delicious.
No tart pan? No worries. Since this tart doesn’t have a traditional pastry shell, it’s essentially a crustless brownie pie that you can bake in any 9-inch round baking dish. You’ll lose those fancy fluted edges, but the flavor remains the same. You can also press the batter into a pre-baked crust to turn it into a more traditional chocolate brownie pie.
It’s ridiculously easy to make and has become one of my go-to desserts for entertaining. Whether I’m baking the regular version or the gluten-free one, it’s rich, fudgy, and exactly what a weekend treat should be.
Why You’ll Love It!
- Simple preparation. It looks and tastes like a professionally made pastry, but it’s easy enough for beginners.
- Perfect taste and texture. Imagine a thick, fudgy, truly melt-in-your-mouth brownie with the distinct crunch of toffee bits and buttery nuts all baked into a pretty pie!
- Gluten-free option. When using a high-quality 1:1 gluten-free flour blend, there’s no difference in decadence and deliciousness.
Ingredients & Substitutions
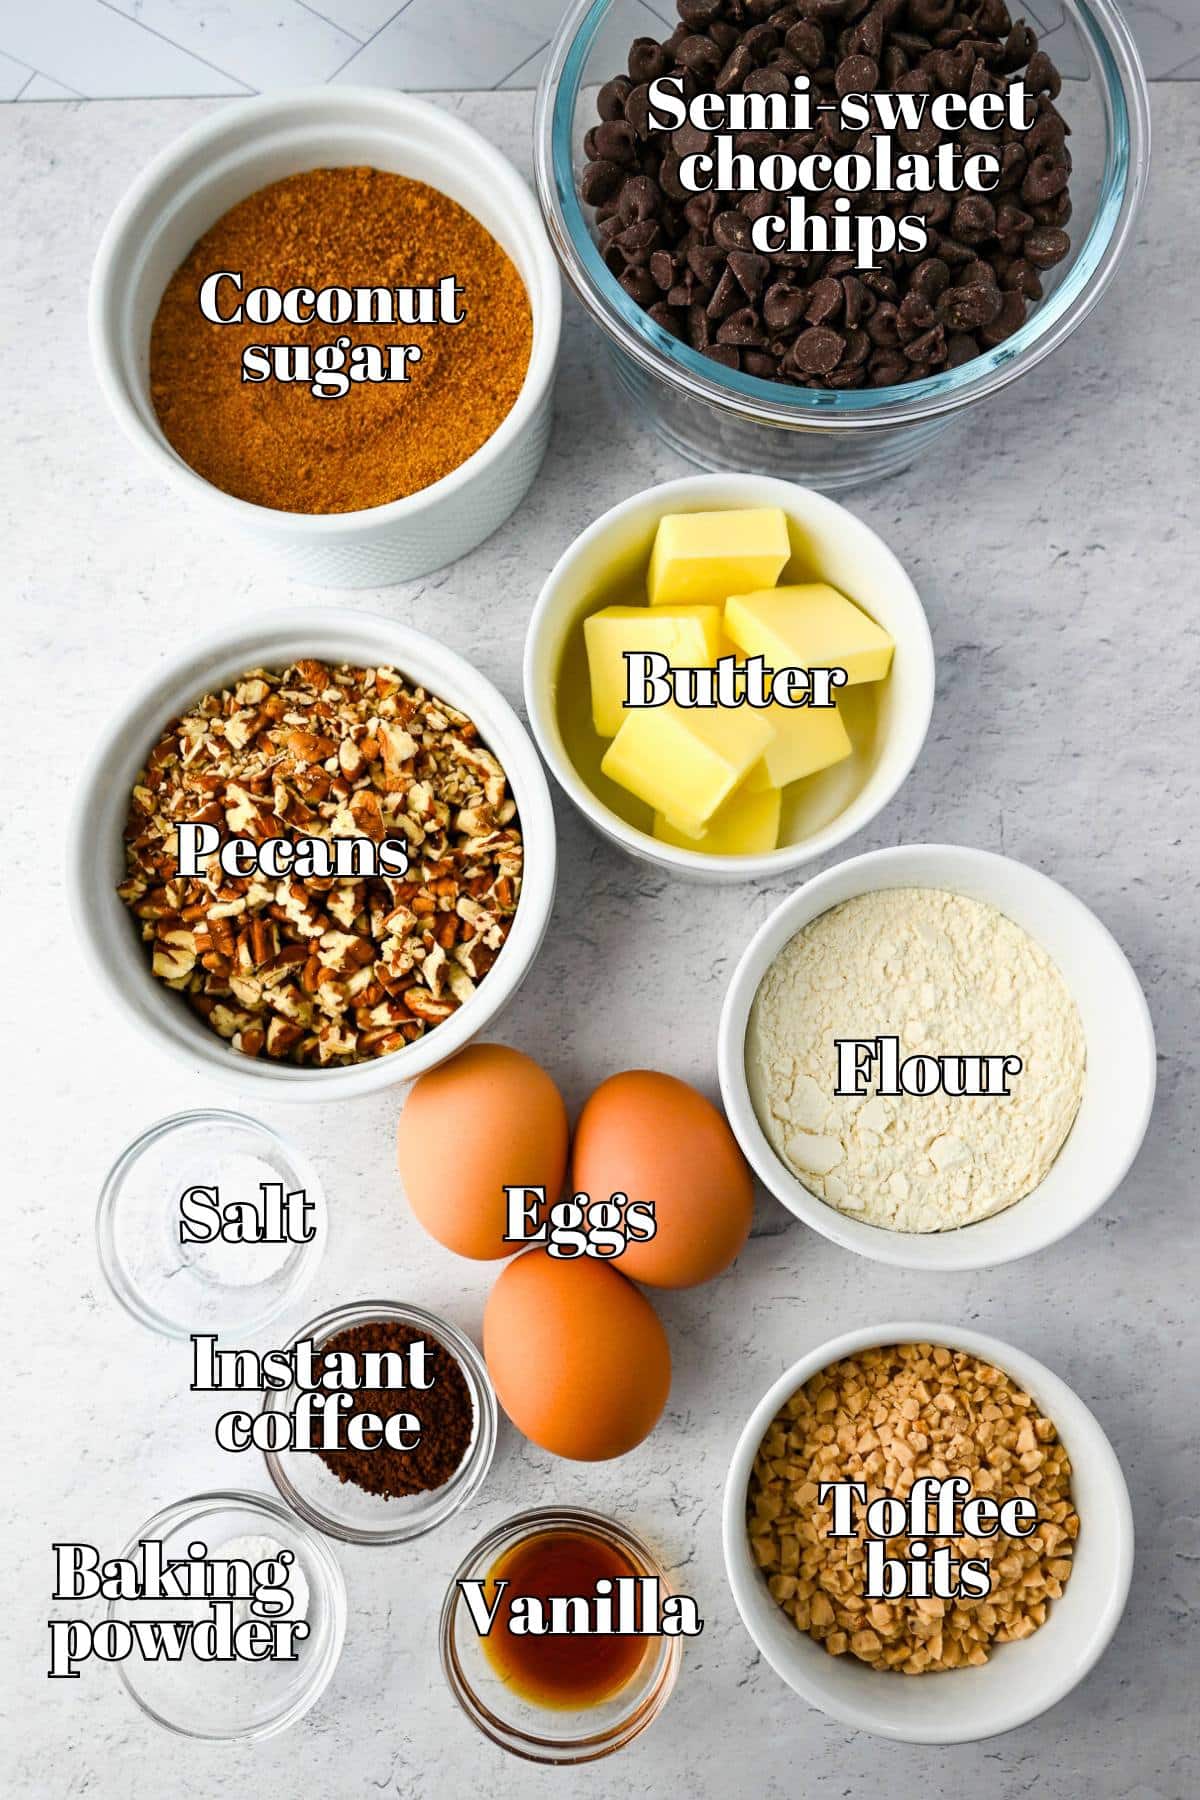
- Butter. The key to rich, fudgy brownies is butter, and a lot of it. I use salted butter, but unsalted butter or even high-quality vegan butter works too.
- Chocolate chips. For the main chocolate flavor, we’re using chocolate chips instead of standard cocoa powder. This helps create a silkier, more chocolate pie-like mouthfeel. Whether you use semi-sweet or dark chocolate, I highly recommend Ghirardelli brand.
- Eggs. These provide lift and that classic crackly brownie top we all obsess over. Bring them to room temperature for the best results.
- Sugar. I prefer coconut sugar for a less refined option, but feel free to use granulated white sugar or brown sugar if you already have it on hand.
- Instant coffee granules. Even if you aren’t a coffee drinker, don’t skip it! It doesn’t make the tart taste like a mocha, but it does make the whole thing taste way more indulgent.
- Vanilla extract. It’s worth splurging on high-quality pure vanilla extract if you can. Imitation vanilla just can’t match the real stuff.
- Heath toffee bits. This is where the toffee crisp brownie magic happens, as they melt slightly, creating little pockets of golden, buttery crunch. If you can’t find the bits, grab a couple of standard Heath Bars and chop them up yourself.
- Flour. To keep the pie moist and fudgy, you can use regular all-purpose flour or a reliable 1:1 gluten-free flour like King Arthur’s Gluten-Free Measure-for-Measure.
- Baking powder. A touch of baking powder keeps the tart from turning into a solid brick of fudge. Make sure it’s fresh!
- Salt. A pinch of salt balances the sweetness. Don’t skip it! You can even sprinkle a little flaky sea salt on top right after baking if you’re feeling fancy.
- Nuts. I love the crunch of chopped pecans or walnuts in my brownies, but if you aren’t a fan, you can leave them out. You’ll still get a little texture from the toffee.
How to Make a Brownie Tart
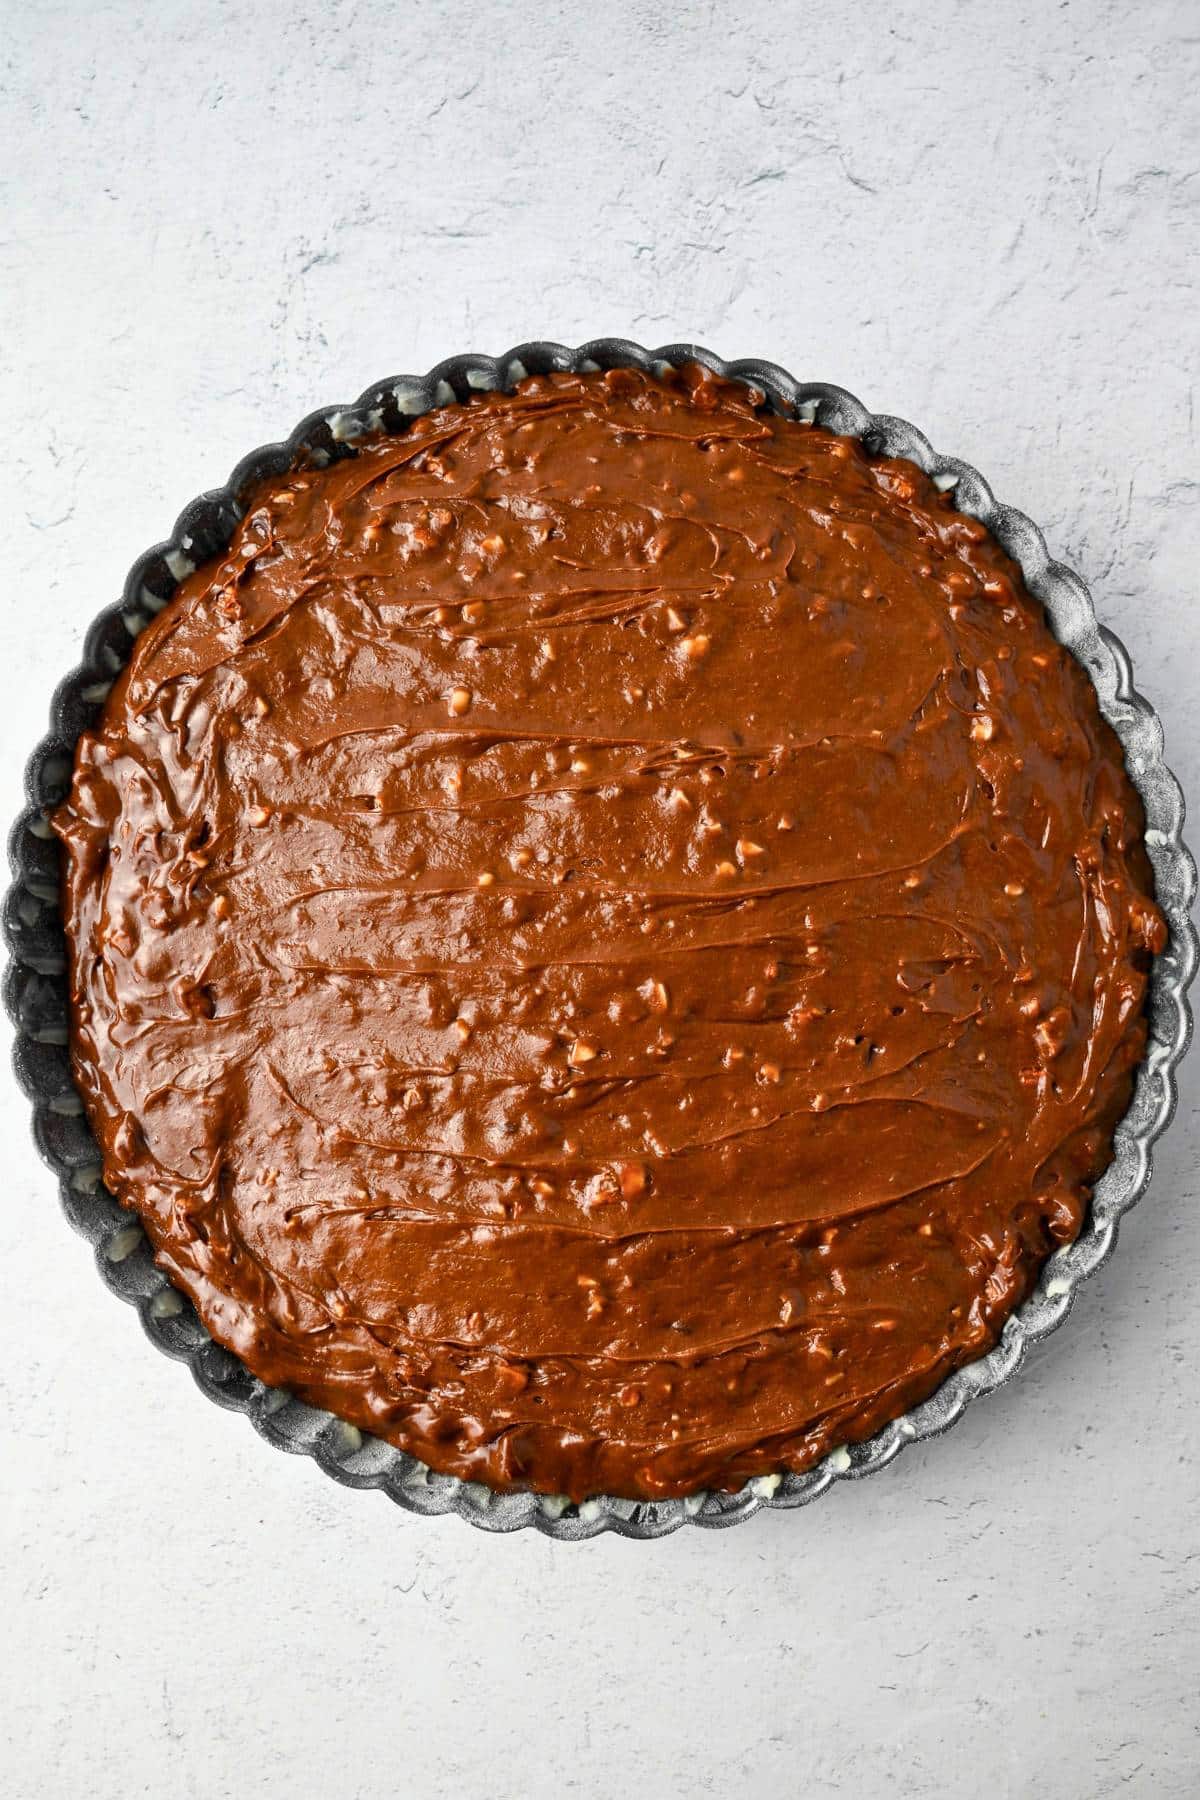
Step 1: Prepare for baking. Position a rack in the center of your oven, then set it to 350°F. Meanwhile, generously grease and flour a 9-inch tart pan or a 9-inch metal pie pan.
Step 2: Assemble a double boiler. Bring a medium saucepan filled with 1–2 inches of water to a gentle simmer over low heat, ensuring the bowl’s bottom does not touch the water.
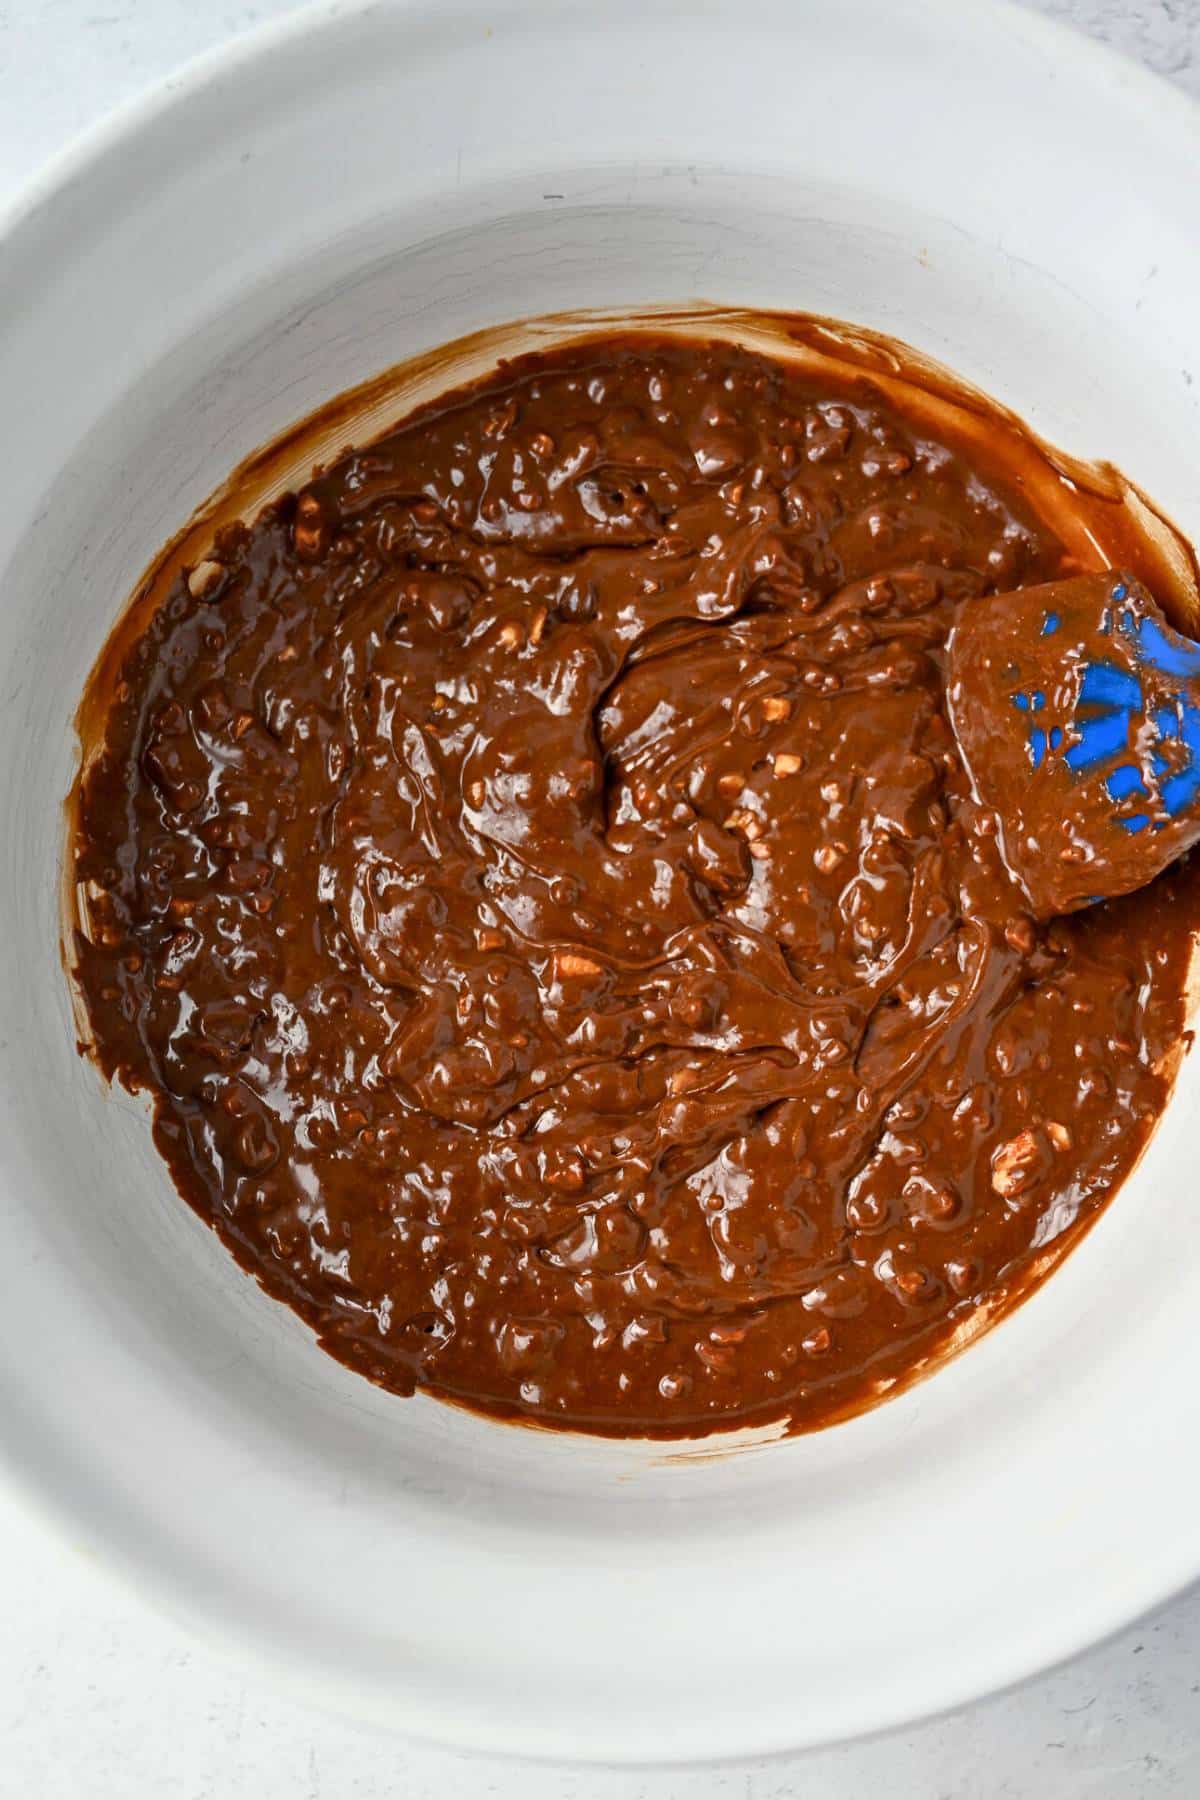
Step 3: Melt the butter and chocolate. Add the butter to the bowl, let it melt, then add 2 cups of the chocolate chips, and remove the pot from the heat, stirring constantly until the mixture is smooth and glossy. Set aside to cool.
Step 4: Aerate the wet batter. Using an electric mixer with the paddle attachment, beat the eggs, sugar, coffee powder, and vanilla on medium-high speed for 4 minutes, until you have a light pale foam (if using regular granulated sugar, it will be very light and fluffy). Then gently stir in the cooled chocolate mixture and toffee bits.
Step 5: Incorporate the dry ingredients. In a separate bowl, whisk together the flour, baking powder, salt, nuts, and remaining ½ cup of chocolate chips. Then, gently fold the flour mixture into the wet batter until just combined.
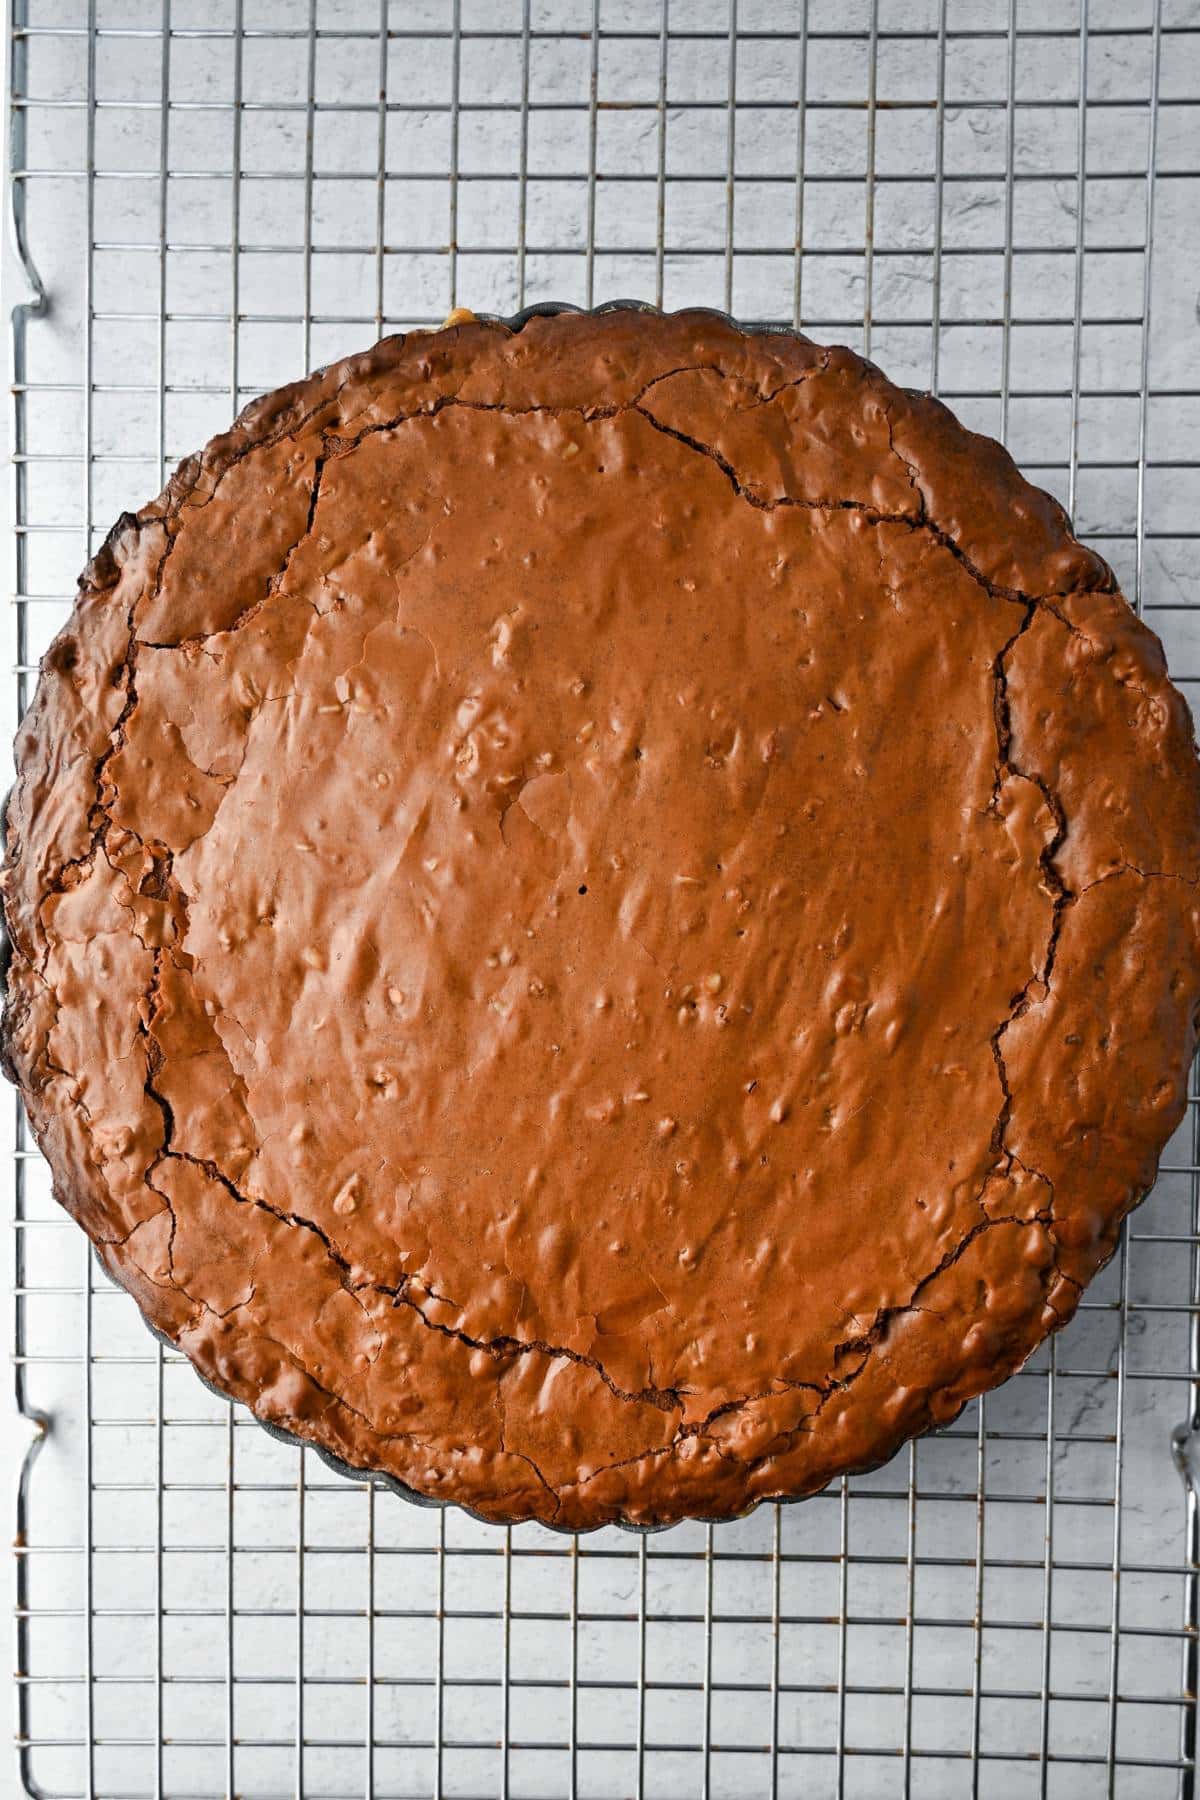
Step 6: Bake. Pour the batter into your prepared pan, and bake for 30–35 minutes, until the center is just set but still slightly soft, just like a traditional brownie.
Step 7: Cool. If you want to remove the pie from the pan before slicing, let it cool to room temperature first. If you’re not too concerned about it being picture-perfect and want to serve it straight from the pan while it’s still warm and gooey, let it cool until the center is firm enough that it won’t become a mushy mess when you dig in.
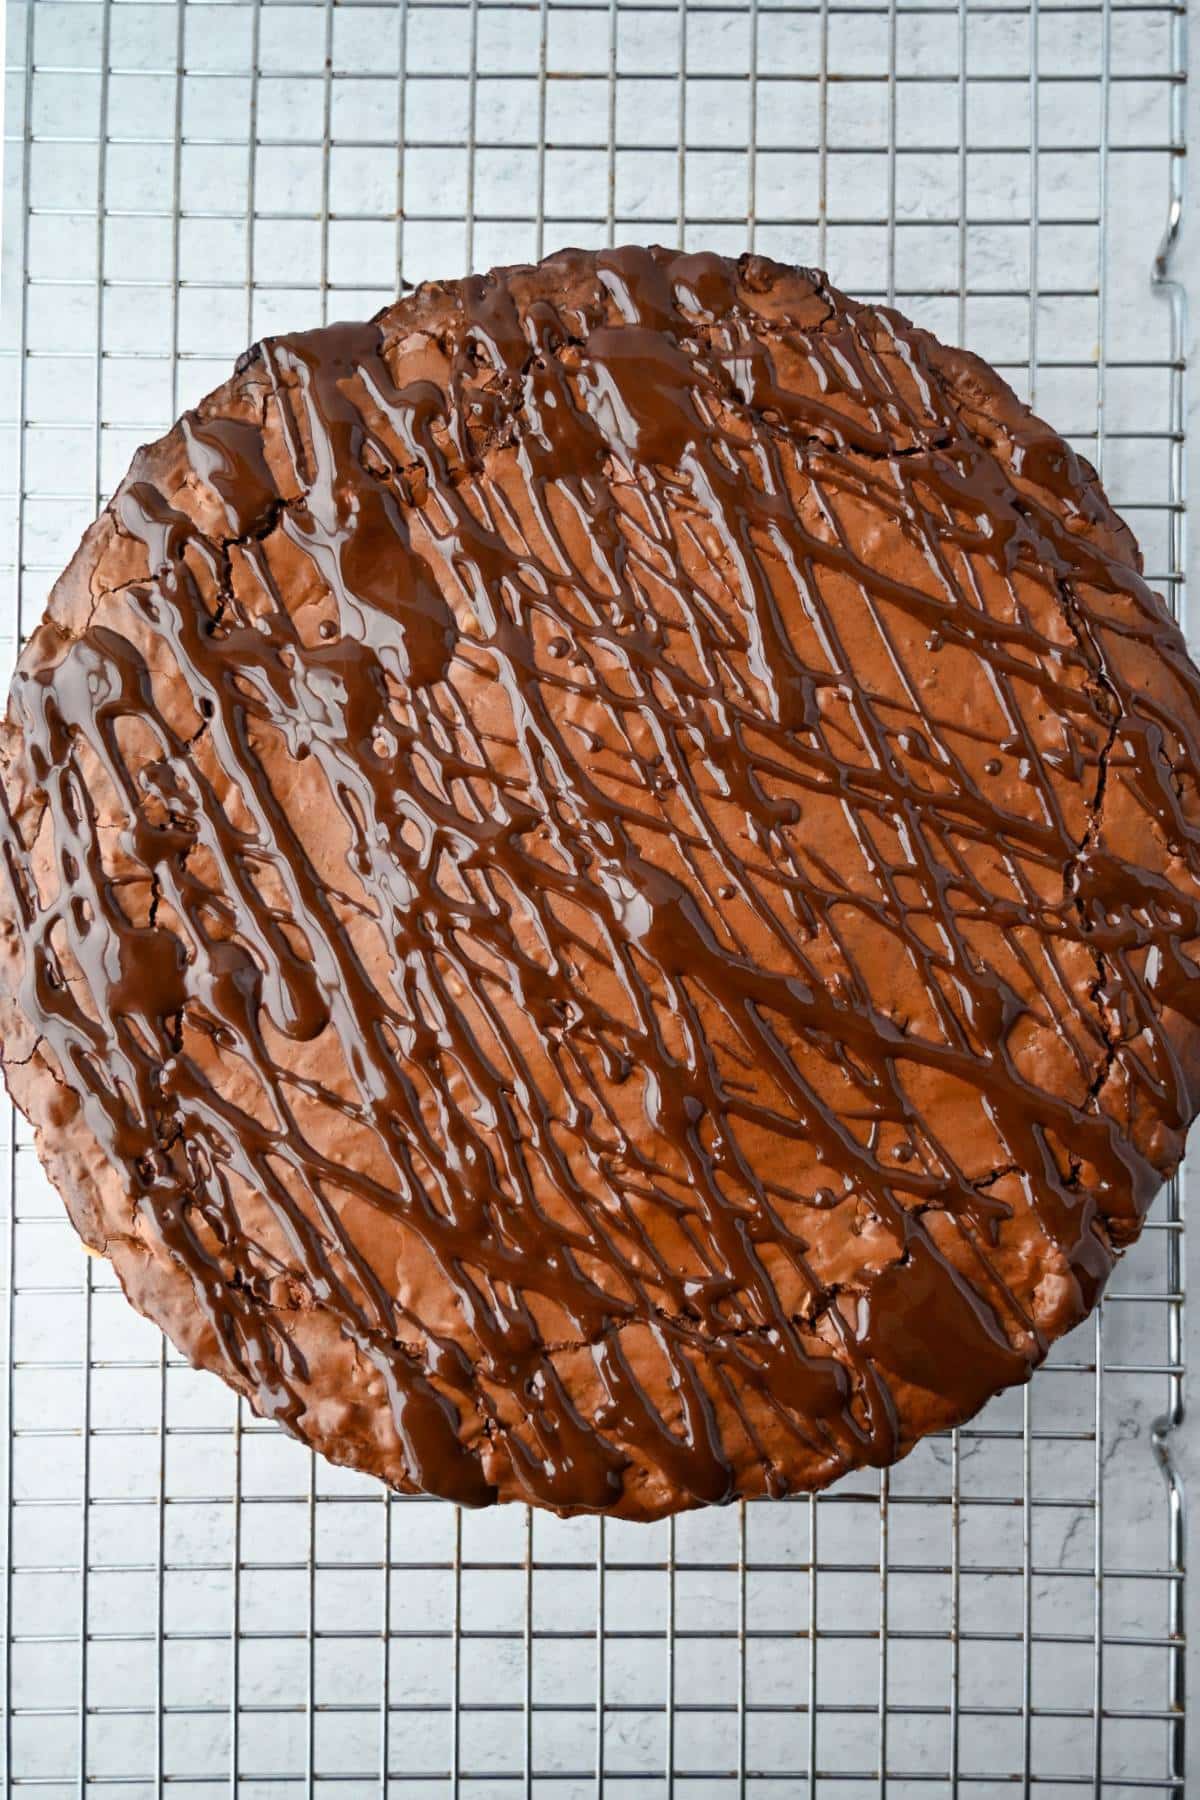
Step 8: Garnish and serve. Of course, a slice of this pie is perfectly delicious just the way it is, but serving it sundae style with vanilla bean ice cream, hot fudge, fresh whipped cream, and a cherry on top is absolute heaven.

Recipe Tips and FAQs
- You must cool the melted chocolate. It’s okay if it’s warm to the touch, but if it’s piping hot when you add it to the egg mixture, you’ll end up with chocolate-flavored scrambled eggs, and we definitely do not want that.
- Don’t over-mix. When folding the flour mixture into the wet batter, put the spatula down the second you see the last streak of flour disappear. Over-doing it can lead to a tough, cakey brownie rather than the moist, fudgy one we want.
- Understand your pan. The baking time stays the same whether you use a metal tart pan or a metal pie dish. However, if you’re using ceramic or glass, you may need to add 3–5 minutes to your bake time, as these materials take longer to heat up.
- The toffee trick. Keep your toffee bits in the freezer until the second you’re ready to stir them in. This helps them hold their shape slightly better during the initial bake, giving you a crunchier toffee-studded interior.
Customize It
Whether you’re calling this recipe a brownie pie or a brownie tart, here are a few ways to put your signature flavor on it:
Chocolate peppermint – Swap the toffee for crushed peppermint candies during the holiday season.
Raspberry chocolate – Press fresh raspberries into the top before baking, or spread raspberry compote over the top once cooled.
Salted caramel – Once cooled, glaze the top with salted caramel sauce. It pairs beautifully with the buttery, sweet toffee in the brownie.
You’re looking for the brownie’s surface to appear firm and slightly cracked. If a toothpick inserted into the center comes out mostly dry, with only a few moist crumbs clinging to it, you nailed it!
Absolutely! If you’re craving a more traditional chocolate pie experience, simply press the brownie batter into a pre-baked graham cracker, Oreo, or shortbread crust, then bake as usual.
Yup! Just grease a standard muffin tin or mini-tart pans and fill them about two-thirds full. Since they are smaller, they’ll bake much faster, so start checking for doneness at the 12–15 minute mark.
Storing and Freezing
Storing: To keep the tart from drying out, skip the fridge and store it in an airtight container at room temperature for up to 3 days.
Freezing: For longer storage, double-wrap the whole pie or individual slices tightly in plastic wrap and freeze for up to 2 months. To thaw, you can either set it out on the counter for an hour or two, or just pop a slice in the microwave for 10-15 seconds.
More Brownie-Inspired Recipes
- Fudgy Protein Brownies with M&Ms
- High-Protein Brownie Baked Oats
- Decadent Grain-Free Tahini Brownies
- Protein Brownie Bites
If you love this Toffee Brownie Pie recipe, I would be so grateful if you could leave a 5-star 🌟 rating in the recipe card below. I love reading your comments and feedback!
Stay posted on my latest cooking adventures through social media @ Instagram, Pinterest, and Facebook. Also, don’t forget to tag me when you try one of my recipes!

Toffee Brownie Tart
Ingredients
- 6 tablespoons butter
- 2 ½ cups semisweet chocolate chips *I use Ghirardelli
- 3 large eggs
- 1 cup coconut sugar *or granulated sugar
- 1 tablespoon instant coffee granules
- 1 teaspoon pure vanilla extract
- ⅓ cup Heath toffee bits *or chopped Health bars
- ½ cup unbleached all-purpose flour regular or gluten-free measure for measure (I recommend King Arthur brand for the best results)
- ¼ teaspoon baking powder
- ¼ teaspoon kosher salt
- 4 oz chopped pecans *or walnuts
Instructions
- Grease and flour a 9-inch tart pan with removable sides.
- Preheat the oven to 350 degrees F.
- Melt the butter in a double boiler over low heat, then add 2 cups of the chocolate chips, remove from the heat, and stir until all the chocolate is completely melted.
- Set aside to cool while you prepare the rest of the ingredients.
- In the bowl of an electric mixer fitted with the paddle attachment, combine the eggs, sugar, coffee, and vanilla on medium-high speed for 4 minutes.
- Stir in the cooled chocolate and the toffee bits.
- In a separate bowl, combine the flour, baking powder, salt, remaining ½ cup of the chocolate chips, and the nuts.
- Fold the flour mixture into the batter until just combined. Pour into the pan and bake for 30 to 35 minutes, until the center is set.
- The inside will still be very soft, like a brownie.
- Cool to room temperature before removing the sides of the tart pan.
- Serve with vanilla bean ice cream or fresh whipped cream
Notes
- You must cool the melted chocolate. It’s okay if it’s warm to the touch, but if it’s piping hot when you add it to the egg mixture, you’ll end up with chocolate-flavored scrambled eggs, and we definitely do not want that.
- Don’t over-mix. When folding the flour mixture into the wet batter, put the spatula down the second you see the last streak of flour disappear. Over-doing it can lead to a tough, cakey brownie rather than the moist, fudgy one we want.
- Understand your pan. The baking time stays the same whether you use a metal tart pan or a metal pie dish. However, if you’re using ceramic or glass, you may need to add 3–5 minutes to your bake time, as these materials take longer to heat up.
Nutrition

- Spicy Tuna Crispy Rice Salad - March 18, 2026
- Toffee Brownie Tart - March 9, 2026
- High-Protein Tortilla Egg Bake - March 4, 2026
That looks amazeballs Amee! My co-worker asked me a couple days ago to pick up some gluten free flour for her because she was going to make a gluten free dessert for a friend – holy balls that stuff is expensive! I think it was $11.99 for a 3 pound bag?
Question: is oat flour gluten free?
Lol, yes it’s a tad pricey Biz! Oat flour is only GF if it’s made from GF oats. They can have traces of gluten if they aren’t processed in a GF facility. Thanks for stopping by and visiting! I hope that we can get together at another blogging event soon! 🙂