Christmas Thumbprint Cookies with Peppermint Buttercream Frosting
This post may contain affiliate links. Please read my disclosure policy.

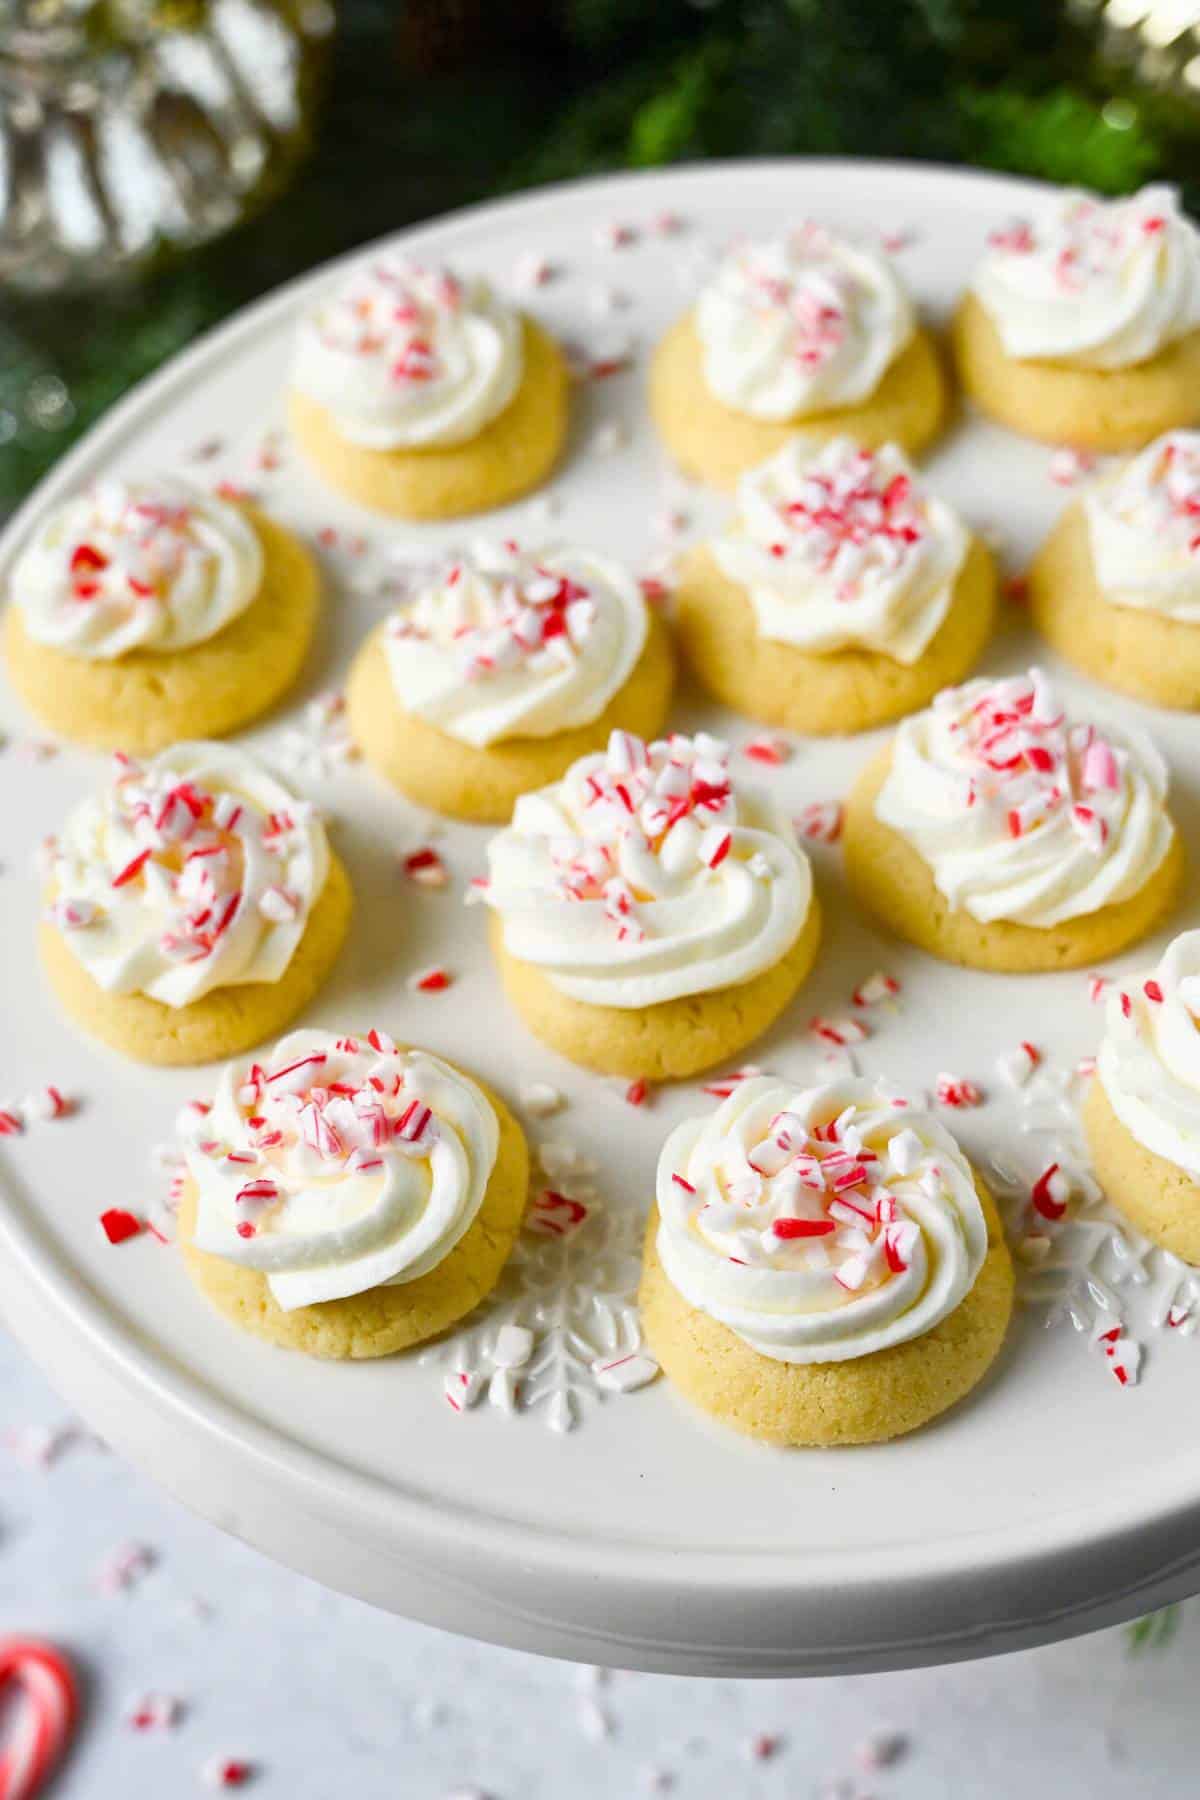
These Christmas Thumbprint Cookies feature a soft, buttery sugar cookie base filled with a festive Peppermint Buttercream. Topped with crushed candy canes, these peppermint cookies are perfect for holiday dessert trays and cookie swaps!
Every year at my annual cookie exchange, my friends and I trade dozens of Christmas cookies, and year after year, these Peppermint Thumbprint Cookies, traditionally known as Candy Cane Thumbprints, steal the show. Inspired by a recipe from one of my well-loved Gooseberry Patch Christmas cookie cookbooks, the combination of flavors and textures going on in these cookies is incredible.
Imagine sinking your teeth into a soft, buttery sugar cookie topped with a sweet, velvety peppermint-flavored frosting and crushed candy canes. Every bite delivers that perfect balance of tender, creamy, minty, and just a little crisp. The flavor is reminiscent of soft buttermints. Simple to make, beautiful on a dessert tray, and guaranteed to impress – thumbprint cookies don’t get more Christmas-y than this.
Why these cookies are perfect for cookie exchanges
- Easy to make. The dough comes together quickly with basic ingredients, the thumbprint shaping is simple, and the snowy peppermint buttercream and crushed candy canes make these cookies festive without being fussy.
- Perfectly peppermint-y. The soft buttery sugar cookie base keeps the peppermint frosting filling from being overpowering, making these a hit even with folks who usually say, “I’m not big on peppermint Christmas cookies.”
- Travel well. Once set, the frosting holds its shape beautifully, and the cookies stay soft and tender, making them ideal for transport, stacking, and sharing.
- Customizable. Swap the filling, change the sprinkles, or adjust the peppermint intensity. The base thumbprint sugar cookie is endlessly versatile.

Ingredients
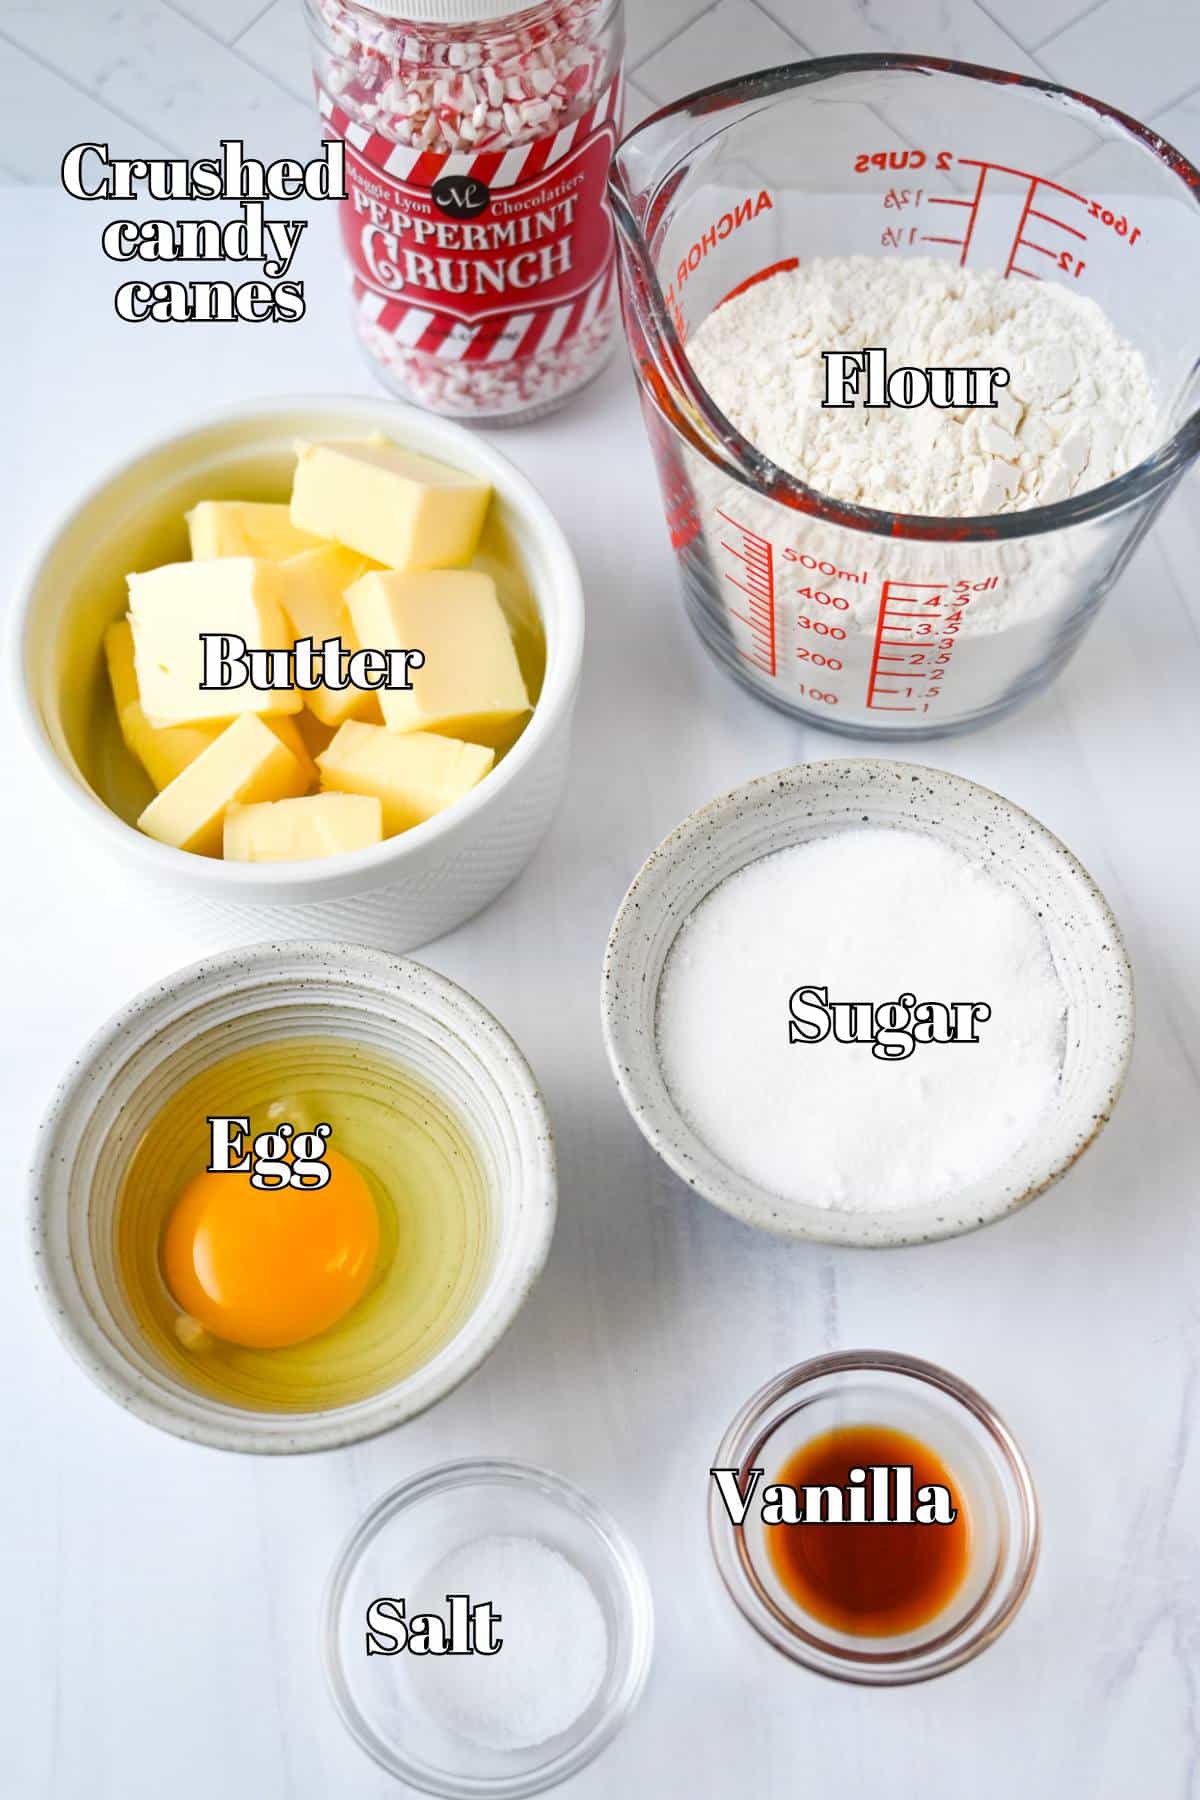
- Butter. First and foremost, you need softened, not melted, unsalted butter. Softened butter creams easily, creating a tender, melt-in-your-mouth cookie.
- Sugar. To sweeten the cookies and help them brown ever so lightly in the oven, granulated sugar is standard, but cane sugar works too.
- Salt. Just a pinch elevates the buttery sweetness and balances the peppermint flavor. Don’t skip it!
- Egg. A room-temperature egg binds the dough and adds richness.
- Vanilla extract. It rounds out the flavor and complements the peppermint beautifully. Pure vanilla extract is best, but you can make an exception for imitation if you already have it.
- Flour. I use unbleached, all-purpose flour here. For a gluten-free version, you should be able to swap in a 1:1 gluten-free all-purpose flour blend without any trouble (but no promises).
- Candy canes. For the topping, you can use finely crushed candy canes or peppermint candies. Or if you can find a jar or bag of crushed peppermint candies (I love the Maggie Lyon Chocolatiers Peppermint Crunch), grab them to save yourself a step.
For the Peppermint Buttercream Filling
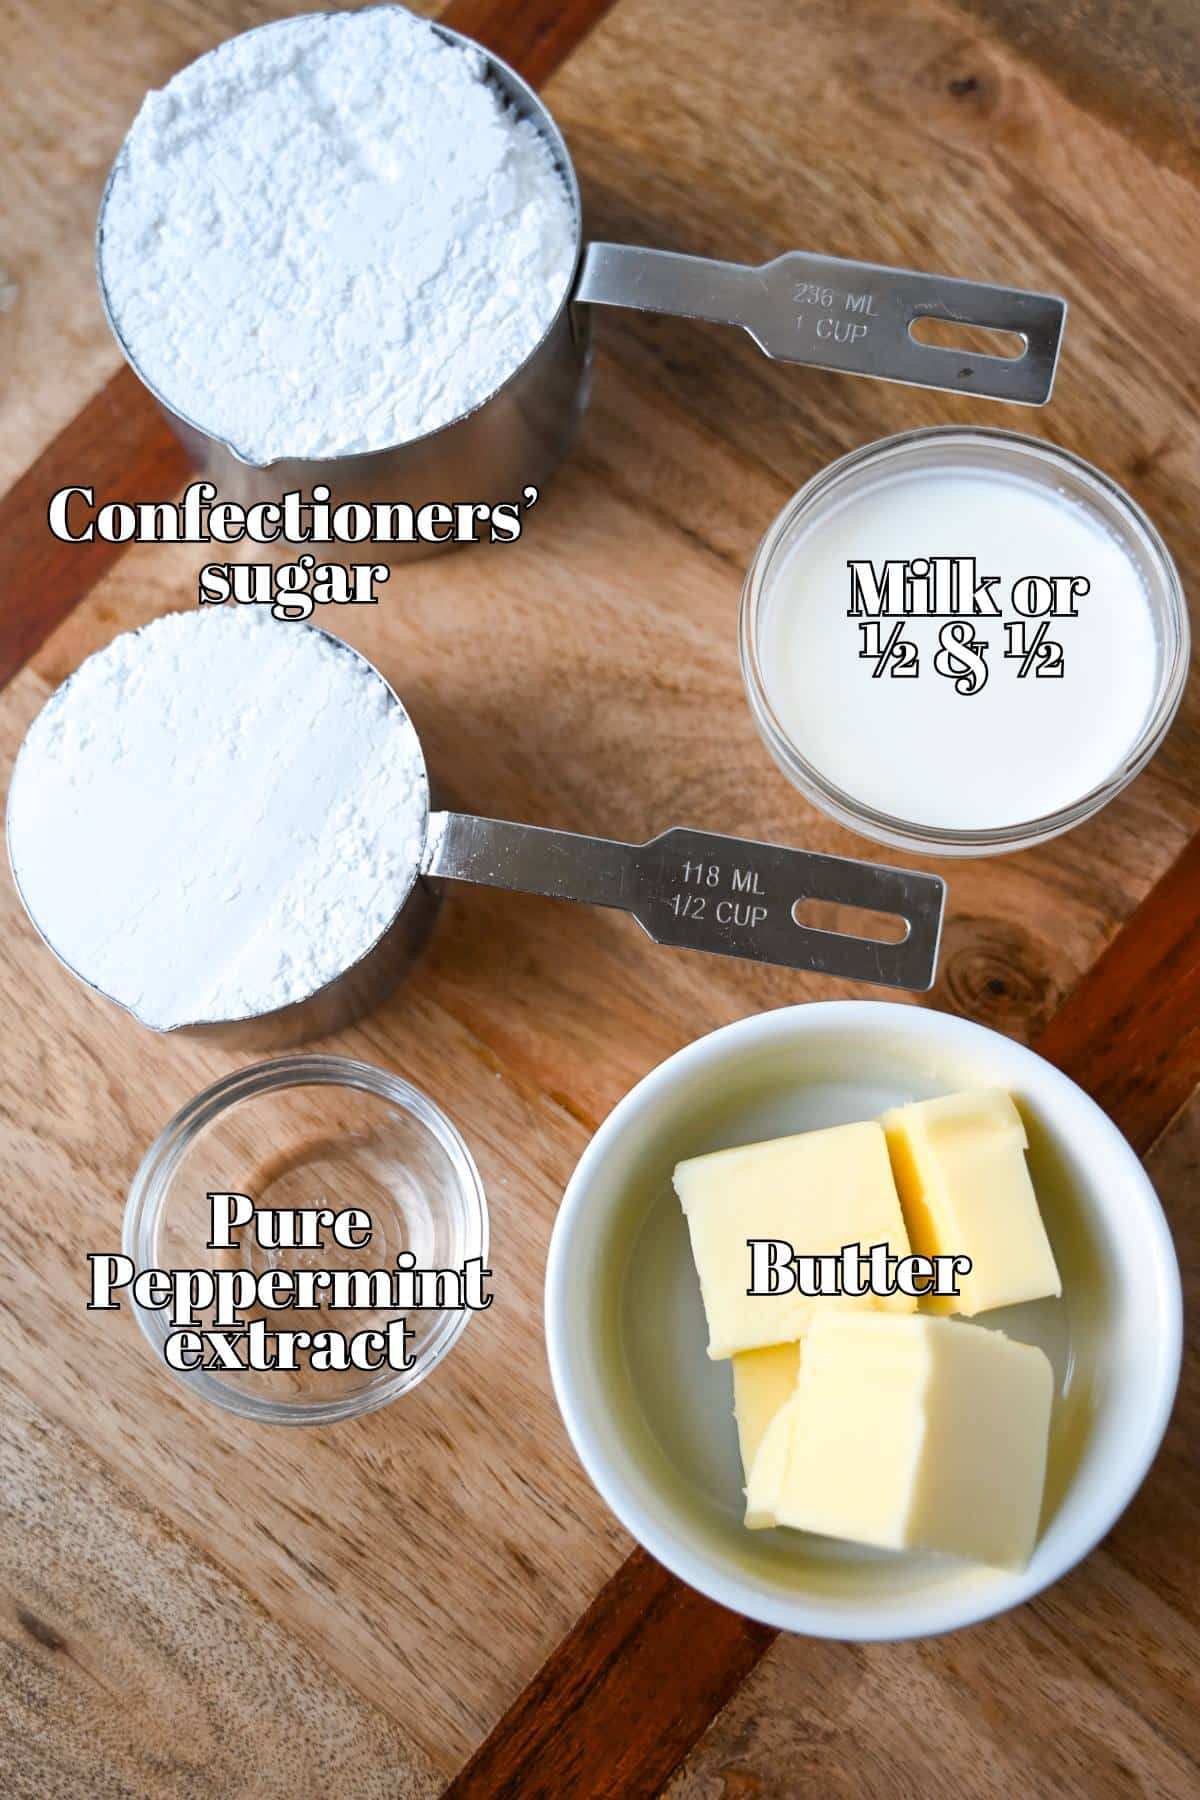
- Butter. Unsalted butter comes into play again as the base of the buttercream frosting, creating a fluffy, pipeable thumbprint cooking filling.
- Peppermint extract. A little goes a long way, giving the frosting its signature flavor. Start with ¼ teaspoon and adjust to taste. It should taste refreshing, not toothpaste-y.
- Powdered sugar. A key ingredient in sweetening and stabilizing frosting. If yours looks a little clumpy, give it a quick sift to ensure a silky texture.
- Milk. To achieve a thick, pipeable filling, I like using half-and-half, but whole milk works too.
How to Make Soft Peppermint Cookies with Icing
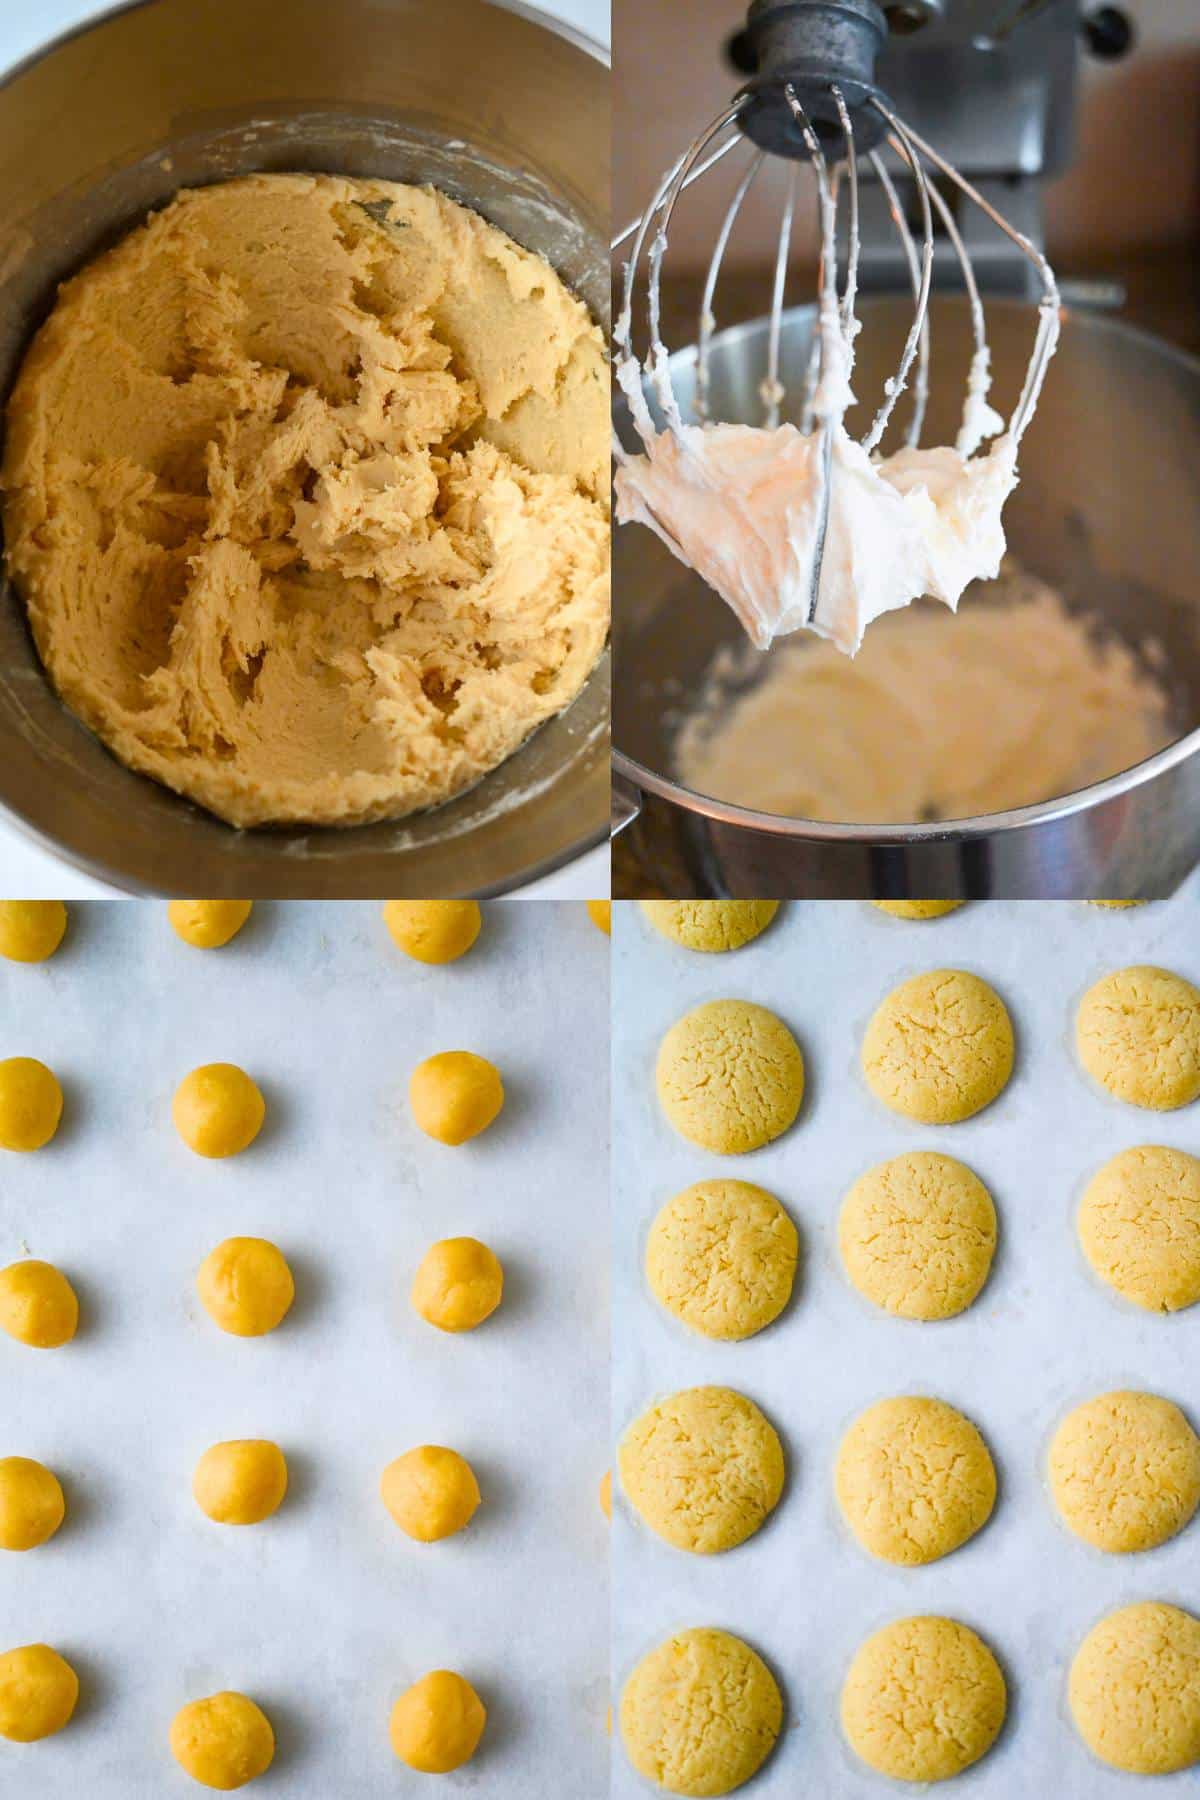
Step 1: Combine wet ingredients. Using an electric mixer on low speed, blend softened butter, sugar, and salt until smooth and fluffy. Mix in the egg and vanilla extract until fully incorporated, scraping down the sides of the bowl as needed.
Step 2: Incorporate the flour. Beat in as much flour as possible with the mixer, then stir in any remaining flour by hand (you can use the stir setting on a stand mixer).
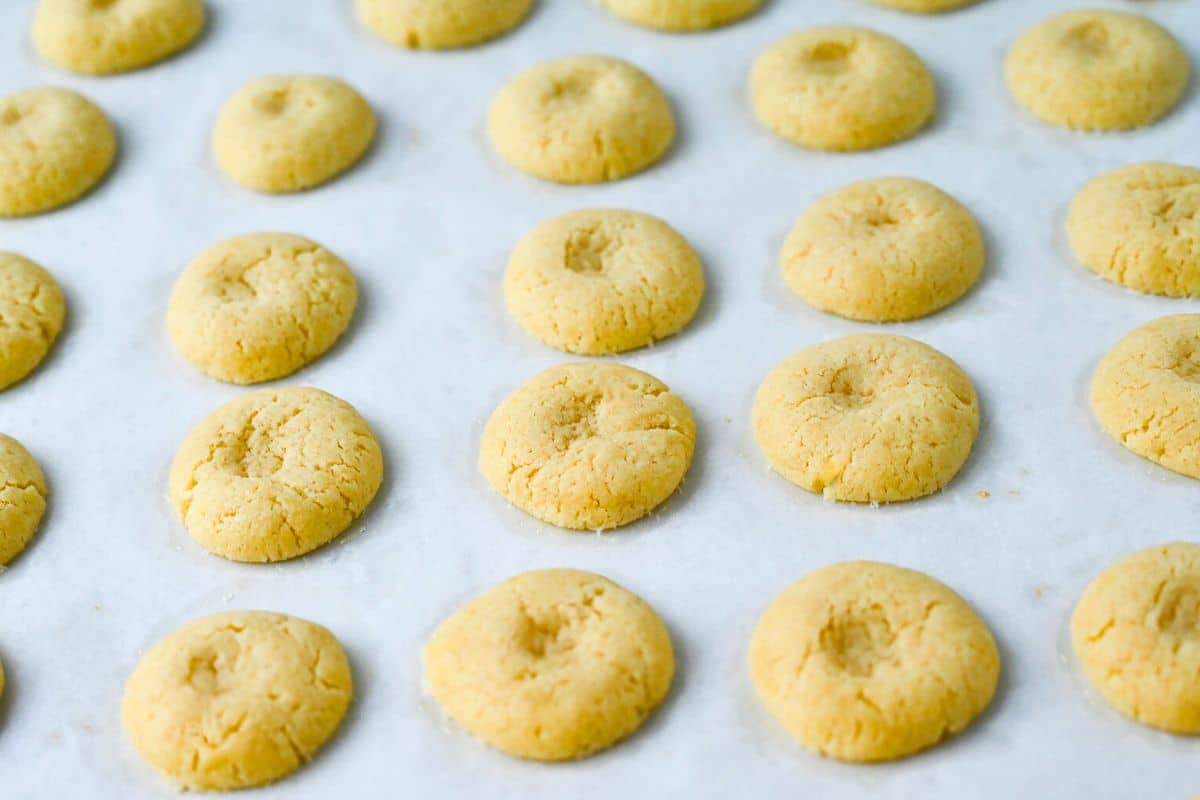
Step 3: Chill and shape. Cover the dough and chill for 1 hour. While the dough chills, preheat your oven to 375°F and line a baking sheet with parchment paper. Then, roll the dough into 1-inch balls and place them 2 inches apart on the prepared baking sheet.
Step 4: Bake. Bake for 8-10 minutes, just until the edges are lightly golden – these cookies are meant to stay soft once cooled.
Step 5: Create the thumbprints. Remove the cookies from the oven and immediately gently indent the center of each one with your thumb. Let the cookies cool completely.
Step 6: Make the icing. While the cookies cool, blend butter and peppermint extract until smooth. Gradually add powdered sugar and half-and-half until the mixture reaches a fluffy, pipeable consistency.
Step 7: Decorate. Pipe the icing into each thumbprint indentation, then immediately sprinkle the crushed candy canes on top so the pieces stick before the icing sets.
Recipe tips and FAQs
- Yes, you must chill the dough first. Trust me, chilled dough is much easier to work with. It also helps prevent the dough from spreading too much during baking. We’re aiming for soft, perfectly plump cookies – not flat.
- Roll and space the dough evenly. Roll the chilled dough into 1-inch balls (a small cookie scoop is good for this), and space them at least 2 inches apart on the baking sheet. They won’t spread a ton, but a little breathing room helps the heat circulate consistently.
- Don’t overbake. For best results, pull the cookies from the oven when they’re still soft and just lightly golden around the edges. They’ll firm up as they cool, keeping the centers tender and delicate.
- Press the thumbprints right out of the oven, while the cookies are still warm and pliable. If you wait too long, the cookies may crack instead of creating a neat little pocket for the frosting.
Tips for the Filling
- Soft butter makes the best buttercream. If it’s too cold and firm, your frosting will look grainy. Too soft and it won’t hold a cohesive, pipeable consistency.
- Adjust the consistency as needed. You’re looking for a frosting that’s smooth, pipeable, and holds its shape. If it’s too thick, add a splash of milk. If it’s too thin, add more powdered sugar.
- Pipe with a small star tip. I love using a small star tip for a consistent bakery-style finish. A small round tip, or even a zip-top bag with the corner snipped off, works just as well – though not as cute!
- Let the cookies cool fully before filling. If the cookies are even slightly warm, the icing will melt and slide right out of the thumbprint.
Variations
I don’t recommend veering too far from the base sugar cookie. However, you can have some fun with the thumbprint filling and topping. Here are a few ideas that still bring all the Christmas cheer:
- Classic Vanilla Frosting + Holiday Sprinkles – A simple kid-friendly option.
- White Chocolate Ganache + Crushed Peppermint – A silky, slightly fancier filling.
- Jam + Powdered Sugar – A dollop of apricot, raspberry, strawberry, or orange jam and a light dusting of powdered sugar give these cookies a classic thumbprint feel.
Spiced Rum Frosting + Nutmeg – A swirl of the Spiced Rum Whipped Frosting I use for these Eggnog Cupcakes with a pinch of nutmeg is perfect for the adults.
This usually means the butter was too soft or the dough wasn’t chilled long enough. Make sure your butter is softened (not melted!) and don’t skip the chilling step. Measuring flour accurately (spoon and level!) also helps.
Yes! You can make the dough up to 2 days in advance and store it in the refrigerator. When you’re ready to bake, simply roll, bake, cool, and fill as directed. This is a great way to save time during the hectic holiday season.
Storing and freezing
Storing: Once the thumbprint cookies are cooled and the frosting is set, store them in an airtight container at room temperature for up to 2 days, or in the refrigerator for up to 5 days.
Freezing: For best results, freeze the cookies unfilled. Arrange the baked, cooled thumbprint cookies in a single layer and freeze until firm, then transfer to a freezer-safe container or bag for up to 2 months. Thaw at room temperature, then fill and decorate as usual.
More Cookie Swap Favorites
- Boozy Kentucky Bourbon Balls
- Chocolate Crunch Cookies
- Walnut Crescent Cookies
- Maple Shortbread Cookies
- Chocolate Peanut Butter Cookie Cups
- Peanut Butter Thumbprint Cookies
If you love this Peppermint Buttercream Thumbprint Cookie recipe, I would be so grateful if you could leave a 5-star 🌟 rating in the recipe card below. I love reading your comments and feedback!
Stay posted on my latest cooking adventures through social media @ Instagram, Pinterest, and Facebook. Also, don’t forget to tag me when you try one of my recipes!

If you don’t currently take part in a holiday cookie exchange, then why not start one of your own? It’s a whole lot of fun! Don’t worry if you are skipping the sweets, there are places where you can donate trays of cookies that would be incredibly grateful to receive them. Nursing homes, your local fire station, homeless shelters, churches, and local families in need are great places to contact about cookie donations. Our local firemen love getting the extra goodies each year!
Merry Christmas from my family to yours! xo~

Christmas Thumbprint Cookies with Peppermint Buttercream
Ingredients
For the cookie
- ⅔ cup butter softened
- ½ cup sugar
- ¼ tsp salt
- 1 egg beaten
- 1 tsp vanilla extract
- 1 ½ cups all-purpose flour
- Garnish: finely crushed candy canes
For the filling
- ¼ cup butter softened
- ¼ tsp peppermint extract *or vanilla
- 1 ½ cups powdered sugar
- 2-3 tsp whole milk or half and half
Instructions
- Using an electric mixer on low speed, blend softened butter, sugar, and salt until smooth and fluffy. Mix in the egg and vanilla extract until fully incorporated, scraping down the sides of the bowl as needed.
- Beat in as much flour as possible with the mixer, then stir in any remaining flour by hand (you can also use the stir setting on a stand mixer).
- Cover and chill for one hour. While the dough chills, preheat the oven to 375 degrees F. and line a large baking sheet with parchment paper.
- Shape dough into one-inch balls; place 2 inches apart on the ungreased lined baking sheet.
- Bake at 375 degrees for 8-10 minutes, until lightly golden around edges (very lightly golden…these should be soft when cooled.)
- Remove from oven; lightly press a thumbprint in the center of each cookie (they don't have to be deep since you are piping icing on top). Allow cookies to cool completely.
- While the cookies cool, make the icing: blend butter and extract. Gradually add powdered sugar and half & half to a piping consistency.
- Pipe filling into centers with a star tip. Sprinkle immediately with crushed candy canes so they will stick before the icing starts to set.
Notes
-
- Yes, you must chill the dough first. Trust me, chilled dough is much easier to work with. It also helps prevent the dough from spreading too much during baking. We’re aiming for soft, perfectly plump cookies – not flat.
- Roll and space the dough evenly. Roll the chilled dough into 1-inch balls (a small cookie scoop is good for this), and space them at least 2 inches apart on the baking sheet. They won’t spread a ton, but a little breathing room helps the heat circulate consistently.
- Don’t overbake. For best results, pull the cookies from the oven when they’re still soft and just lightly golden around the edges. They’ll firm up as they cool, keeping the centers tender and delicate.
- Press the thumbprints right out of the oven, while the cookies are still warm and pliable. If you wait too long, the cookies may crack instead of creating a neat little pocket for the frosting.
- I usually double this recipe because they disappear fast! This recipe makes small 1.5″ cookies, so if you want to make them larger, just double the batch.
Nutrition

- Toasted Reuben Wrap Sandwich - May 20, 2026
- Low-Carb Spicy Tuna Bowl with Canned Tuna (High Protein) - May 17, 2026
- Lightened-Up Tiramisu Parfaits - May 11, 2026
I would love to host a cookie exchange. It would be fun to try lost of dfferent cookies and swap their recipes. LIke these. They look fabulous and I can’t wait to try them!
can I come over?
You’re always welcome here Jennifer! 🙂