Easy No Bake Protein Cheesecake
This post may contain affiliate links. Please read my disclosure policy.

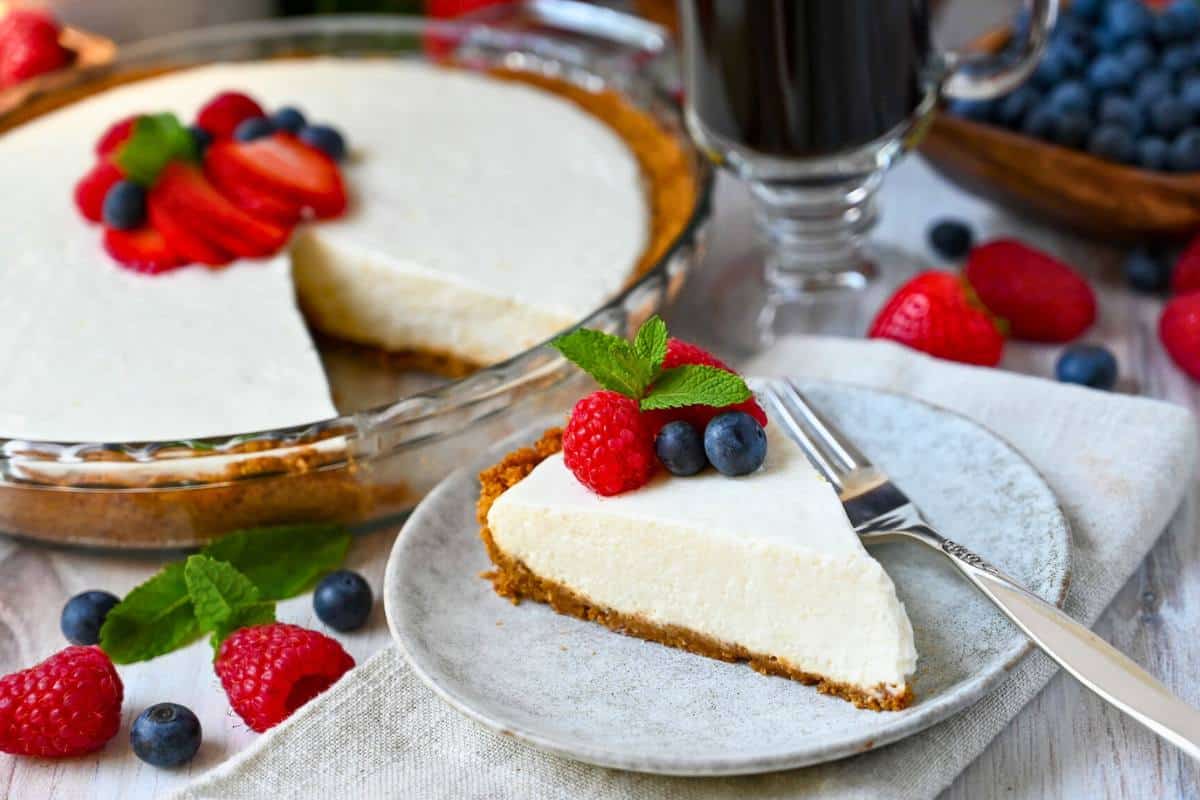
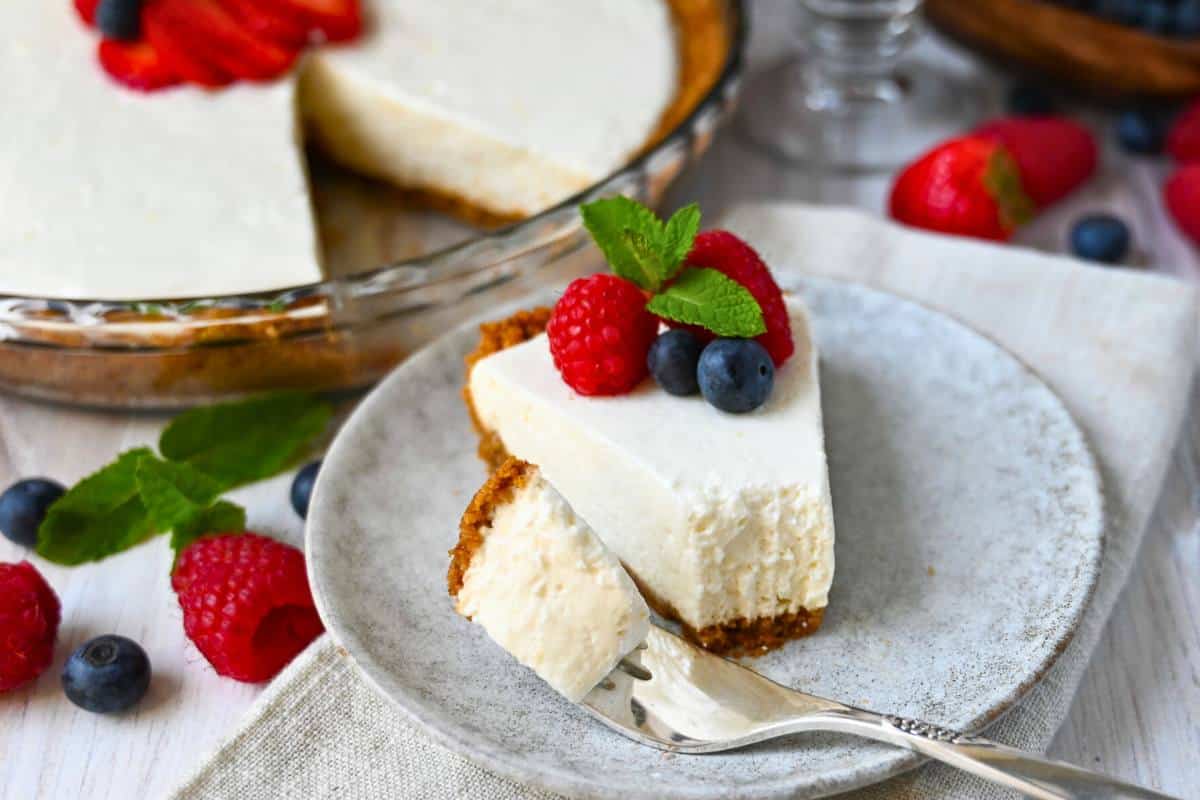
This No Bake Protein Cheesecake focuses on better-for-you ingredients yet tastes just as rich, creamy, and delicious as the real deal. The graham cracker crust is optional, but highly recommended for that classic crunch. Makes 6 small or 8 large slices, each containing 9-12 grams of protein.

Every now and then, I have an idea for a recipe that takes a few rounds of testing to get just right. This no-bake protein cheesecake is one of those recipes, but rest assured, I eventually nailed the formula to pack in extra protein without compromising the rich, creamy, and satisfying texture you expect from a really good slice of cheesecake.
Cheesecake filling is typically made with full-fat cream cheese, sugar, eggs, and sometimes heavy cream, all of which deliver richness, but not much in the way of protein. For this version, I swapped in more nutrient-dense ingredients, including low-fat cream cheese, skyr yogurt, whipped cottage cheese, and gelatin, to boost the protein and cut back a bit on the fat and sugar.
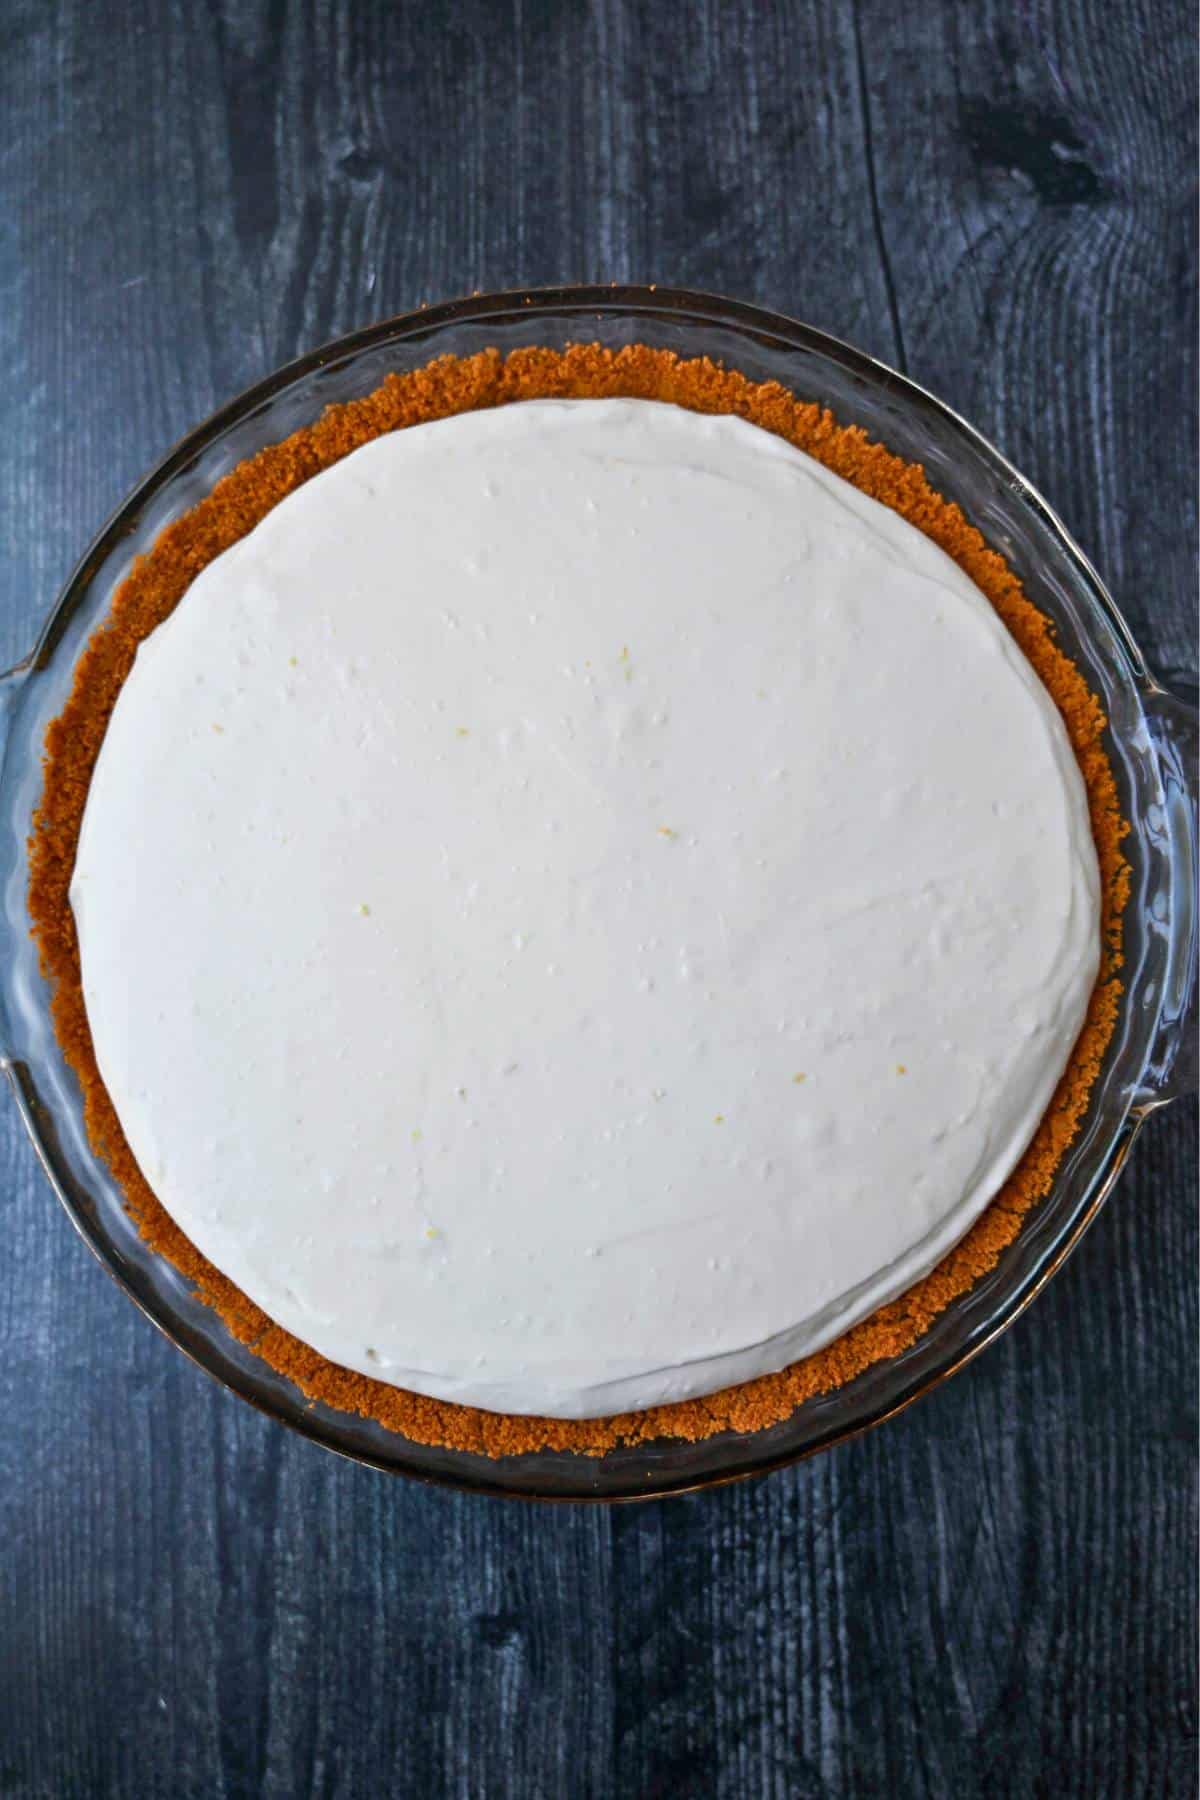
I went all-in and layered the filling into my Homemade Graham Cracker Crust, but you can easily make a lighter version with fewer carbs by skipping the crust altogether or spooning the filling into jars, ramekins, or parfait glasses for the cutest mini protein cheesecakes. They’re perfect for make-ahead desserts, meal-prepped snacks, or anytime you want a healthier, high-protein treat that still feels like dessert.
Why you’ll love it
- This no-bake cheesecake with Greek yogurt and cottage cheese is just as creamy, rich, and indulgent as classic recipes, but without the sugar crash.
- This recipe sneaks in a solid dose of protein, making it a smart choice for a satisfying snack or after-dinner dessert.
- Make-ahead friendly. With or without the graham cracker crust, the creamy filling only gets better after a night in the fridge.
Ingredients you’ll need
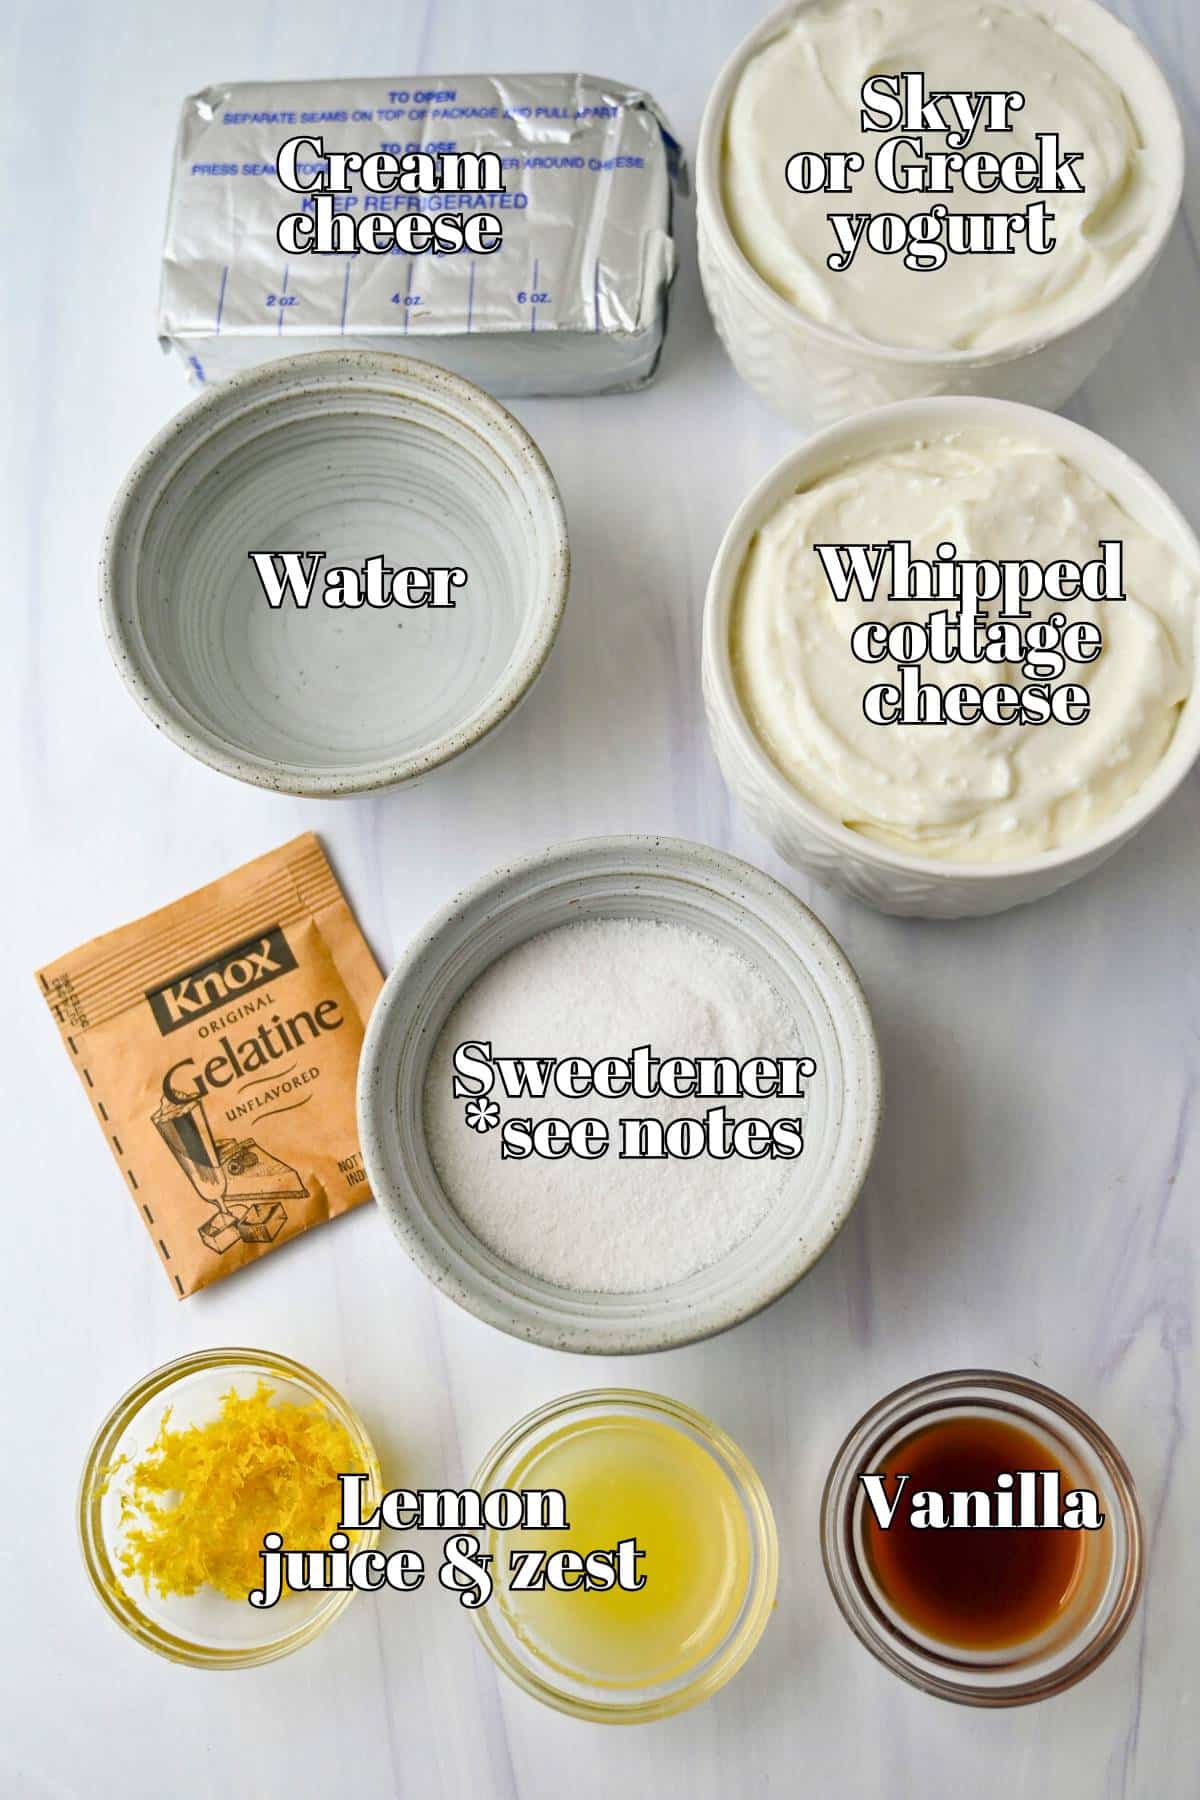
- Graham cracker crust. You only need 3 ingredients to make this Homemade Graham Cracker Crust, but a store-bought crust works too. Just make sure it’s fully cooled before adding your filling. See the ‘Variations’ section below for the crustless option.
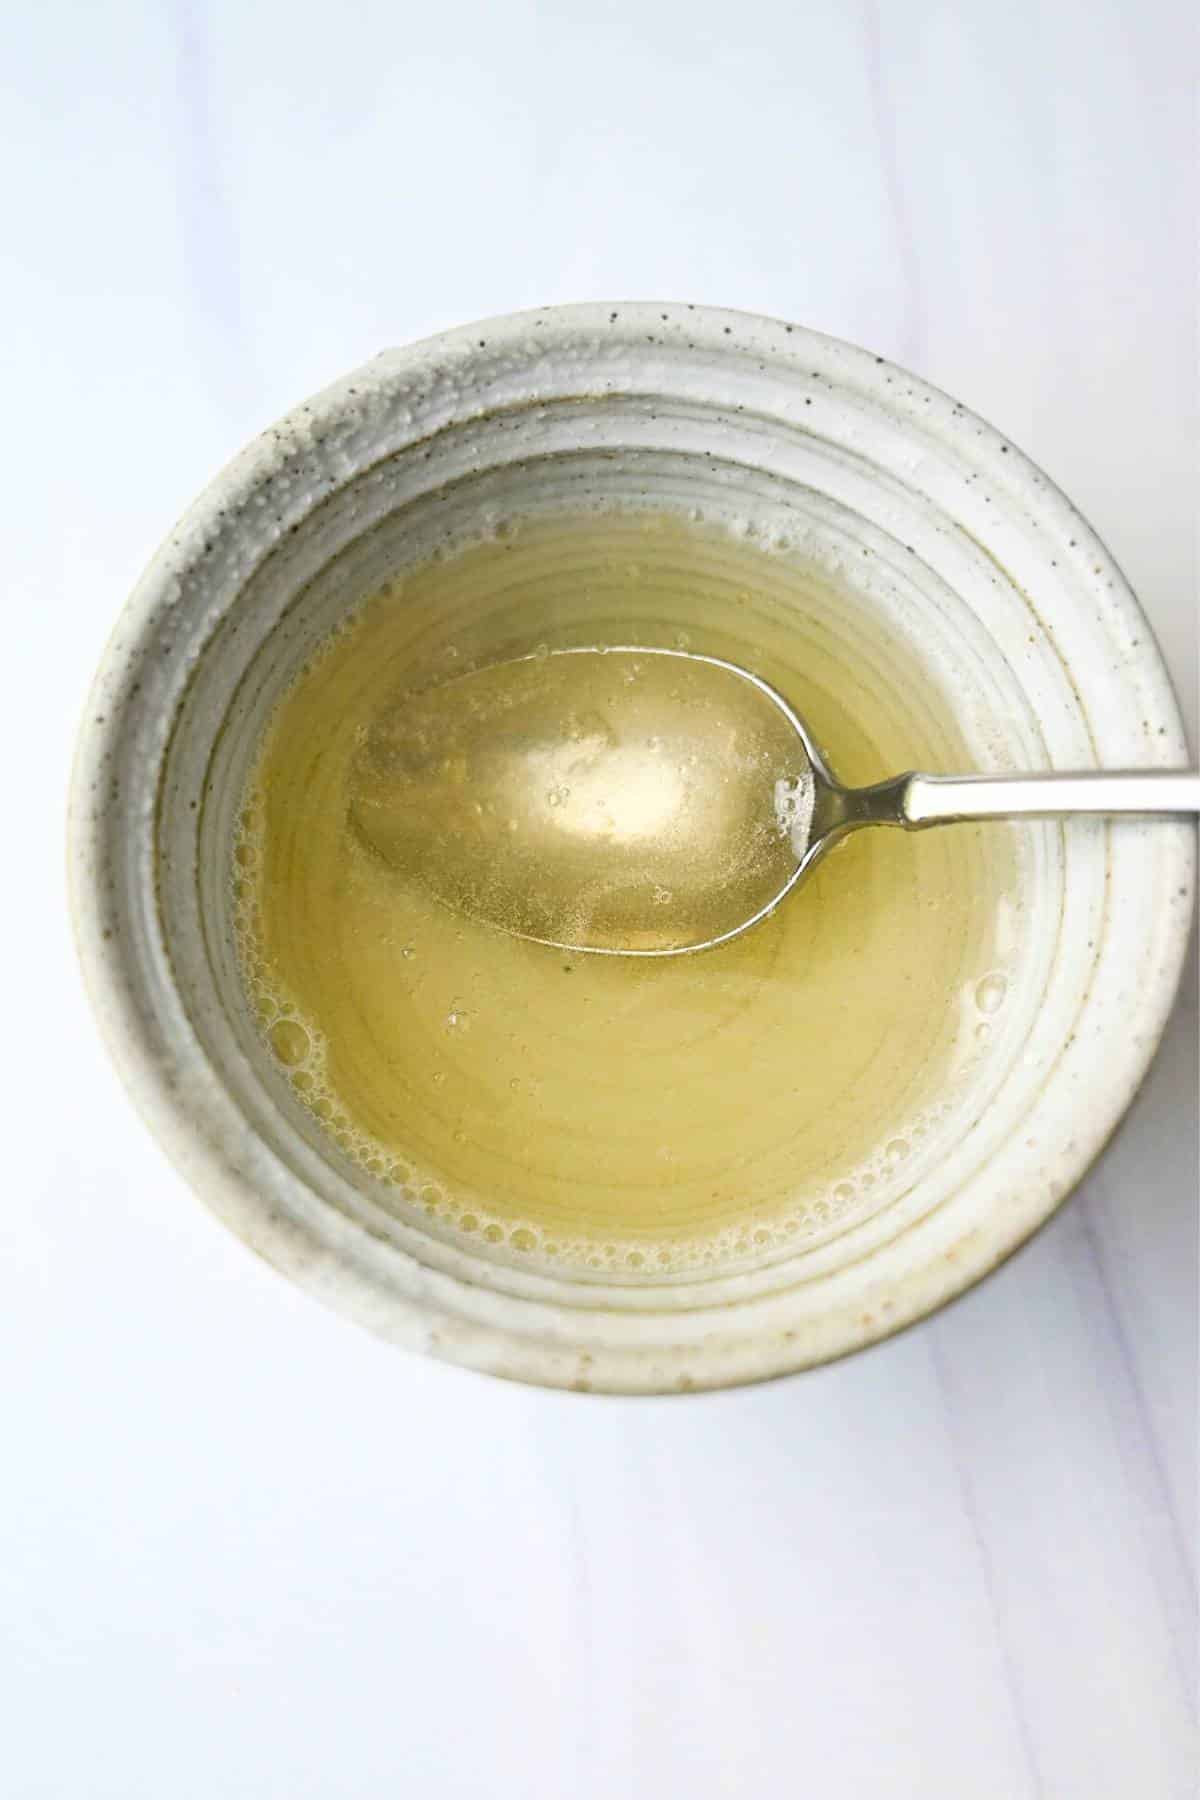
- Unflavored gelatin + water. Gelatin is what gives this cheesecake its sliceable structure without the need for baking. Blooming it in cold water, followed by a quick zap in the microwave, activates its gelling magic.
- Low-fat cream cheese. Use block-style cream cheese here, not the whipped kind. The block version is denser and more structured, which is exactly what you want in a no-bake cheesecake. Just let it fully soften at room temperature first, so it blends smoothly with the other ingredients.
- Skyr or Greek yogurt. I prefer using plain, low-fat skyr, but plain Greek yogurt works just as well. Either way, the yogurt adds extra creaminess and a subtle tang while keeping things light and packed with protein.
- Whipped cottage cheese. This adds even more protein and contributes to a lighter, more mousse-like feel. I usually just grab a tub of Good Culture and blend it right in the container with a stick blender.
- Splenda sugar blend. Splenda Sugar Blend is twice as sweet as regular sugar, so if you’re using something like cane sugar or allulose, use double the amount listed for Splenda. Maple syrup is also a great natural sweetener swap here.
- Vanilla extract. A splash of high-quality vanilla rounds everything out, adding that signature sweet, cozy flavor we all love.
- Lemon juice & zest. The acidity from the juice brightens the filling, while the zest really wakes up the citrusy flavor. It’s easiest to zest the whole lemon before squeezing it.
How to make no-bake protein cheesecake
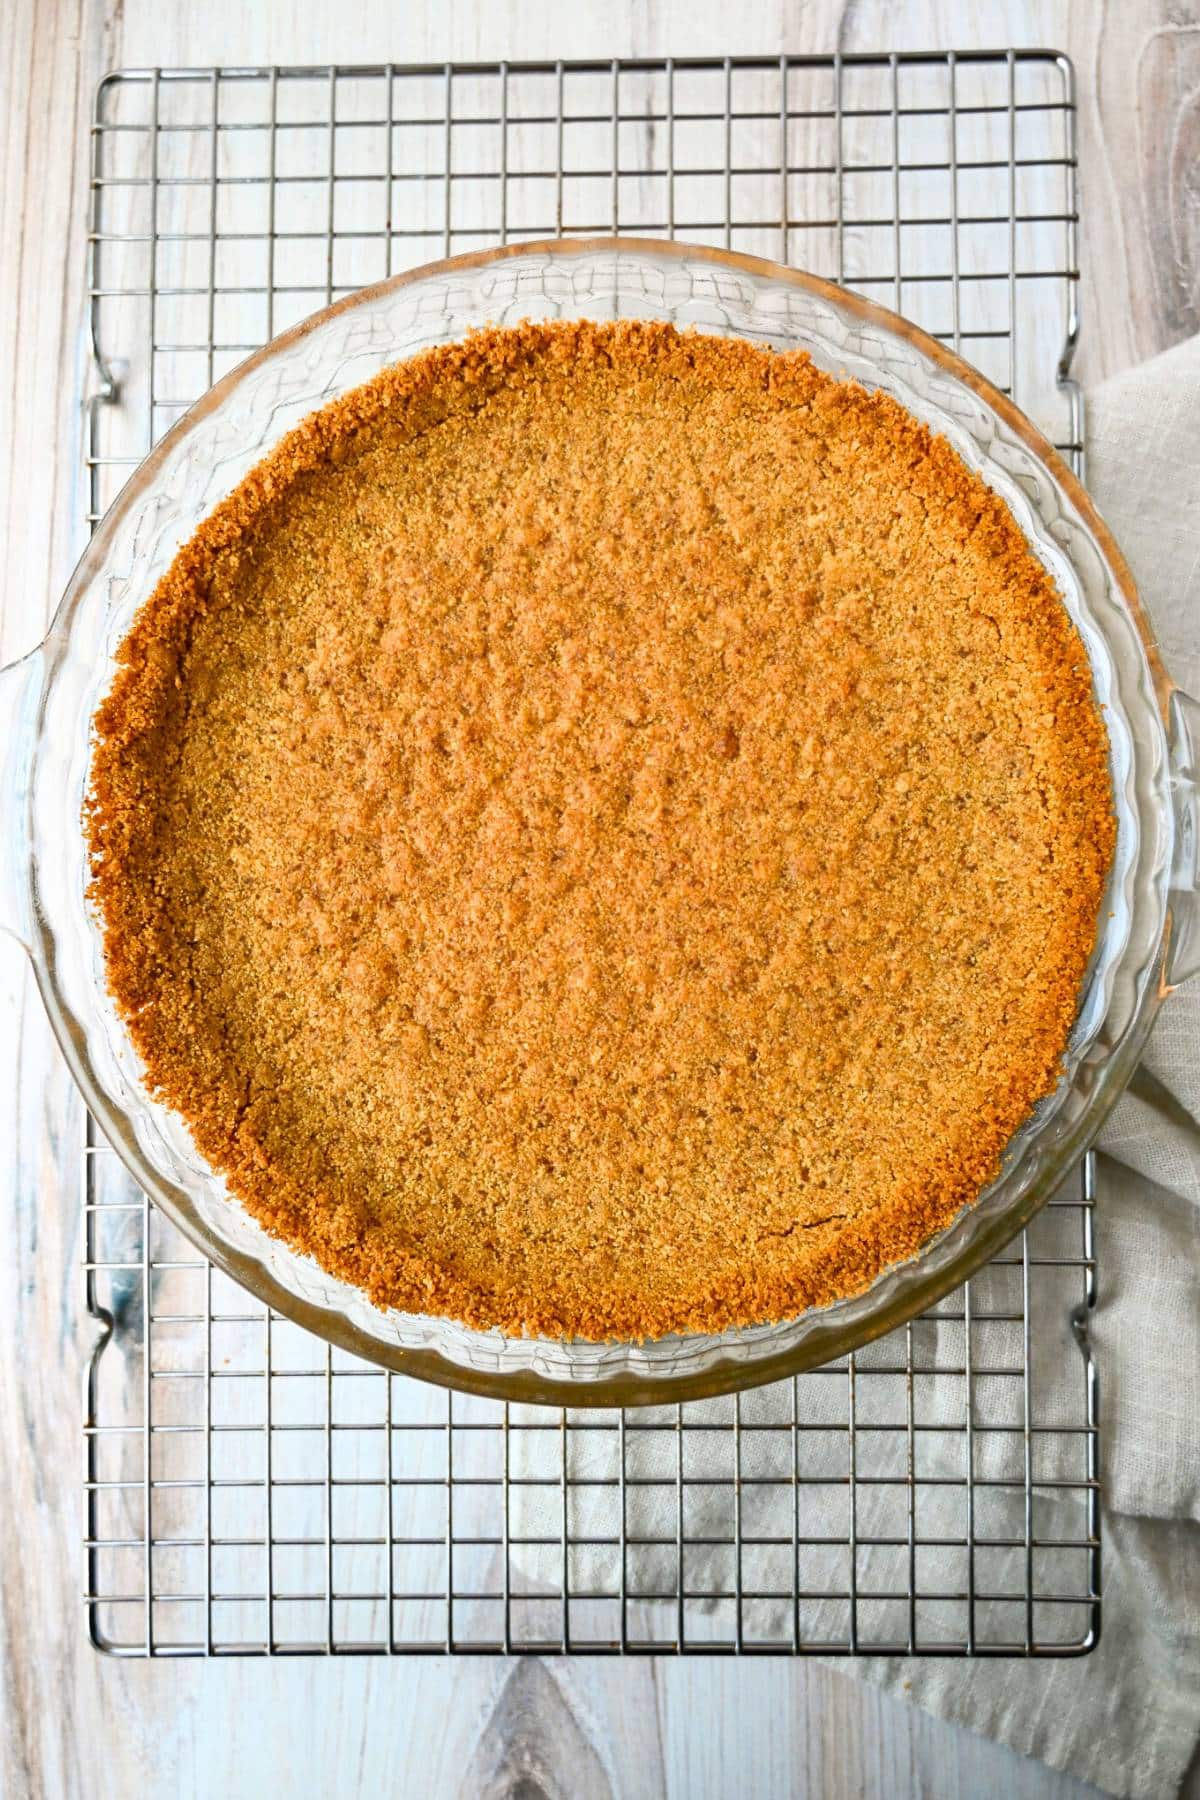
Step 1: Prepare the crust. Make your graham cracker pie crust and set it aside to cool to room temperature (or grab your favorite store-bought crust).
Step 2: Bloom the gelatin. In a small bowl, stir the gelatin into ¼ cup of cold water and let it sit for about 5 minutes. Once bloomed, warm it in the microwave for 15-20 seconds until fully dissolved. Stir it and set it aside.
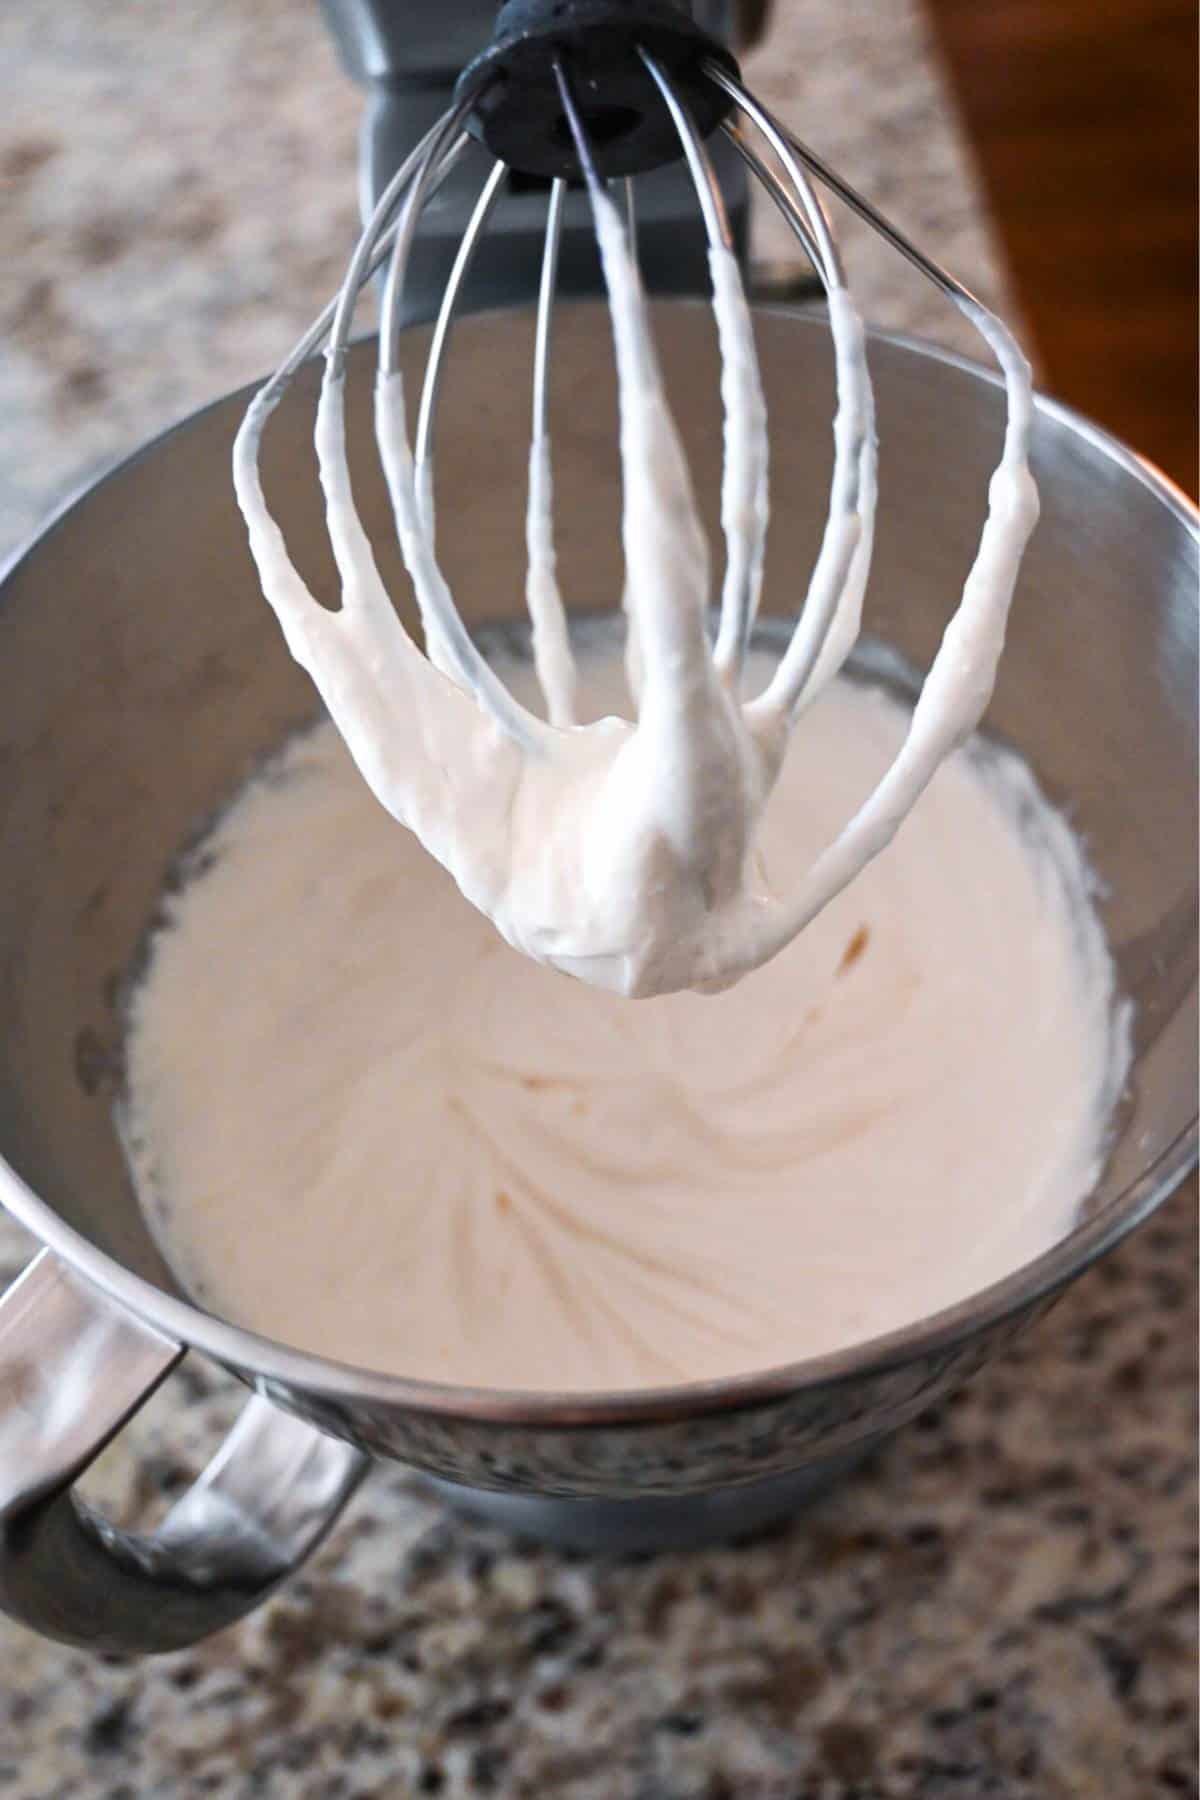
Step 3: Blend the filling. In a large bowl or food processor, beat the softened cream cheese, yogurt, whipped cottage cheese, sweetener, vanilla, lemon juice, and lemon zest until smooth and creamy. I use the whisk attachment on my stand mixer for this part.
Step 4: Incorporate the gelatin. Slowly pour in the gelatin mixture while beating until well-combined.
Step 5: Fill and chill. Pour the mixture into your prepared crust and smooth out the top with a spatula. Cover and refrigerate for at least 6 hours, preferably overnight. Once firm and fully set, it’s ready to slice and serve!
Recipe tips and FAQs
- Don’t overheat the gelatin. After blooming the gelatin in cool water, microwaving the mixture for 15-20 seconds is plenty. Just give it a good stir and minute or two to cool off (but don’t let it set!) before mixing it into the filling. If it gets too hot, it can lose some of its gelling power, causing the dairy to curdle.
- Make sure the filling is well-blended. Once the assembled cheesecake is in the fridge, it’s not getting any smoother, so take your time slowly stirring in the gelatin and then whipping it all together until the mixture is lump-free and silky smooth. You can also use a food processor instead of a stand mixer for a smooth, creamy consistency.
- Chill at least 6 hours, but overnight is even better. This gives the gelatin time to set fully and helps the flavors meld. Trust me, you’ll get much cleaner slices if it’s had the whole night to chill.
Variations
One of the best parts about this high-protein cheesecake recipe is the many ways to make it your own:
- Go crustless – If you’re looking for a more macro-friendly, low-carb take, skip the crust altogether and spread the filling directly in a 9-inch pie pan before chilling it overnight. You can also divide the filling mixture into small ramekins, parfait glasses, or cute little mason jars to make crustless mini cheesecakes (perfect for portion control!).
- Natural sweetener – If you’re avoiding Splenda or refined white sugar, you can use ⅓ cup of good-quality maple syrup or honey instead. When I tested these versions, the flavor was spot on, but the filling felt slightly softer immediately after mixing. Don’t worry –after a night in the fridge, it firmed up perfectly.
- Top it your way – Try spooning a refined sugar-free fruit compote over the top, like Wild Blueberry Lemon, Blackberry, Raspberry, or Cherry. Or splurge on a drizzle of melted dark chocolate, strawberry syrup, or caramel sauce and a dollop of whipped cream.
- Switch up the citrus – Instead of lemon, try lime (or even key lime!) for a slightly tangier, more tropical flavor. Use orange and it will taste like a creamsicle!
I haven’t tested this exact recipe with protein powder, but it should work just fine. I would start with 1 scoop of unflavored, vanilla, lemon, or even strawberry protein powder, and blend it in with the cream cheese, yogurt, and whipped cottage cheese before adding the gelatin mixture. If the filling seems a little thick, stir in an extra 1-2 tablespoons of yogurt to smooth it out.
Yes, and I recommend it! No-bake cheesecake needs at least 6 hours in the fridge to set correctly, but it’s even better after chilling overnight.
Storing and freezing
Storing: When stored tightly covered in the fridge, this protein cheesecake will keep for up to 5 days. It holds up well, and the texture improves as it sits.
Freezing: Wrap the entire cheesecake tightly in plastic wrap and foil, and store it in the freezer for up to 1 month. Thaw it in the fridge overnight before serving. Note that the texture may soften slightly.
More high-protein dessert recipes
- Vanilla Protein Donuts with Fruity Pebble Topping
- Mini Biscoff Cheesecakes
- Peanut Butter Protein Cookies
- Fudgy Protein Brownies with M&Ms
- Protein Tiramisu
- Strawberry Protein Banana Ice Cream
If you love this high-protein cheesecake recipe, I would be so grateful if you could leave a 5-star 🌟 rating in the recipe card below. I love reading your comments and feedback!
Stay posted on my latest cooking adventures through social media @ Instagram, Pinterest, and Facebook. Also, don’t forget to tag me when you try one of my recipes!
*Nutrition info below is for the cheesecake filling only (crustless version), since crust options will vary.

Easy No Bake Protein Cheesecake
Equipment
- Mixer or food processor
Ingredients
- 9" prepared graham cracker pie crust homemade or store-bought (regular or gluten-free)
- .25 oz unflavored gelatin (1 packet)
- ¼ cup water
- 8 oz block low-fat cream cheese softened to room temp
- 1 cup low-fat plain skyr or plain Greek yogurt
- 1 cup Good Culture cottage cheese whipped *I use a stick blender and blend it right in the container
- ¼ cup Splenda sugar blend or sweetener of choice *see notes
- 2 tsp good-quality vanilla extract
- 2 tsp freshly squeezed lemon juice
- 1 tsp lemon zest *I use the zest of one whole lemon
Instructions
- Prepare the graham cracker pie crust and set aside to cool to room temperature (or use your favorite store-bought crust). You can also make this as a crustless cheesecake or serve it in single-serving parfait dishes.
- Bloom the gelatin in ¼ cup of water, let sit for 5 minutes, then warm for 15-20 seconds in the microwave until dissolved. Stir and set aside.
- In a large bowl (or food processor), beat the cream cheese, skyr, whipped cottage cheese, sweetener, vanilla, lemon juice, and lemon zest until completely smooth and creamy. *I use the whisk attachment for this on my stand mixer.
- Slowly beat in the gelatin mixture until combined.
- Pour into a prepared crust, spreading the filling into an even layer, and chill for at least 6 hours, preferably overnight, until firm and set.
Notes
-
- Don’t overheat the gelatin. After blooming the gelatin in cool water, microwaving the mixture for 15-20 seconds is plenty. Just give it a good stir and minute or two to cool off (but don’t let it set!) before mixing it into the filling. If it gets too hot, it can lose some of its gelling power, causing the dairy to curdle.
- Make sure the filling is well-blended. Once the assembled cheesecake is in the fridge, it’s not getting any smoother, so take your time slowly stirring in the gelatin and then whipping it all together until the mixture is lump-free and silky smooth. You can also use a food processor instead of a stand mixer for a smooth, creamy consistency.
- Chill at least 6 hours, but overnight is even better. This gives the gelatin time to set fully and helps the flavors meld. Trust me, you’ll get much cleaner slices if it’s had the whole night to chill.
- Sweetener options. The Splenda sugar blend sweetener conversion is 1/4 cup of the Splenda blend for 1/2 cup of regular sugar. If you make a sweetener swap, you’ll need 1/2 cup of another sweetener of choice (if using a granulated sweetener, go with white sugar or a white sugar substitute). I’ve also made this recipe with 1/3 cup good-quality maple syrup with great results. It will be a softer set before chilling, but it firms up nicely as it chills overnight. Honey can be used instead of maple syrup, if preferred.
- Go crustless – If you’re looking for a more macro-friendly, low-carb take, skip the crust altogether and spread the filling directly in a 9-inch pie pan before chilling it overnight. You can also divide the filling mixture into small ramekins, parfait glasses, or cute little mason jars to make crustless mini cheesecakes. Don’t miss my Mini Biscoff Cheesecakes for another delicious variation!
Nutrition

- Toffee Brownie Tart - March 9, 2026
- High-Protein Tortilla Egg Bake - March 4, 2026
- Steak Fajita Rice Skillet - March 2, 2026
I tried this recipe today and it is delicious! We put fresh blueberries mixed with a little bit of no sugar jam on top. I did not make a crust and it was still amazing!
I’m so glad that you enjoyed it Lori!