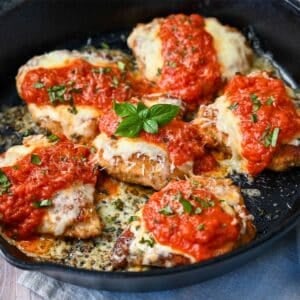
Cast Iron Skillet Chicken Parmesan
This post may contain affiliate links. Please read my disclosure policy.

Crispy, cheesy, and beautifully golden, this Cast Iron Skillet Chicken Parmesan is a fuss-free weeknight or weekend dinner. Discover step-by-step tips, expert tricks, and variations for a flavorful, healthier twist on a classic the whole family will love. Gluten-free option.

There’s nothing quite like the crispy, cheesy goodness of chicken parmesan straight from a hot cast iron skillet—am I right?! This version is quick, lightened-up, and packed with protein, making it a go-to family favorite around here!
Unlike traditional chicken parmesan that can be heavy on breadcrumbs and oil, this skillet chicken parmesan recipe keeps things light without sacrificing flavor. You still get that golden, crispy crust, along with all the comforting, cheesy deliciousness from the melty Parmesan and Fontina cheese.
Whether you make your own marinara or grab your favorite store-bought jar, this skillet dinner comes together faster than you’d expect, so grab a skillet, fire up the oven, and get ready because your new favorite easy chicken parmesan recipe starts here!
Recipe features
- Restaurant-quality. Enjoy that classic golden, crispy crust with tender, juicy chicken, all from the comfort of your own kitchen!
- Quick & easy. Ready in under an hour, this skillet chicken parm is perfect for busy weeknights or a simple weekend dinner.
- Gluten-free option. You can easily adapt this recipe while still achieving that same crispy, golden crust.
- Lightened up. With a lighter coating and plenty of cheese and chicken, it’s a protein-packed meal that doesn’t feel heavy.
Ingredients you’ll need
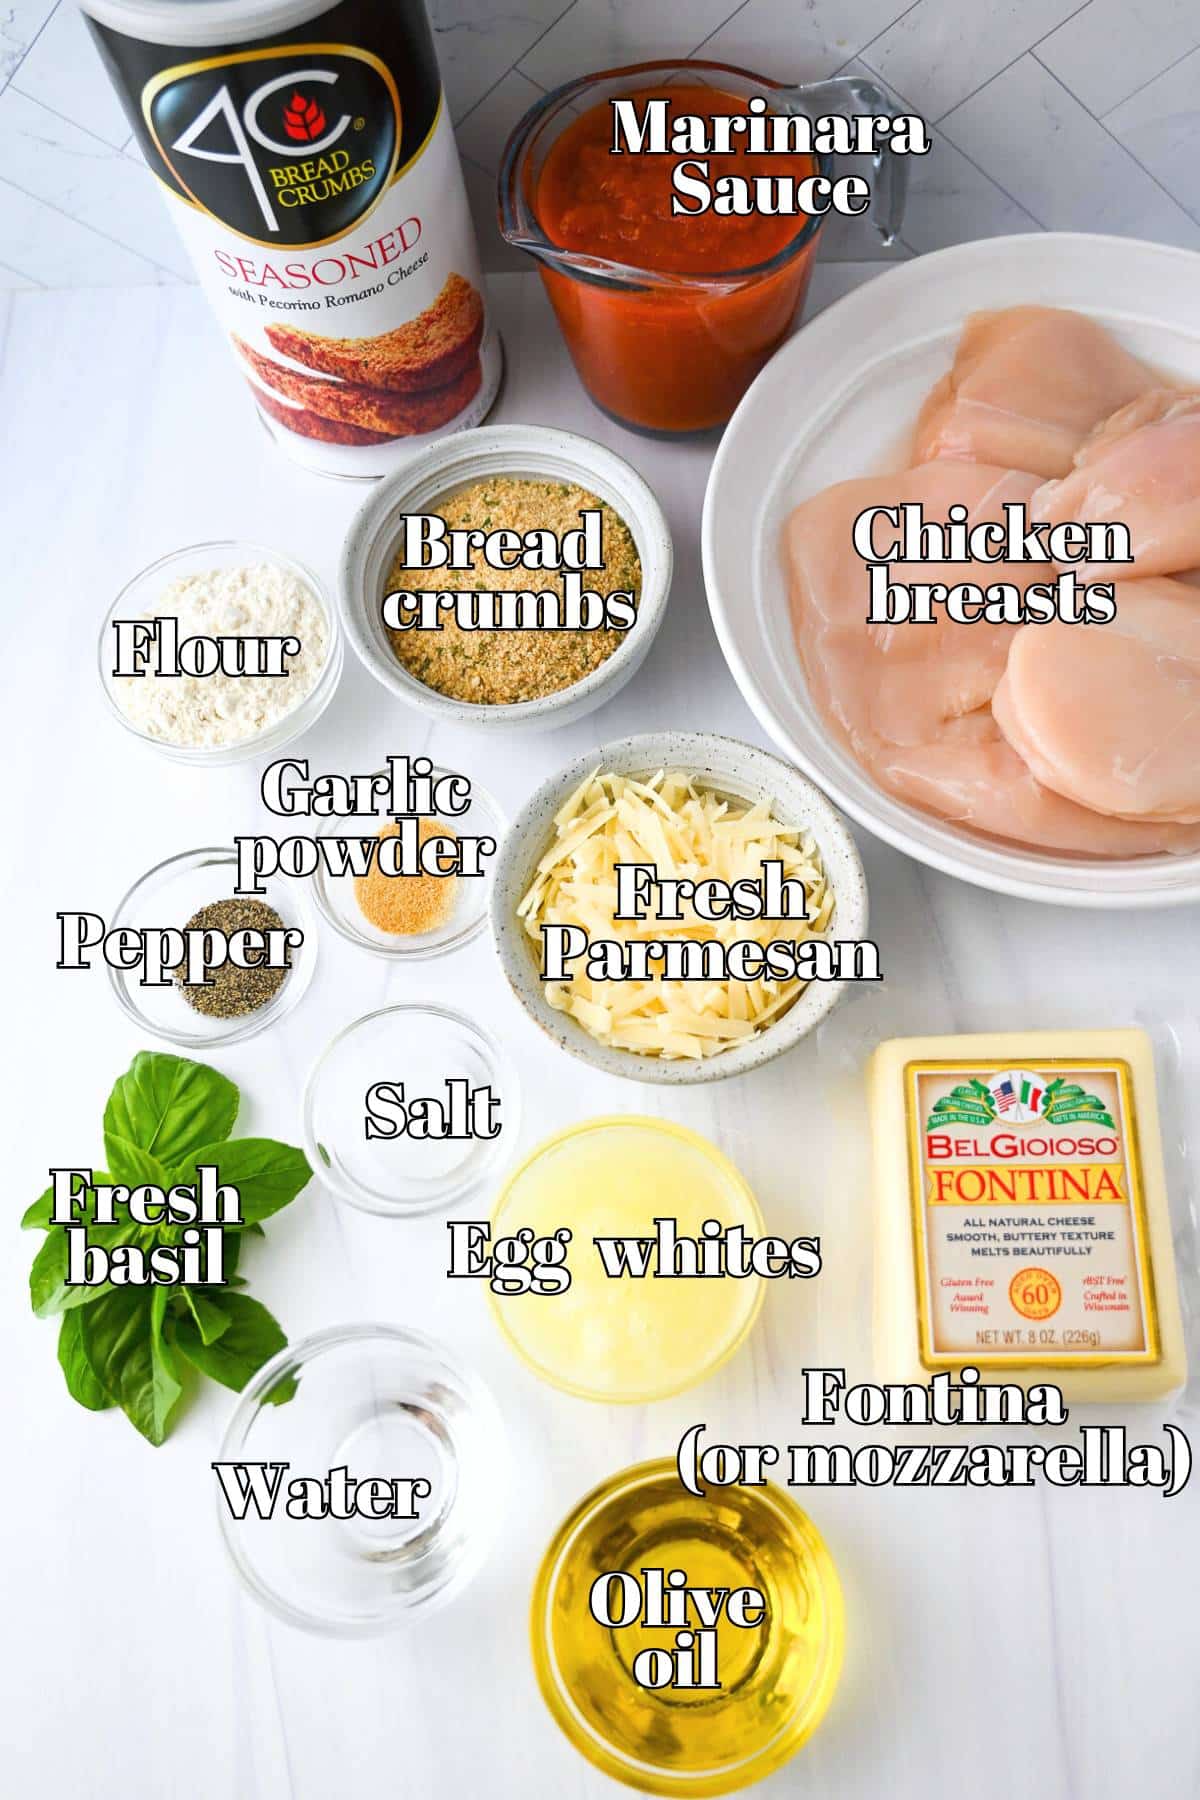
- Chicken breast. I use six 4-ounce Springer Mountain Farms boneless, skinless chicken breasts, but any good-quality chicken works. Just be sure to lightly pound each breast to an even thickness so they cook evenly and remain juicy.
- Flour. A base coating of flour helps the egg wash stick to the chicken. Use regular unbleached all-purpose flour or swap in a good 1:1 gluten-free flour blend if needed.
- Seasonings. I season the flour with garlic powder, salt, and black pepper. Feel free to add a pinch of Italian seasoning or smoked paprika for more depth.
- Eggs + water. The egg wash helps the breadcrumbs stick to the chicken. I use liquid egg whites, but whole eggs work too—just whisk with 2 tablespoons of water to make them easier to coat evenly.
- Seasoned breadcrumbs. I love Pecorino Romano cheese-seasoned breadcrumbs for that classic, crisp chicken parmesan coating. Feel free to make your own by pulsing plain breadcrumbs with Italian seasoning and a bit of Parmesan. Panko is also great here for a crispier crust.
- Olive oil + olive oil cooking spray. Olive oil is ideal for searing in a cast-iron skillet, while the cooking spray is useful for lightly misting the tops of the chicken before flipping to encourage even browning.
- Cheeses. Finely shredded Parmesan adds a salty, nutty flavor, while Fontina (or Mozzarella) melts beautifully on top. Remember, pre-shredded cheese is often coated with anti-caking agents. Freshly grated will melt creamier and give you that irresistible cheese pull.
- Marinara sauce. I love using my Hearty Marinara Sauce in this recipe. However, store-bought options, such as Carbone’s, Rao’s, or Botticelli, all taste homemade and aren’t too sweet. I love these options when I don’t have time to whip up sauce from scratch.
- Basil. This final sprinkle of fresh herbs ties everything together with a pop of color and freshness. If you don’t have basil on hand, chopped parsley can also work as a garnish.
How to make chicken parmesan in a cast-iron skillet
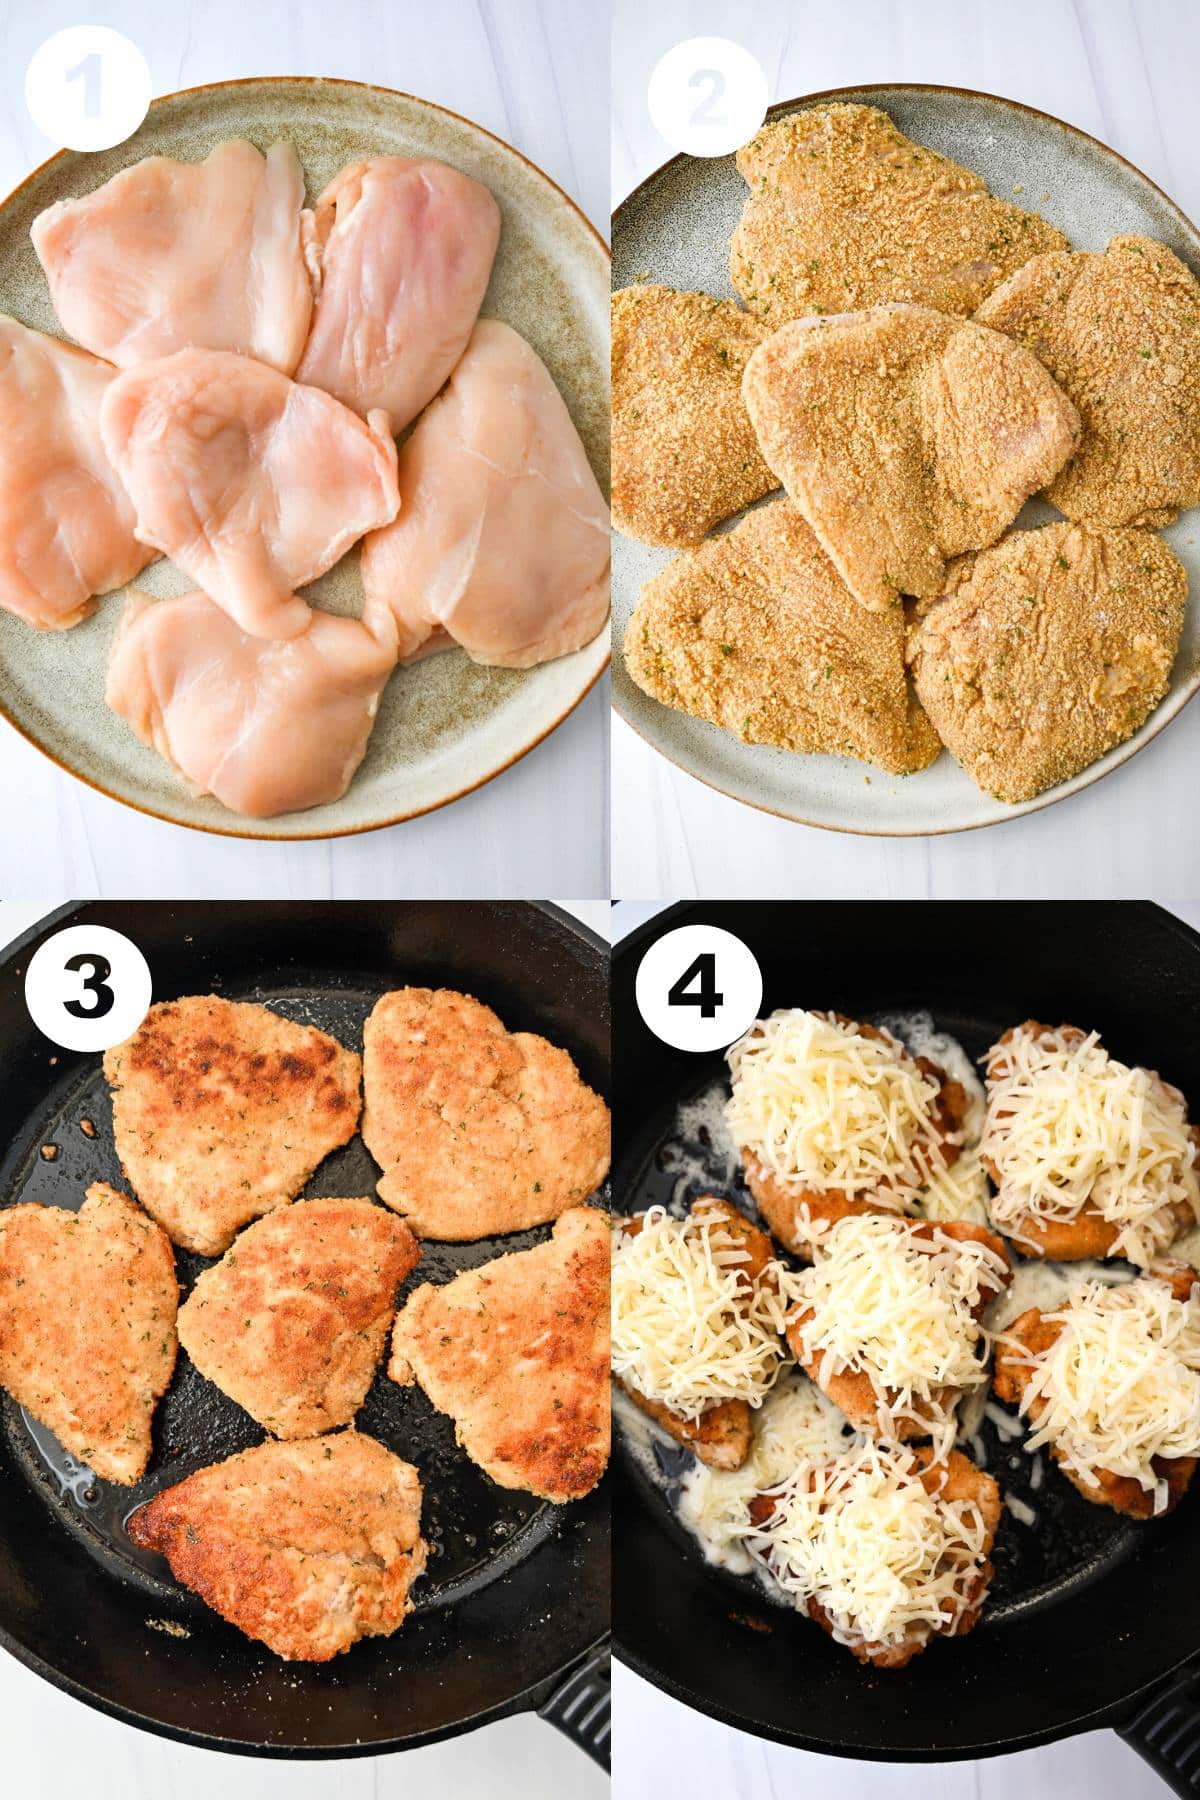
Step 1: Prepare. Set your oven to 350°F. Meanwhile, mix the flour, garlic powder, salt, and black pepper in a shallow dish. In a second shallow dish, whisk the egg whites (or whole eggs) with 2 tablespoons of water. Pour the seasoned breadcrumbs into a third shallow dish.
Step 2: Dredge. Coat each chicken breast in the flour mixture, gently shaking off any excess. Next, dip it into the egg wash, letting any excess drip off, then press it into the breadcrumbs so it’s evenly coated on all sides, shaking off any loose crumbs. Repeat with all breasts.
Step 3: Sear. Heat olive oil in a large, well-seasoned cast-iron skillet over medium heat until shimmering. Then, lay the breaded chicken breasts in the skillet in a single layer and cook for 3-4 minutes per side, until lightly golden brown. I like to spray the tops with a little olive oil spray before flipping for even browning.
Step 4: Bake. Transfer the skillet straight to the oven (careful—the handle will be hot!), and bake for 20 minutes. While the chicken bakes, heat the marinara sauce in a small saucepan over low to medium heat.
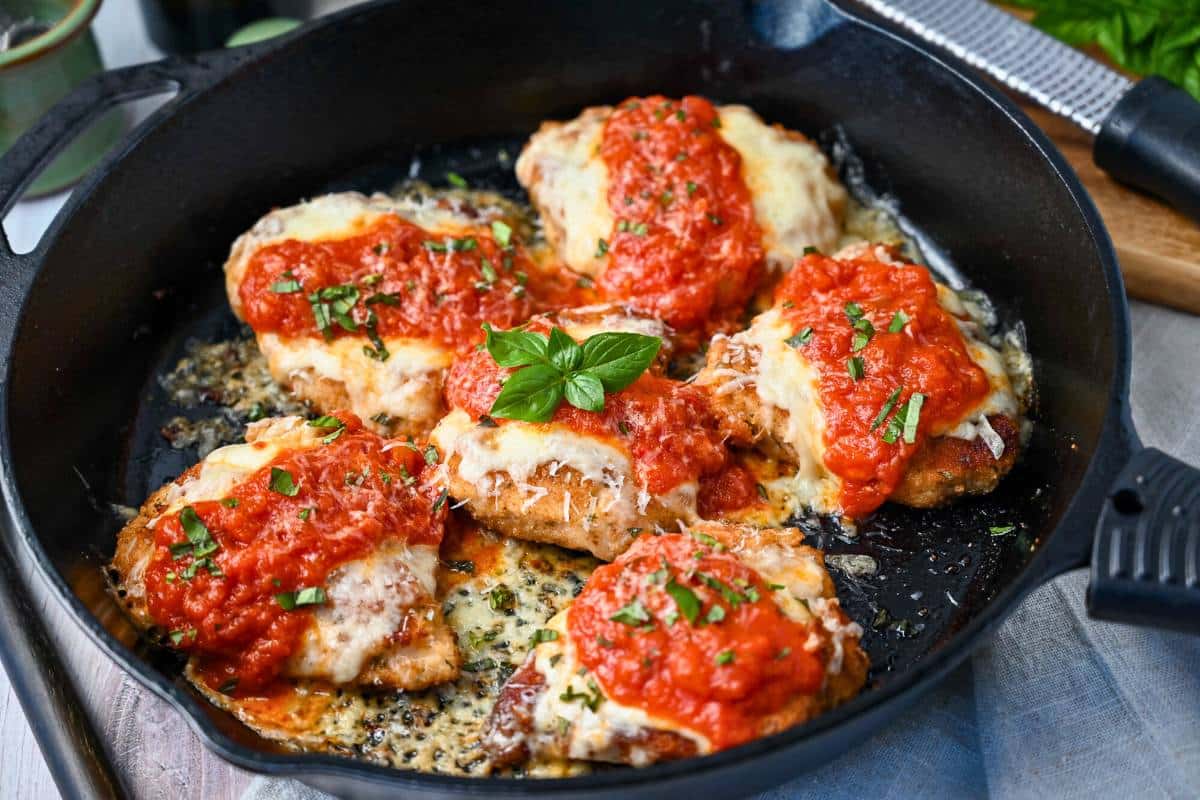
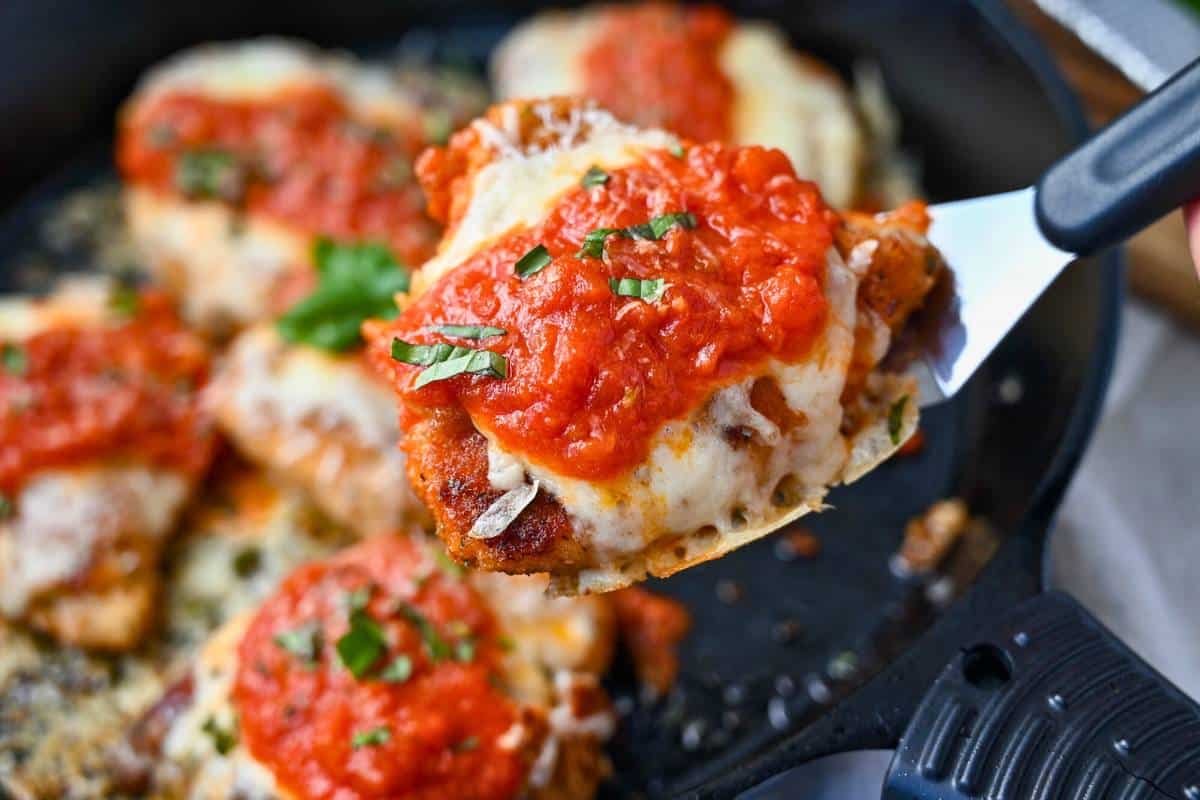
Step 5: Top. Remove the skillet from the oven and top each chicken breast with shredded Parmesan and Fontina cheese. Return the dish to the oven and bake for an additional 10 minutes, or until the cheese is melted, bubbly, and beginning to brown.
Step 6: Finish. Spoon about 2 tablespoons of marinara over each breast and sprinkle with fresh chopped basil. Serve extra sauce on the side for anyone who wants more. Enjoy!
Recipe tips and FAQs
- Pound the chicken evenly. Use a meat mallet or rolling pin to gently pound just the thicker ends of each chicken breast so they’re roughly the same thickness. This helps them cook evenly—no dry, overcooked edges while waiting for the thickest part to finish.
- Keep the breading from falling off. The key is to shake off excess flour, let extra egg wash drip off, and press the breadcrumbs firmly onto the chicken. Also, handle the coated chicken gently and don’t flip too early—let it sear until golden before turning.
- Sear to golden, crispy perfection: Make sure the oil is shimmering (not smoking) before adding the chicken in a single layer with space between each piece. If needed, work in batches. Use tongs or a thin spatula to flip gently, keeping the breading intact. Spritzing the tops with olive oil spray before flipping helps them brown more evenly.
- Know when the chicken is done. Chicken breasts are perfectly cooked when the internal temperature reaches 165°F. If you have one, use an instant-read thermometer to check the thickest part. If you don’t, cut into one breast to ensure the juices run clear and there’s no pink.
Variations
- Gluten-free – With a 1:1 gluten-free flour blend for dredging and gluten-free seasoned breadcrumbs, the crust will still turn out crispy and golden.
- Dairy-free – Use your favorite dairy-free Parmesan-style cheese (or nutritional yeast) and a good melty vegan cheese for the topping. Everything else stays the same.
- Low-carb – Swap the flour for almond flour and the breadcrumbs for a mixture of ground pork rinds and grated Parmesan cheese for a satisfying keto-friendly crust.
Yes. You can bread the chicken ahead of time, then refrigerate it in a covered container for up to 24 hours. When ready to serve, sear, bake, top, and finish as directed.
Definitely! Any large oven-safe skillet will work, or you can sear the chicken in a regular skillet and transfer it to a baking dish for the oven step.
Serving suggestions
If you want to go classic, you can’t go wrong pairing cast-iron chicken parmesan with spaghetti, garlic bread, and a crisp green salad. Want a nutritional boost? High-fiber or protein-enriched pasta, such as Barilla Plus, is a great choice—my family loves it, and you’d never even notice the difference.
If you’re looking for lighter or low-carb options, there are plenty of delicious alternatives:
- Palmini hearts of palm linguine: Just drain, warm, and serve!
- Zucchini noodles: Sautéed zucchini noodles make a fresh, low-carb swap for pasta. Check out my Zucchini Spaghetti with Beef Bolognese post for my method.
- Spaghetti squash: Another tasty low-carb noodle substitute that pairs perfectly.
- Cauliflower rice: A light, low-carb option that soaks up sauce beautifully.
Storing and freezing
Storing: Let any leftover chicken parm cool completely, then transfer it to an airtight container and store it in the refrigerator for 3-4 days. The best way to reheat is in a 350°F oven or air fryer until heated through and the crust re-crisps.
Freezing: To freeze, let the chicken cool completely, then wrap each breast individually in plastic wrap or foil and place in a freezer-safe bag or container. Freeze for up to 2 months. When ready to eat, reheat in a 375°F oven for 20-25 minutes until the cheese is bubbly.
More skillet chicken recipes
- Skillet Orange Cranberry Chicken
- Easy Skillet Tarragon Chicken
- Pesto Chicken Skillet
- Creamy Tomato Chicken Skillet
- Easy Skillet Salsa Chicken
If you love this Cast Iron Skillet Chicken Parmesan recipe, I would be so grateful if you could leave a 5-star 🌟 rating in the recipe card below. I love reading your comments and feedback!
Stay posted on my latest cooking adventures through social media @ Instagram, Pinterest, and Facebook. Also, don’t forget to tag me when you try one of my recipes!
Cast Iron Skillet Chicken Parmesan
Equipment
- Large Cast-Iron Skillet well-seasoned
Ingredients
- 24 oz boneless skinless chicken breasts *I use six 4-ounce breasts, lightly pounded to an even thickness
- ¼ cup all-purpose flour , regular or GF
- ¼ tsp garlic powder
- ½ tsp salt
- ½ tsp black pepper
- ¼ cup liquid egg whites *or 2 large eggs, beaten
- 2 tbsp water
- ½ cup seasoned breadcrumbs *I used the Pecorino Romano cheese seasoned breadcrumbs (panko is also great here for a crispier crust)- regular or GF
- 3 tbsp olive oil + olive oil cooking spray
- ½ cup finely shredded parmesan cheese
- 1 cup fontina cheese , freshly grated (or mozzarella)
- 1 cup prepared marinara sauce , or more if serving over pasta
- freshly chopped basil for topping
Instructions
- Preheat the oven to 350 degrees F.
- In a shallow dish, mix the flour, garlic powder, salt, and pepper.
- In a second shallow dish, whisk together the egg whites (or whole eggs) with 2 tbsp water.
- Pour the seasoned breadcrumbs into a 3rd shallow dish.
- Dredge the chicken in the flour mixture, shaking off any excess, then dip it into the egg mixture, and finally into the breadcrumbs. Shake off any excess breading, but ensure the breasts are well coated. Repeat with all the breasts.
- Heat the oil in a large, seasoned cast-iron skillet over medium heat.
- Sauté the chicken breasts until lightly golden on each side, about 3-4 minutes (1 ½- 2 minutes per side). Spray the breasts with a little extra olive oil spray, if needed, when flipping.
- Transfer the skillet to the oven and bake for 20 minutes.
- While the chicken is baking, warm the marinara in a saucepan over low-medium heat.
- Top the chicken with the shredded parmesan and fontina and bake for 10 minutes more, until the cheese is melted and bubbly.
- Drizzle each breast with 2 tbsp marinara and top with chopped fresh basil. Serve any extra sauce on the side.
Notes
- Pound the chicken evenly. Use a meat mallet or rolling pin to gently pound just the thicker ends of each chicken breast so they’re roughly the same thickness. This helps them cook evenly—no dry, overcooked edges while waiting for the thickest part to finish.
- Keep the breading from falling off. The key is to shake off excess flour, let extra egg wash drip off, and press the breadcrumbs firmly onto the chicken. Also, handle the coated chicken gently and don’t flip too early—let it sear until golden before turning.
- Sear to golden, crispy perfection: Make sure the oil is shimmering (not smoking) before adding the chicken in a single layer with space between each piece. If needed, work in batches. Use tongs or a thin spatula to flip gently, keeping the breading intact. Spritzing the tops with olive oil spray before flipping helps them brown more evenly.
- Know when the chicken is done. Chicken breasts are perfectly cooked when the internal temperature reaches 165°F. If you have one, use an instant-read thermometer to check the thickest part. If you don’t, cut into one breast to ensure the juices run clear and there’s no pink.
Nutrition

- Crispy Steak and Egg Breakfast Burritos - June 14, 2026
- Toasted Reuben Wrap Sandwich - May 20, 2026
- Low-Carb Spicy Tuna Bowl with Canned Tuna (High Protein) - May 17, 2026
I love this healthier version.
thanks, Liz:)
Very very AWESOME 🙂
Thanks, Angie:) We love just about anything Italian in this house!