Adorable Carnival Clown Cupcakes
This post may contain affiliate links. Please read my disclosure policy.

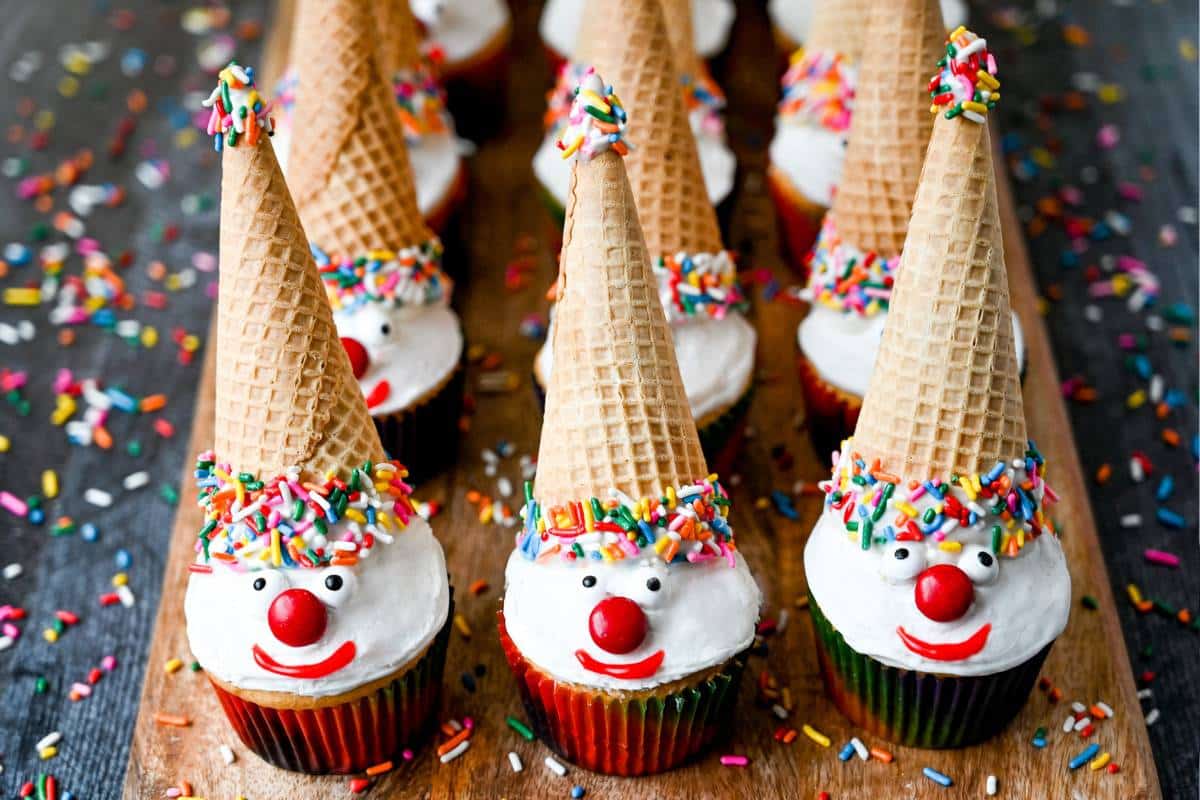
A simple recipe for making carnival clown cupcakes using ice cream cones, M&M’s, colored frosting, candy melts, and sprinkles. Carnival Clown Cupcakes are a fun and easy cupcake recipe project for kids to make and eat! Transform ordinary cupcakes into playful edible works of art! *I’ve recently updated this post to include a new simple method to make these fun treats. 😃
Who doesn’t love a touch of whimsy in their dessert? Enter the delightful world of clown cupcakes topped with sugar ice cream cone hats dipped in white candy melts and adorned with colorful sprinkles! These adorable treats are not only fun to make but are sure to bring smiles to faces of all ages. Join us as we step into the carnival of creativity and learn how to whip up these playful confections.
I originally baked these Carnival Clown Cupcakes as a treat for my daughter’s spelling carnival at school after seeing them featured in Taste of Home magazine. They were easy to make, just a little time-consuming to paint the cones, so I came up with an alternative method to decorate the cones that will allow you to prep them in advance. Here’s the original version made with ice cream cones “painted” with colored frosting.
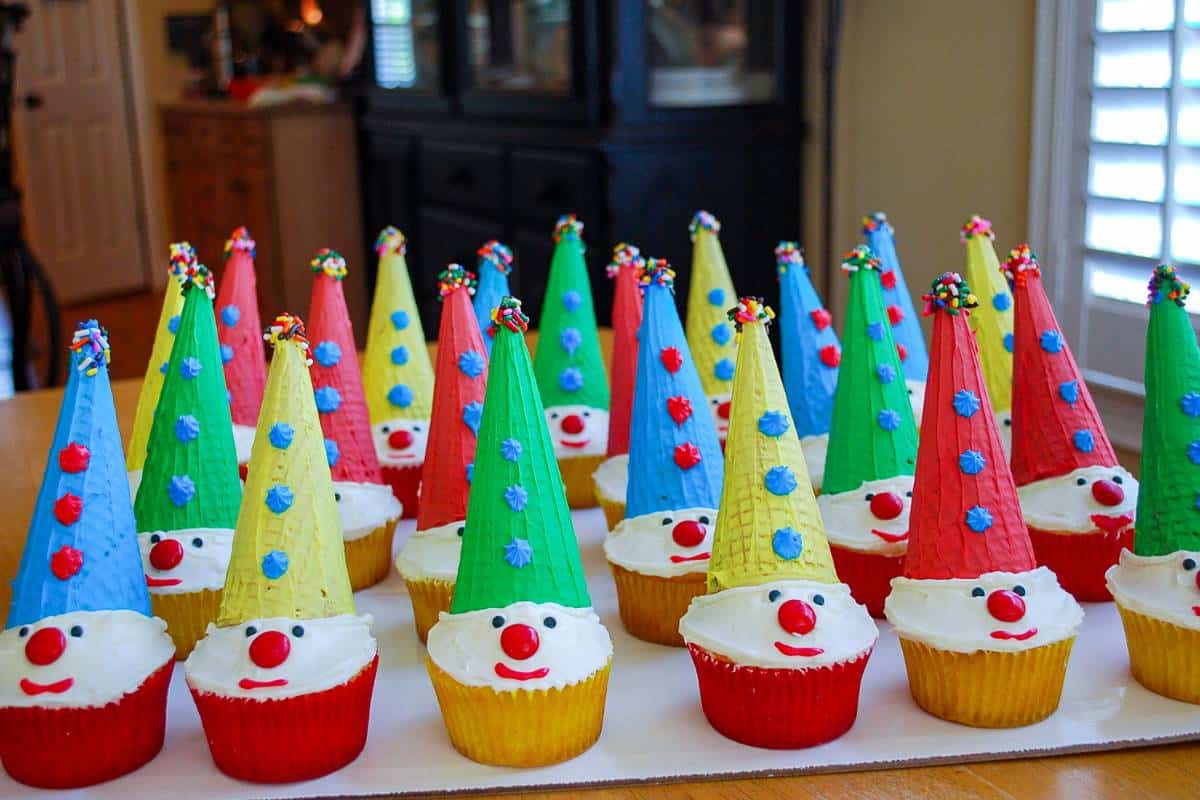
These cupcakes were fun to make and my kids loved “painting” the sugar ice cream cones with colored frosting, but the icing will begin to crack if you make them too far in advance, these are best prepared close to the time you want to serve them. This would be a great DIY food craft for kids to make for a carnival-themed birthday party. You could set up stations for them to make their own treats. I’m including the original process in the post, so you can pick your preferred method. We love food crafts in our house. These Oreo Turkey Cookie Pops are always a hit at Thanksgiving!
Clown Cupcakes with Sugar Ice Cream Cone Hats (Original Method)
*Inspired by Taste of Home magazine
Ingredients you’ll need
- 24 cupcakes (your favorite flavor and favorite recipe)
- 3 cans vanilla frosting (or a double batch of homemade vanilla buttercream)
- Yellow, blue, red, and green food coloring gel or liquid (There are natural food dyes available. India Tree is a brand that I have found @ Whole Foods)
- M&M candies (I just used the red ones)
- small candy eyes
- baking cups (I used red and yellow)
- container ice cream sprinkles
Method
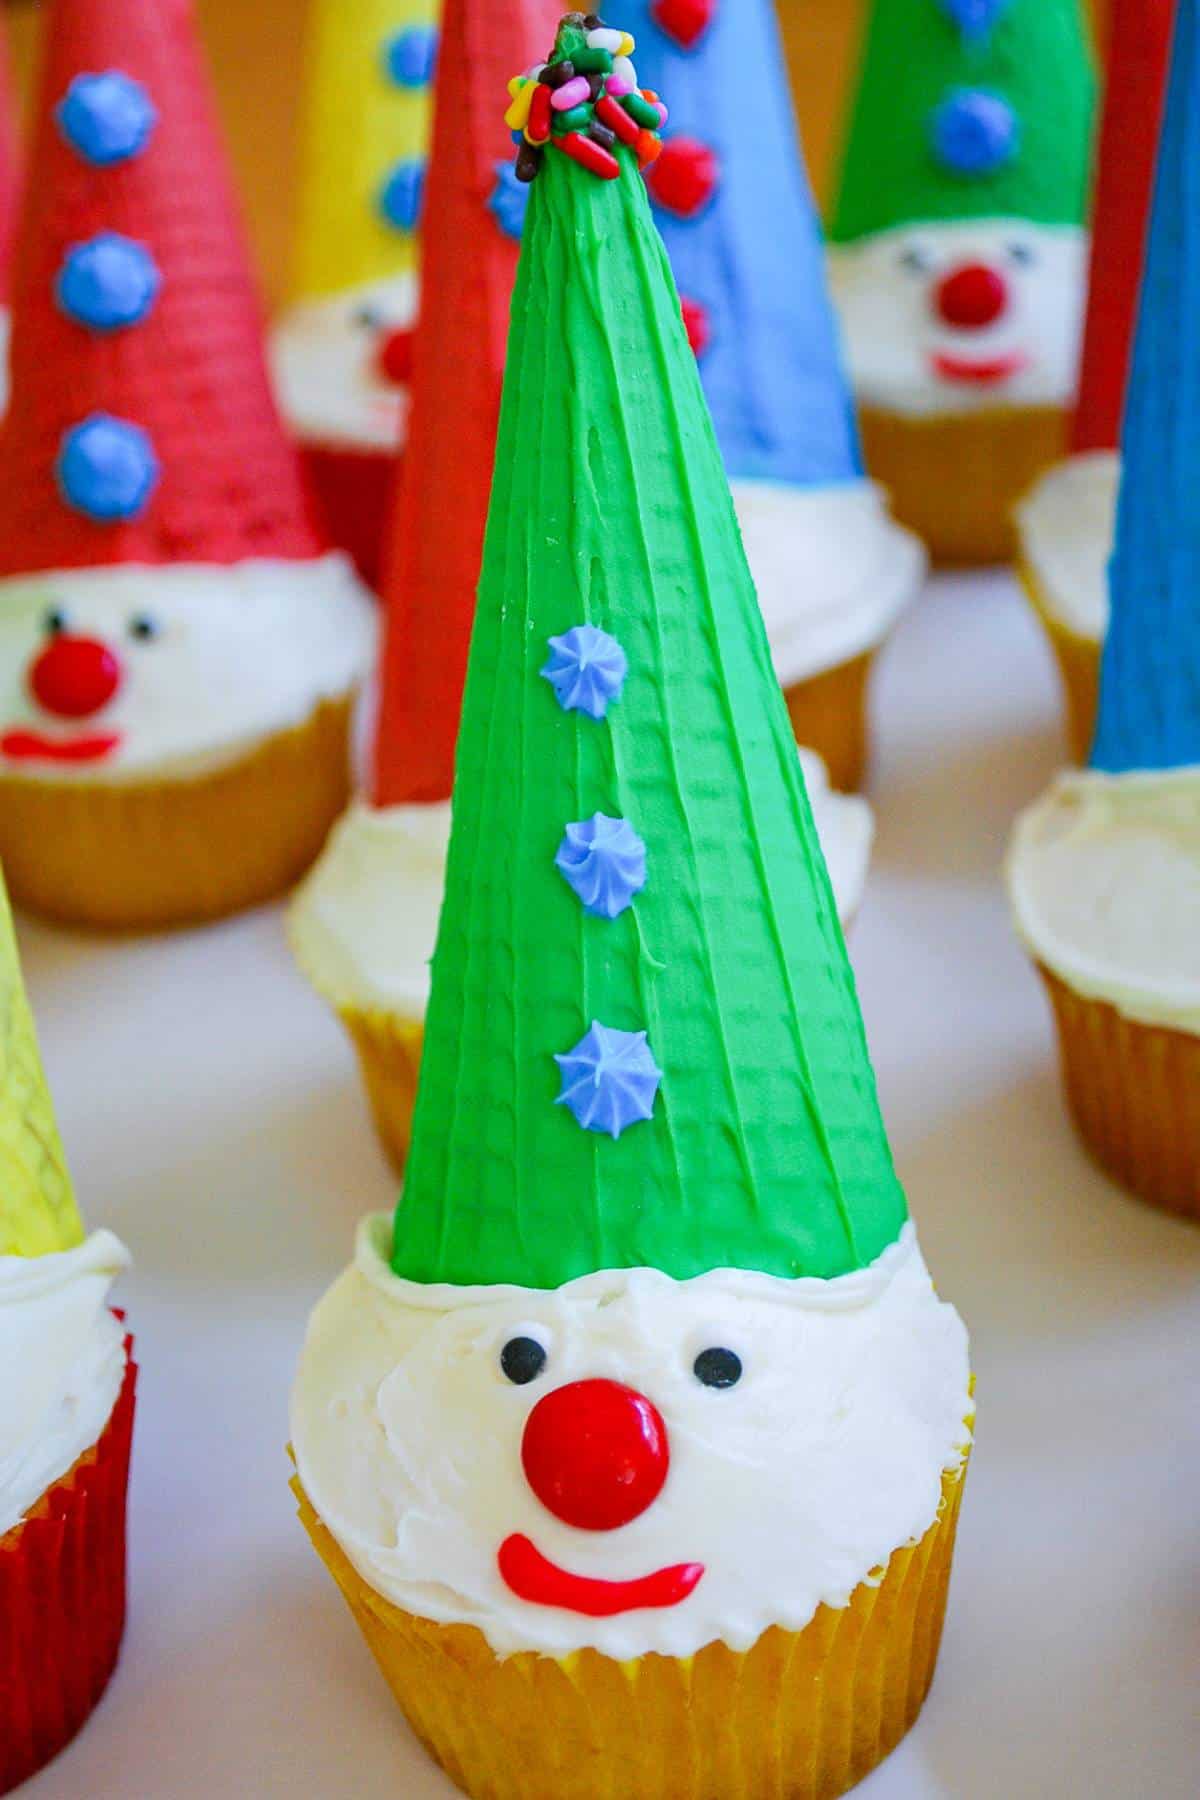
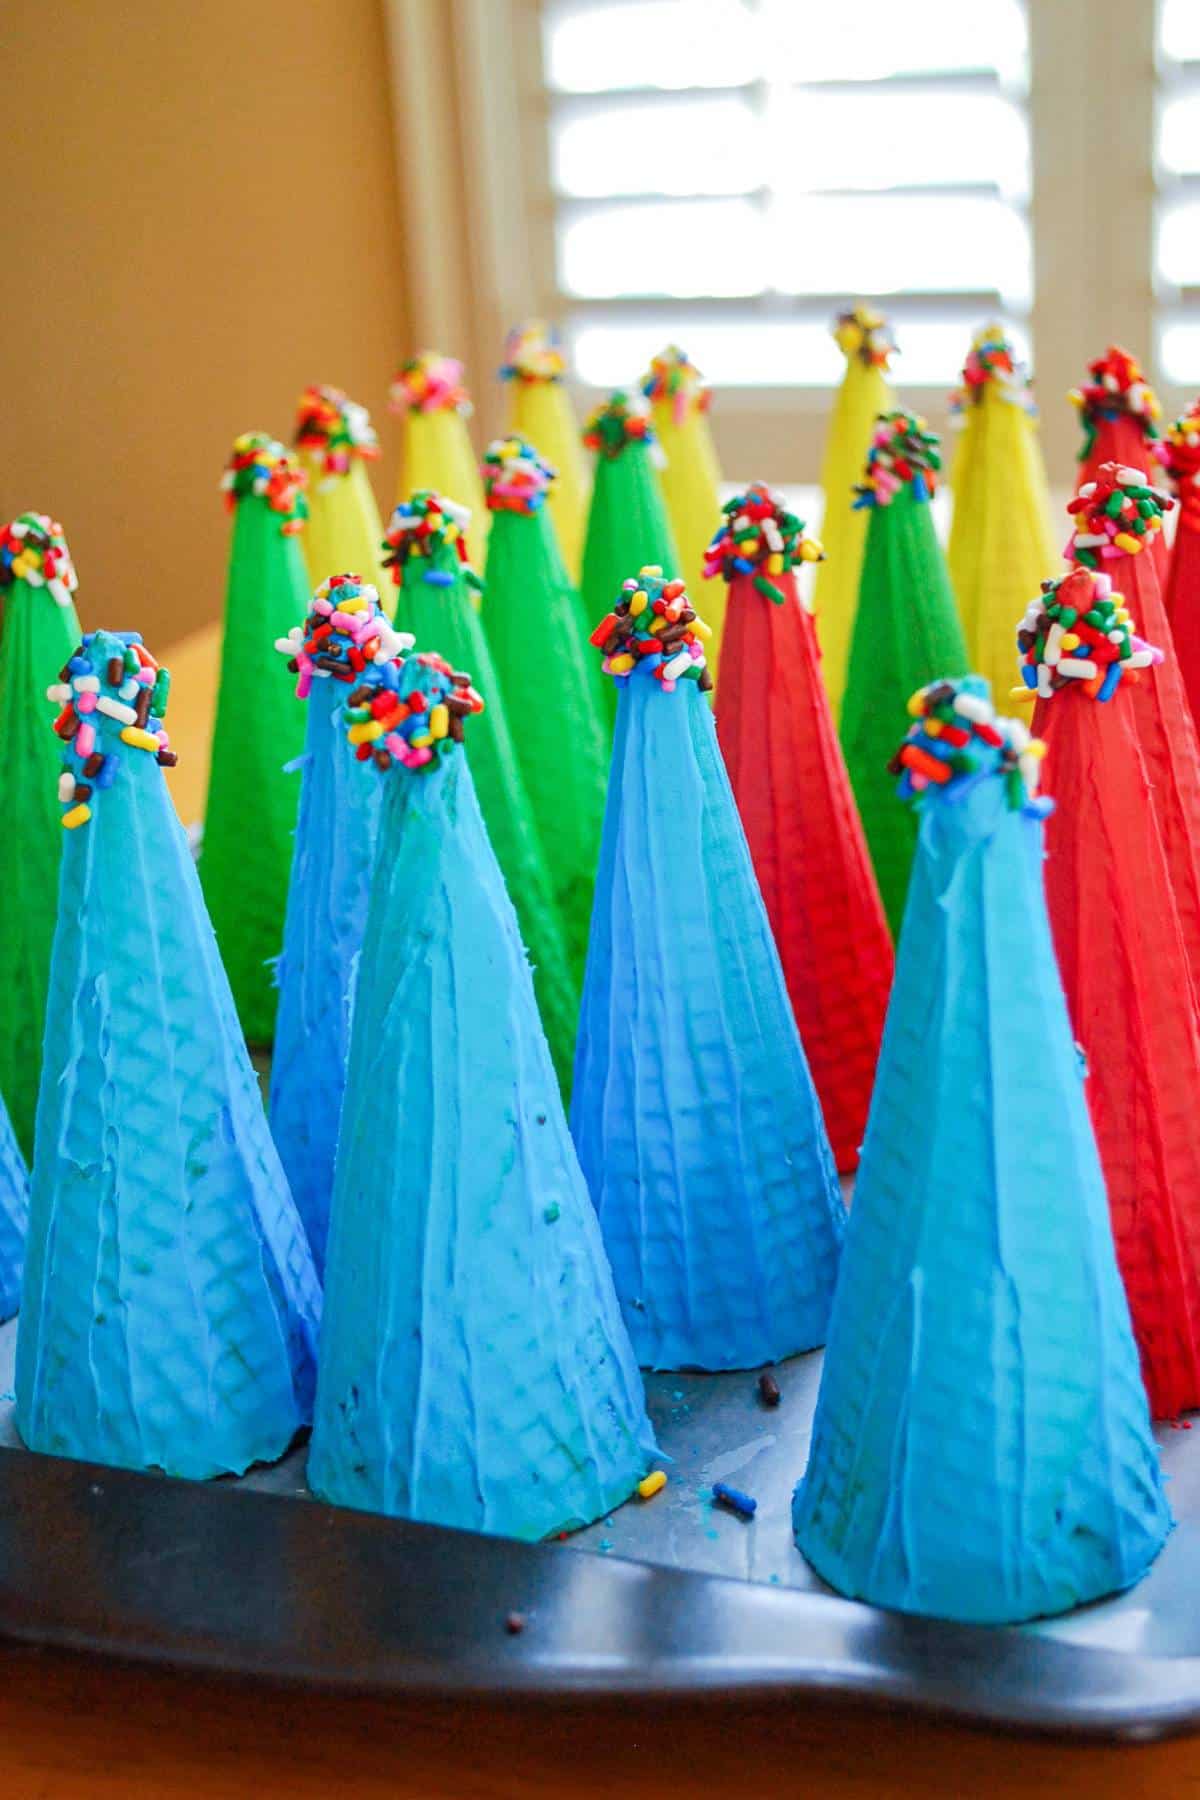
Prepare 4 bowls of frosting using one and a half cans of frosting or about 1/2 cup buttercream in each bowl. Add enough food color gel, in each bowl, to achieve a rich color and stir. Pour sprinkles into a small bowl and set aside. Using a knife or pastry brush, coat each sugar cone with icing and smooth it out with a finger. Put a dollop of icing on the end and dip the end into the sprinkles. You will end up with 6 cones of each color. Set aside and allow to thoroughly dry.
After the cupcakes are completely cooled, frost and add eyes, a red M&M nose, and (using some of the red icing from frosting the cones) draw a small mouth. Place the leftover icing in a quart-size ziploc bag and snip off the end. Pipe icing around the bottom rim of the sugar cone. Place the “hat” on the cupcake and lightly press into the frosting. Decorate with remaining frosting using your favorite tip (I used the small star tip on the hats).
Recipe tip
Assemble the cupcakes on the same day that you plan on serving them. If the frosted cones get soft, they tend to crack. You can decorate the faces and the cones the day before serving and place the “hats” on as the last step.
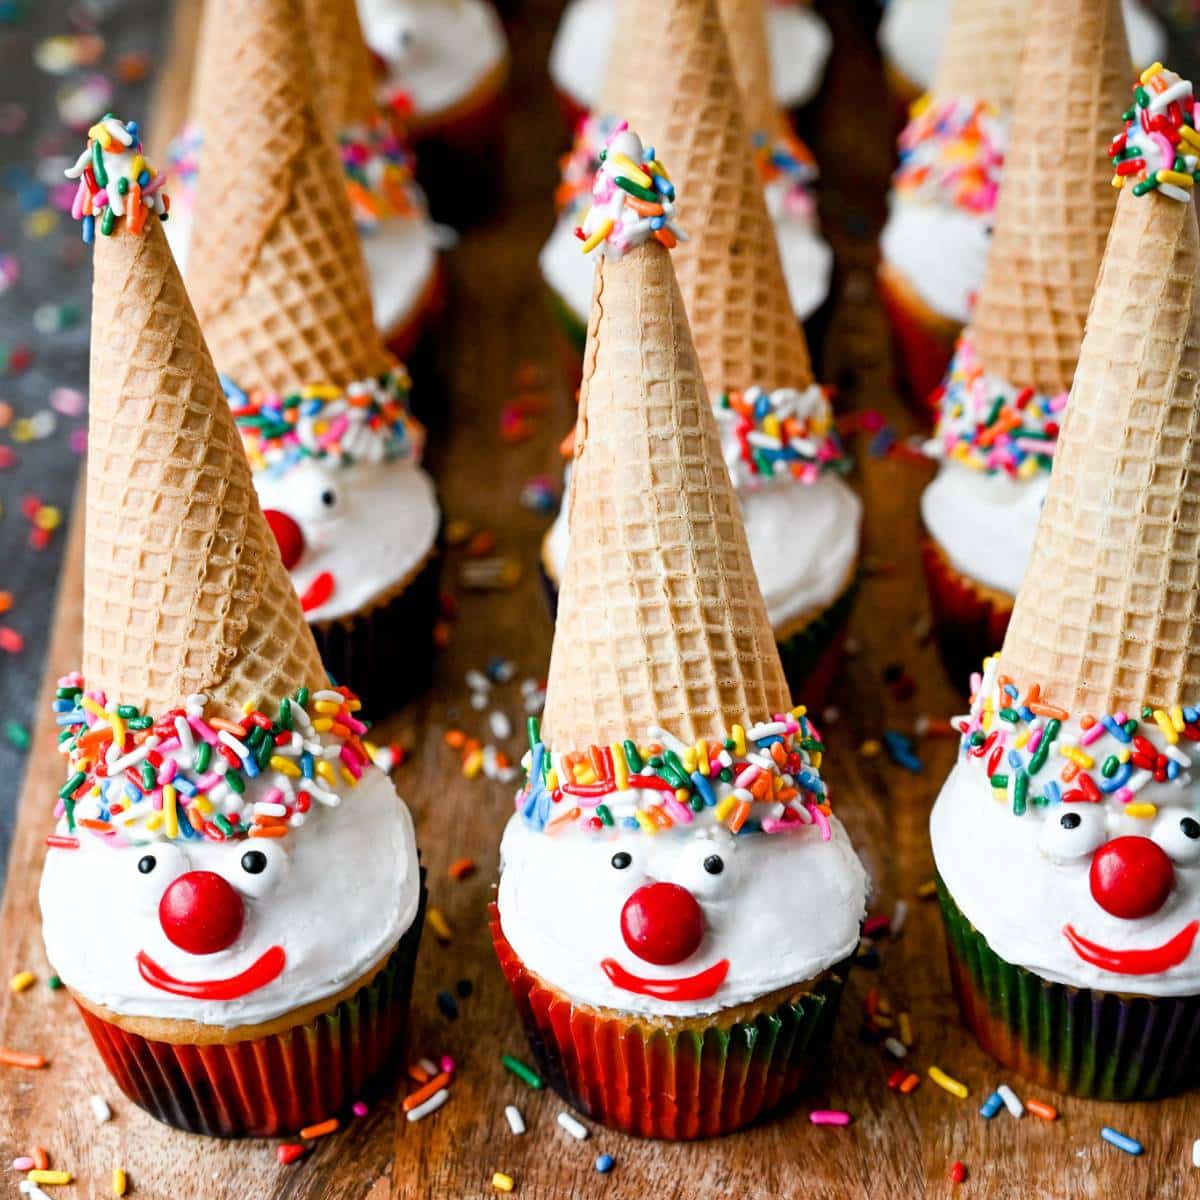
How To Make Clown Cupcakes (New Easier Method)
The new clown cupcake method works well for making the dipped cones a day in advance, so you only need to assemble the cupcakes on the day you plan to serve them. The candy melts hold up better than frosting the cones and the sprinkles add a festive touch. I couldn’t find the small candy eyes (used in the original recipe), so these guys are a little bug-eyed.😂
Ingredients
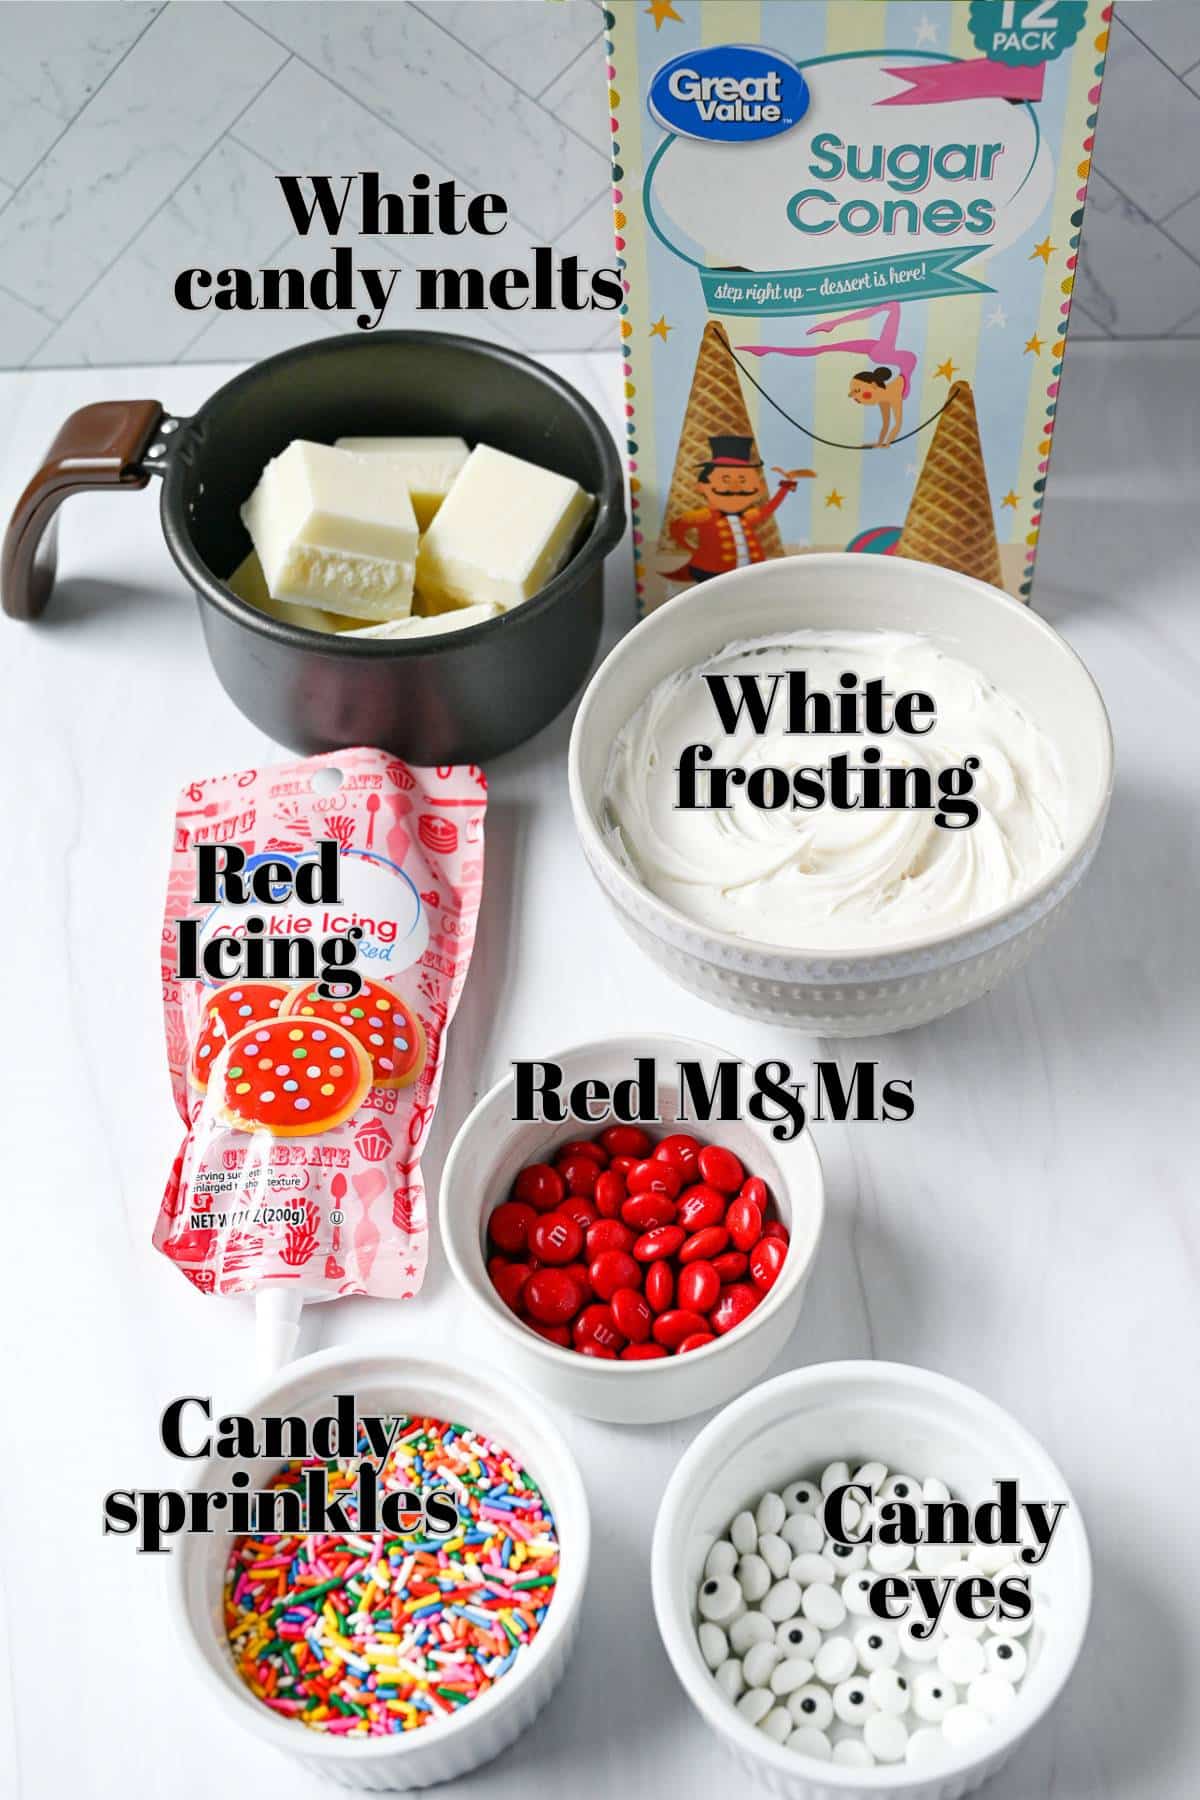
- Baked cupcakes- unfrosted
- Vanilla frosting- store-bought or homemade
- Vanilla candy melts
- Candy eyeballs- small or large
- M&Ms- you’ll only need the red ones for the nose
- Red decorating icing- for drawing the mouth
- Sugar ice cream cones- you want the small 5 oz boxes
- Candy sprinkles
New method
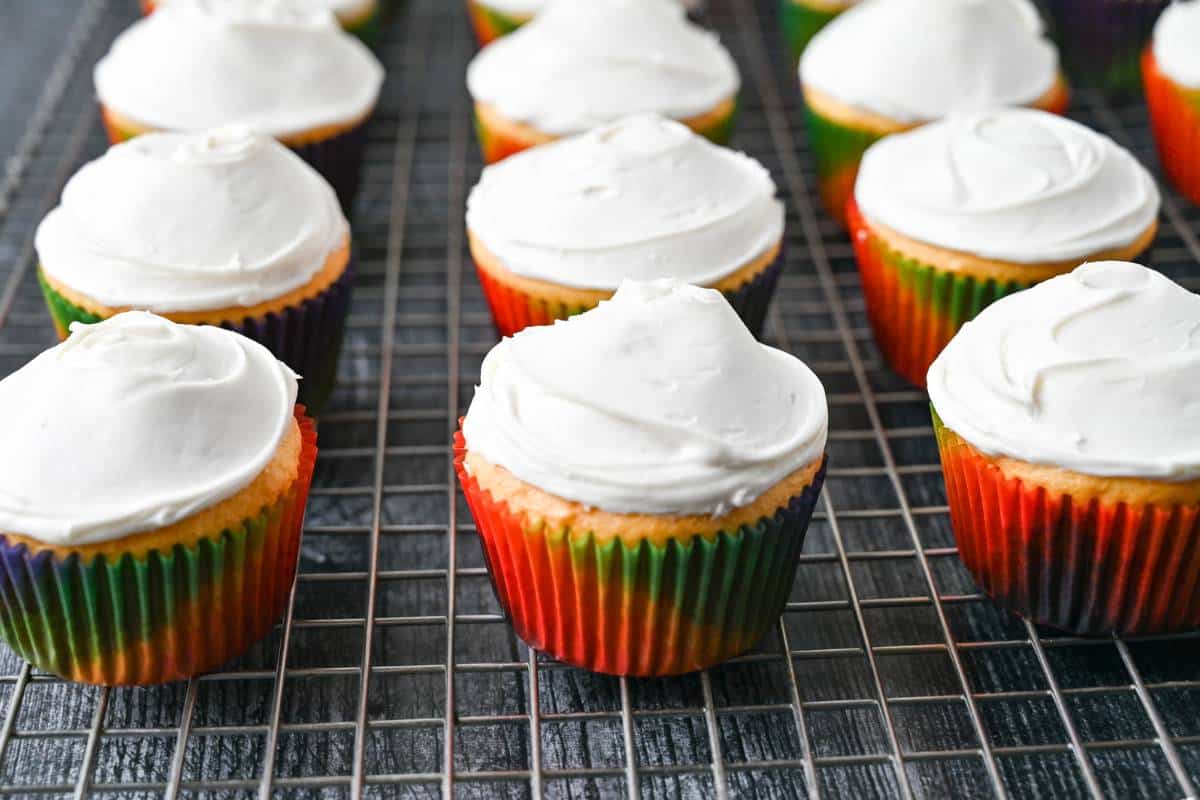
Step 1. Frost prepared cooled cupcakes with a thin layer of frosting.
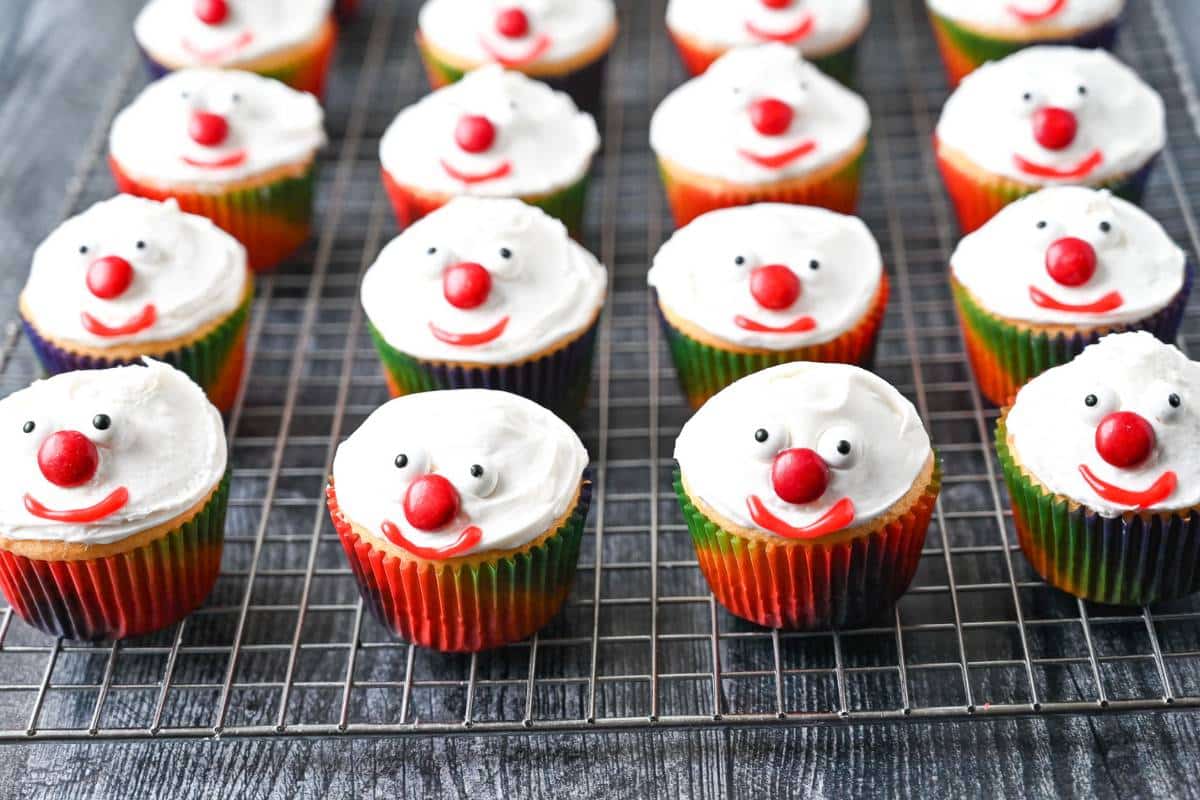
Step 2. Add an M&M nose, candy eyes, and draw a mouth with the red icing. Make sure to leave room on the back of the cupcake for placing the cone.
Step 3. Melt candy melts. I use a Wilton candy pot I love it for melting chocolate and keeping it the perfect temperature for dipping.
Step 4. Dip the tip, swirling off any excess and quickly cover with candy sprinkles. Repeat this process with the bottom of the cone. Place the sprinkle-covered dipped cones on wax paper to set.
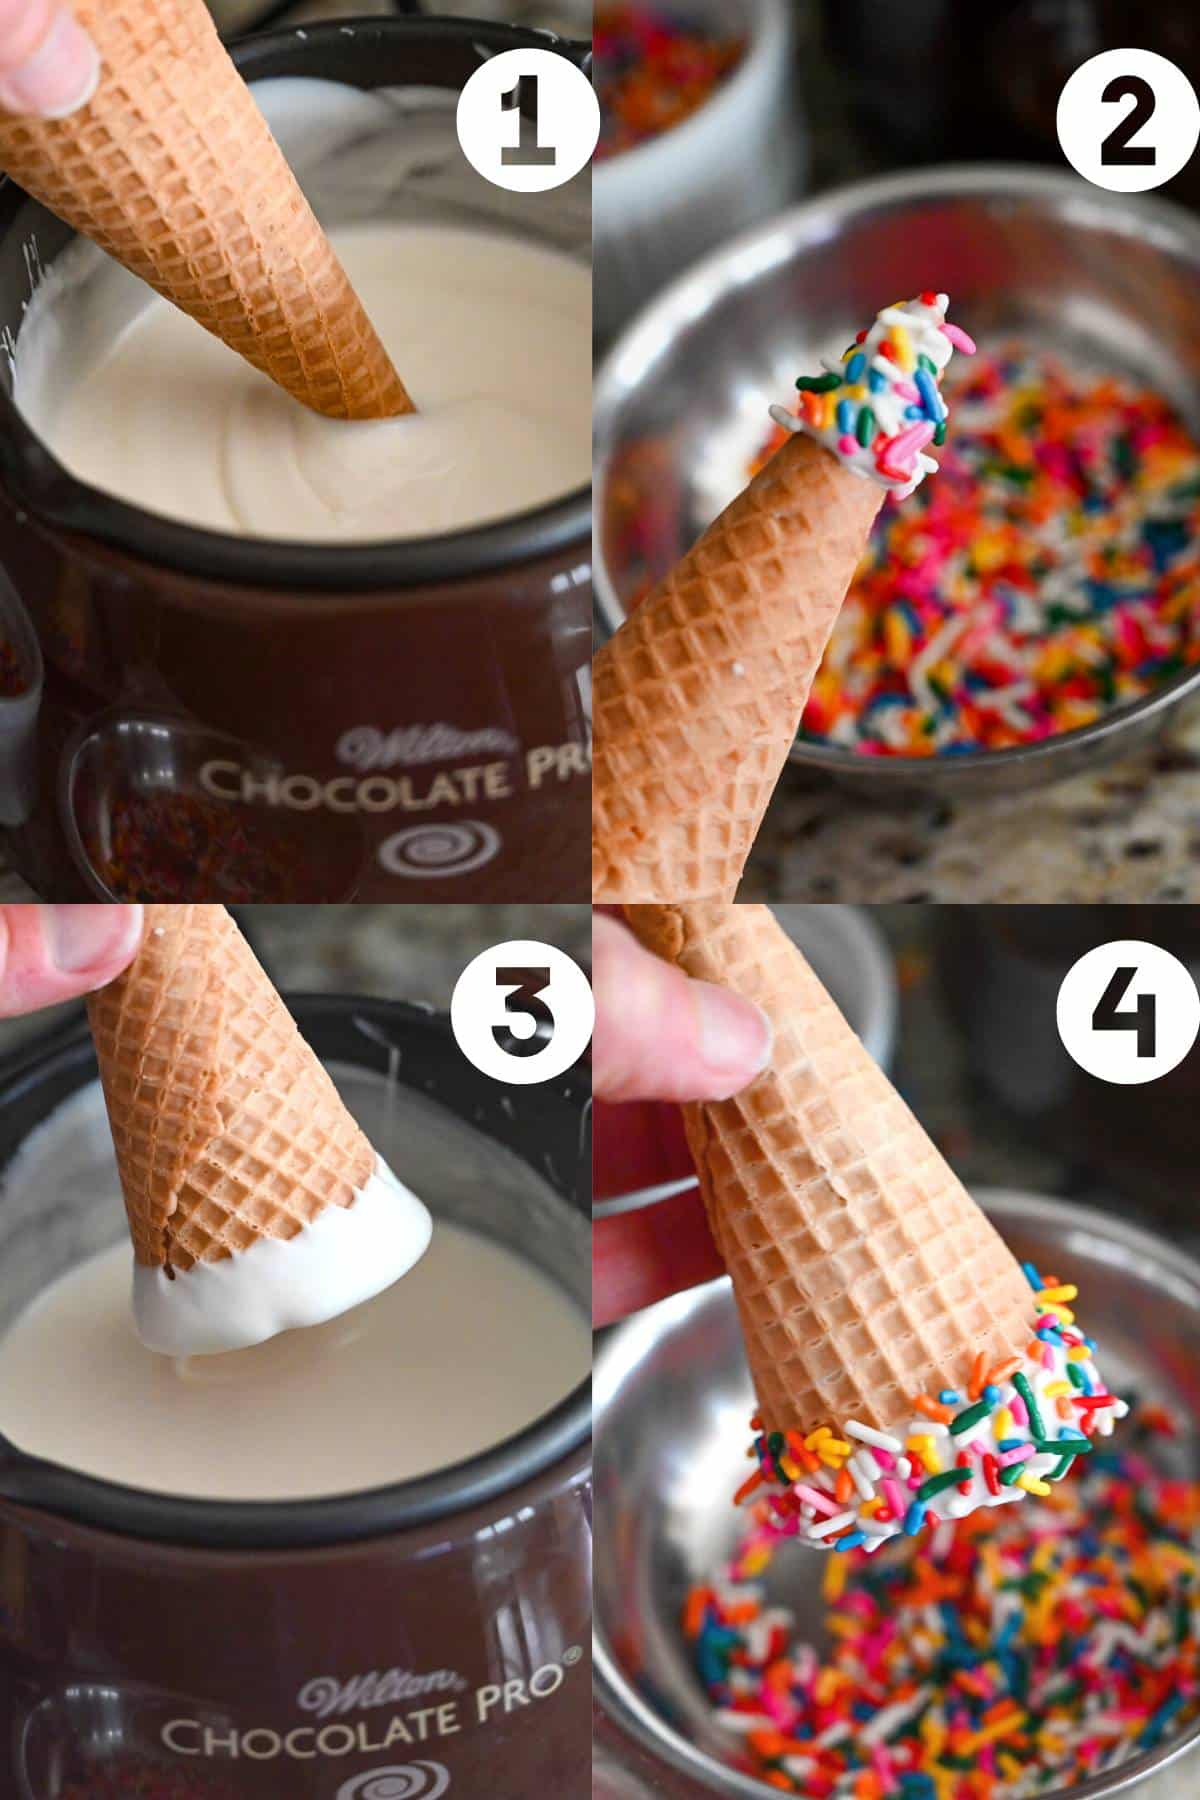
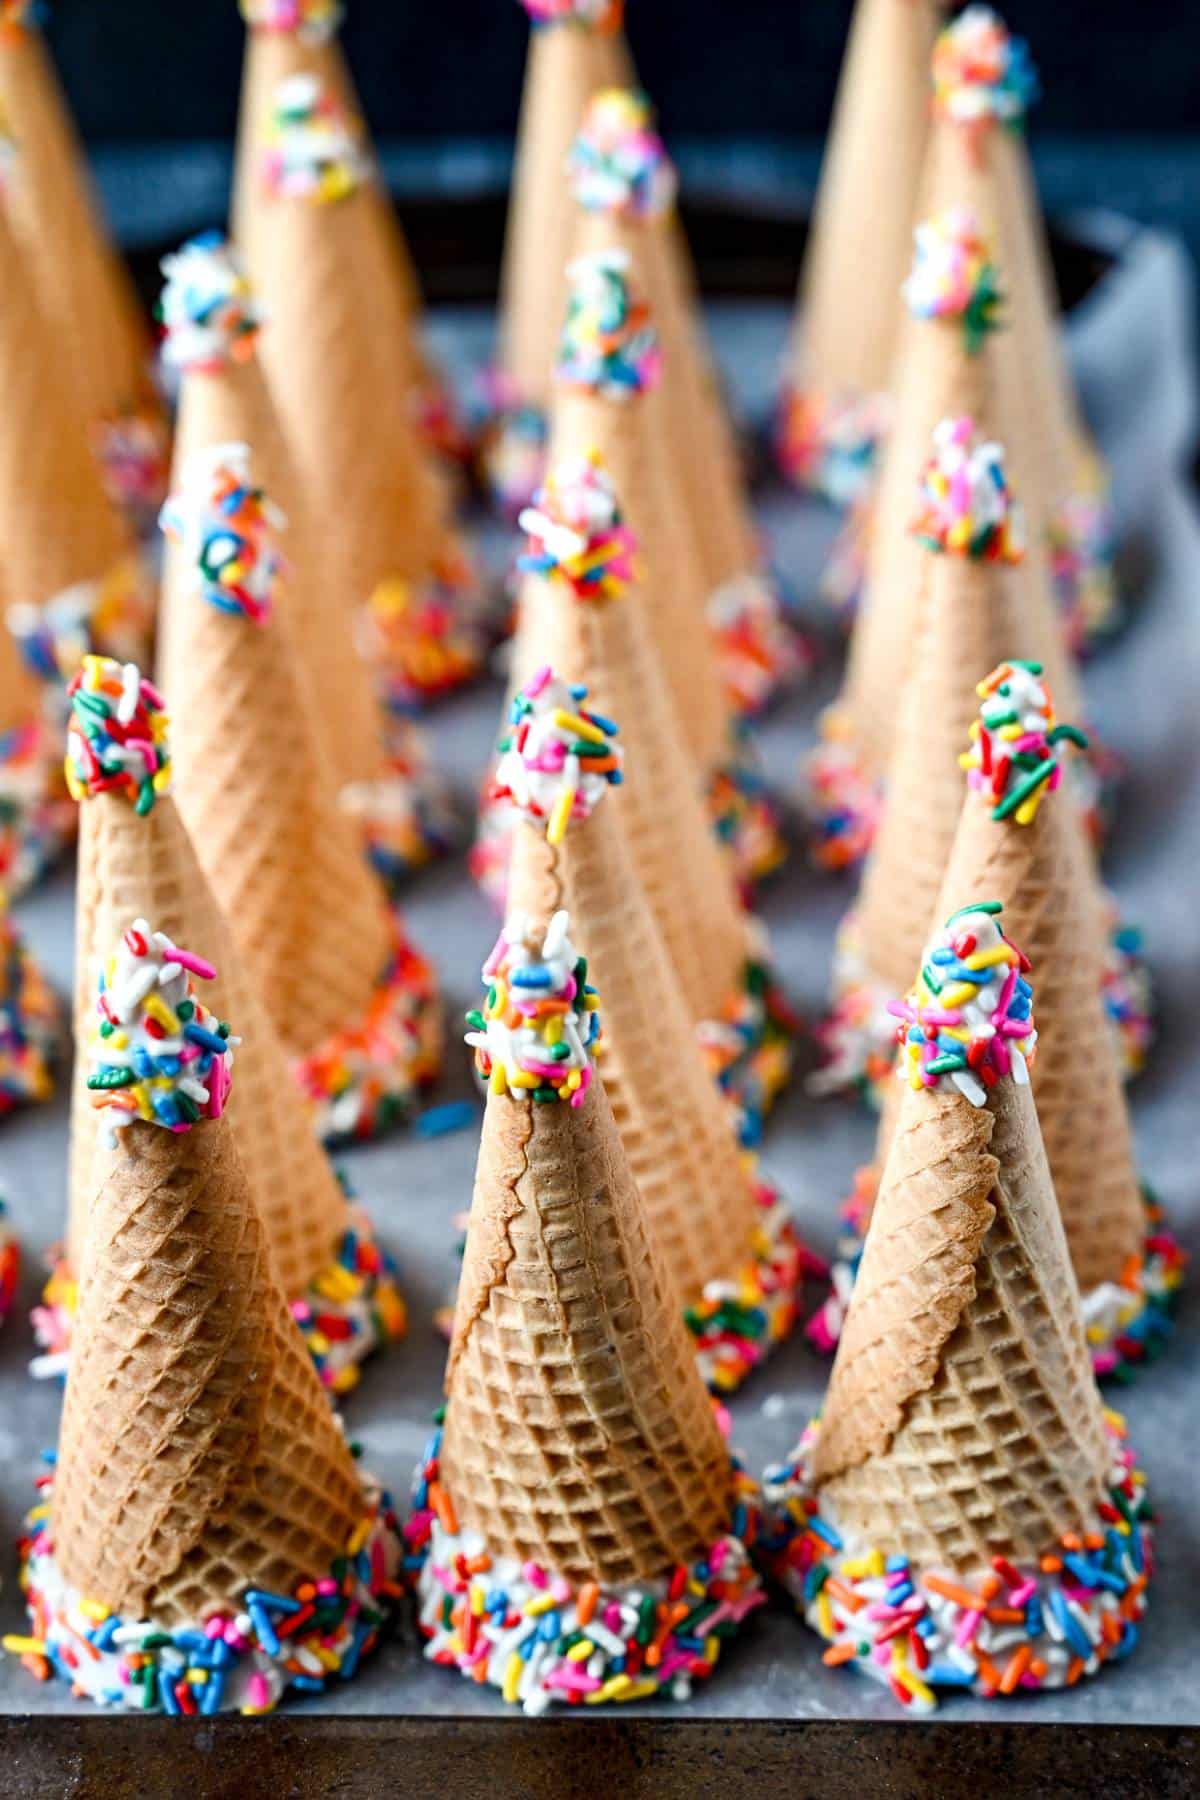
Step 5. When cones have cooled and set, you’re ready to assemble your cupcakes. Lightly dip the bottom of the cone in the melted chocolate, swirling off any excess, and immediately press it down onto the cupcake. Repeat with the remaining cones.
Storing
Two large (tall) round cake storage containers work great to store and transport decorated clown cupcakes to a party. These cupcakes are best consumed within 1-2 days of preparation for the best flavor and texture.
More favorite cupcake recipes
Chocolate Fudge Cupcakes with Chocolate Chip Frosting
Owl Chocolate Oreo-Stuffed Cupcakes
Lavender Earl Gray Tea Cupcakes
Orange Cupcakes with Cream Cheese Orange Frosting
If you love this fun clown cupcake recipe I would be so grateful if you could leave a 5-star 🌟rating in the recipe card below. I love reading your comments and feedback!
Stay posted on my latest cooking adventures through social media @ Instagram, Pinterest, and Facebook. Don’t forget to tag me when you try one of my recipes!

Carnival Clown Cupcakes
Ingredients
- 24 cupcakes baked and cooled
- 14 oz vanilla frosting store-bought or homemade
- 24 oz vanilla candy melts
- 48 small candy eyes
- 24 red M&M candies
- 24 sugar cones you'll need 2 (5 oz) boxes
- 5 oz candy sprinkles
- 7 oz red icing
Instructions
- Frost the cooled cupcakes with a thin, smooth layer of frosting.
- Add the M&M nose, the eyes, and draw a mouth with the red icing, making sure to leave room on the back of the cupcake for the "hat".
- Melt the candy melts in a double boiler, a candy melt pot, or in the microwave following the package directions. Stir well to ensure that the chocolate is completely melted and smooth.
- Dip the tip in the melted chocolate, swirling off any excess and immediately cover in sprinkles. Repeat with the bottom of the cone, working quickly before the chocolate cools. Place the cones on wax paper to set and cool.
- When the cones are completely cooled and set, lightly dip the bottom of each cone in the chocolate and place them on top of the cupcakes.
- Once the cupcakes are assembled, they are best consumed within 24 hours.
Notes
Nutrition

- Easy No Bake Strawberry Cheesecake Parfaits (High Protein) - April 20, 2026
- One-Pan Lemon Shrimp and Orzo Skillet - April 6, 2026
- Easy Bean Corn Salsa Dip - April 1, 2026
thank your for this recipe. i did them for my son’s 7th birthday and he was very happy with them
You’re welcome Marianne! I’m so glad that he loved them! 😃
Love this idea but all the cones I find are so much bigger! They topple over on the cupcake. Where did you find these small cones??
Hi Christina! These are actually the regular size sugar cones (not the large ones) and I believe that I found them at Kroger. I would just go for the smallest ones you can find.
So glad you love them!! My best tip with making these cupcakes is to assemble them as close as possible to the serving time. I have assembled them in advance and covered them and the cones can get soft and crack. If you assemble the day of serving. They stay perfect!
Amee, thanks so much for this idea. I looked for other recipes, but they said to cut 2 inches off the top of the cone — a dangerous proposition, I think, because I can just see every one of them crumbling. I’m glad you found a creative way to use the whole cone. We will be having these for my daughter’s 5th Circus Birthday Party!
These turned out super cute!!!! Thanks for sharing it with Six Sister’s Stuff Link Party. We hope to see you back next Saturday!
-The Sisters
These are really cute. I’ll have to file this idea away for future birthday parties.
Awwww, thank you all so much!! Kristi, what an honor to be your feature this week!!!
Me again! I just can’t quit thinking of all of the adorableness of these. I featured you on this week’s Mop It Up Mondays: http://www.ishouldbemoppingthefloor.com/2012/02/mop-it-up-mondays-3.html.
Feel free to stop by and link up some more fabulousness if you get a chance!
{HUGS},
kristi
Amee- These are so cute I can hardly stand it!! Love everything about them…especially the multicolored cones. And super cute sprinkles on the tops! They’re fantastic! Thank you bunches for linking up with Mop It Up Mondays at ishouldbemoppingthefloor. So happy you could stop by!
{HUGS},
kristi
These are so cute! They would be perfect for a birthday party!! We’re so glad you linked up to “Strut Your Stuff Saturday” We loved having you! Please come back next Saturday and share more of your great recipes and ideas! -The Sisters
Adorable and perfect for a child’s birthday party!
These are absolutely adorable.
I am hosting an ice cream social this weekend. I hope you will join us.
These are so cute!! I used to love making fun treats for my kids classes but up here in MN everything has to be store bought for safety reasons…. I know the kids loved the cupcakes!!
Oh.My.Goodnes! These are just adorable! You did a fine job “Fun Mom”….I’m sure your kids are the proudest ones at school. I love kid-friendly ideas like this. SO glad you shared!