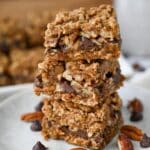
Gluten-Free Oatmeal Carmelita Bars
A delicious and flavorful gluten-free cookie bar made with gluten-free flour oats, butter, and caramel sauce.
Servings 16
Calories 246kcal
Ingredients
For the crust:
- 1 cup gluten-free all-purpose flour I use and recommend King Arthur brand
- 1 cup gluten-free quick oats
- ¾ c coconut sugar -or brown sugar
- ¾ cup salted butter softened
- ¼ tsp sea salt
- ½ tsp baking soda
- ½ tsp vanilla
For the filling:
- ¾ cup semi-sweet chocolate chips -or dark chocolate chips (go with your favorite gluten-free brand)
- ¾ cup chopped pecans or walnuts
- ½ cup caramel sauce *I used Smuckers Salted Caramel sauce (can also use homemade caramel sauce-recipe in post, or sugar-free *see notes)
- 1 tbsp gluten-free all purpose flour *for combining with the caramel sauce
Instructions
- Mix the cup of flour, quick oats, coconut sugar, softened butter, baking soda, salt, and vanilla in a stand mixer on low speed until it forms crumbs.
- Press half of this mixture into the bottom of an 8" square baking dish lined with parchment paper (you need to reserve half of this mix for the topping.) Bake at 350 degrees for 12 minutes.
- Sprinkle chopped nuts and chocolate chips over crust as soon as it comes out of the oven.
- Combine ½ cup of salted caramel sauce and 1 tbsp gluten-free flour with a whisk. Drizzle over nuts and chocolate chips. Sprinkle remaining crumbs over the top and bake for 18-22 minutes more, until lightly golden.
- Let the bars cool completely in the baking dish, then chill in the refrigerator for 1-2 hours. Once chilled, lift the bars out using the parchment paper, slice, and enjoy!
Notes
-
- Sugar-free caramel sauce option. I have tested these bars using Torani's sugar-free caramel sauce and it works if you need a lower sugar option. It has a good consistency for the caramel filling. Just be sure to follow the recipe step of mixing in the GF flour to thicken it a bit more.
- Quality counts! Good-quality chocolate melts better and offers a richer flavor, while fresh, high-quality nuts add a delightful crunch, so go for the good ones!
- Always line your baking dish. Line it with parchment paper, leaving an overhang on the sides so it’s easier to lift the bars out of the pan once they’re cooked and cooled.
- Chill before slicing. Allow the Carmelitas to cool completely in the baking dish, then let them chill in the fridge for 1-2 hours before slicing. This helps them set properly, making clean slices much more manageable instead of turning into an ooey-gooey mess!
Nutrition
Calories: 246kcal | Carbohydrates: 25g | Protein: 3g | Fat: 16g | Saturated Fat: 8g | Polyunsaturated Fat: 2g | Monounsaturated Fat: 5g | Trans Fat: 0.4g | Cholesterol: 23mg | Sodium: 179mg | Potassium: 94mg | Fiber: 2g | Sugar: 13g | Vitamin A: 279IU | Vitamin C: 0.1mg | Calcium: 23mg | Iron: 1mg